


Knowing how to setup a Windows XP virtual machine lets you run classic software, use old hardware tools, or revisit older games on a modern PC. Instead of installing Windows XP directly on your computer, you use virtualization so everything stays contained in a safe, isolated environment.
This guide shows how to setup a Windows XP virtual machine in VirtualBox using two methods: a clean installation from a Windows XP ISO and a quicker setup using an existing Windows XP VHD image such as VirtualXP.VHD from Windows XP Mode. Both methods work on current Windows 10 and Windows 11 systems at the time of writing, as long as your hardware supports virtualization.
You need VirtualBox plus either a Windows XP ISO image or a Windows XP VHD to proceed. Both approaches allow you to run a Windows XP virtual machine; they just differ in how you install XP.
- Download the latest VirtualBox installer for your host OS and install it.
- Get a legitimate Windows XP ISO file and a valid product key if you plan to perform a fresh install.
- Optionally download a Windows XP VHD such as VirtualXP.VHD from a legal XP Mode source if you prefer the VHD method.
- Plan to keep this Windows XP virtual machine offline or behind strong network rules because XP no longer receives security updates.
Method 1: Install Windows XP In VirtualBox From An ISO
Method 1 uses a standard Windows XP ISO file to create a new Windows XP virtual machine from scratch. This method works well when you have a licensed XP disc or ISO and want a clean, predictable setup.
Create A New Windows XP Virtual Machine
You start by creating a fresh VM in VirtualBox tailored for a Windows XP virtual machine. This ensures that the default settings match what XP expects.
- Open VirtualBox and click the New button on the toolbar.
- Enter a name such as Windows XP so VirtualBox automatically sets the Type to Microsoft Windows and Version to Windows XP (32-bit).
- If Version does not show Windows XP, change it manually to Windows XP (32-bit) for better compatibility with legacy XP software.
- Set the memory size to at least 512 MB; if you have plenty of RAM, use 1024 MB–2048 MB for smoother performance.
- Choose Create A Virtual Hard Disk Now and continue to the hard disk options.
Configure The Virtual Hard Disk
The virtual hard disk stores your Windows XP installation, programs, and files. You can use a dynamically allocated disk to save host storage while still giving XP room to grow.
- Select VDI (VirtualBox Disk Image) as the hard disk file type.
- Choose Dynamically Allocated to let the file grow as you add data.
- Set the virtual disk size to at least 20 GB; allocate more space if you plan to install large Windows XP programs.
- Pick a folder where VirtualBox should store the disk, then click Create to finish the base VM setup.
Attach The Windows XP ISO And Tweak Settings
Next you attach the Windows XP ISO so the virtual machine boots from it like a DVD. This step also gives you a chance to tune system, display, and network options.
- Select your new Windows XP VM in VirtualBox and click Settings.
- On the System tab, confirm the Base Memory matches your earlier choice and move Hard Disk above Optical only after installation finishes.
- On the Processor tab, assign at least one CPU core; two cores usually feel smoother if your host PC can spare them.
- Open the Display tab and increase Video Memory to at least 32 MB for better graphics and window resizing.
- Go to the Storage tab, click the empty optical drive, then click the disc icon and choose Choose A Disk File.
- Select your Windows XP ISO so VirtualBox mounts it as a virtual DVD.
- On the Network tab, keep NAT enabled for basic internet access or switch to Host-Only if you prefer to isolate the Windows XP virtual machine.
- Click OK to save these settings.
Install Windows XP From The ISO
Once the VM boots from the ISO, you follow the normal Windows XP setup steps to install the operating system onto the virtual disk.
- Highlight your Windows XP VM in VirtualBox and click Start.
- Wait while the virtual machine boots from the mounted Windows XP ISO and loads the setup program.
- Follow the on-screen prompts to create or select a partition on the virtual disk.
- Select formatting options such as NTFS and allow setup to copy files to the virtual hard disk.
- Enter your Windows XP product key and regional settings when prompted.
- Let the VM restart and complete the graphical portion of setup until you reach the XP desktop.
Install VirtualBox Guest Additions
VirtualBox Guest Additions improve the Windows XP virtual machine with better graphics, smoother mouse integration, and shared folders. You should install them right after XP finishes its first boot.
- With the Windows XP VM running, click Devices in the VirtualBox menu bar.
- Select Insert Guest Additions CD Image to mount the tools inside the XP VM.
- Open My Computer in Windows XP and double-click the VirtualBox Guest Additions CD icon.
- Run the VBoxWindowsAdditions installer and follow the prompts to add drivers and integration features.
- Restart the virtual machine when setup finishes so the new drivers take effect.
Enable Shared Folders And Final Tweaks
Shared folders let you move files between your host system and the Windows XP virtual machine without complex network setup. You can also refine display and audio settings to get a smoother XP experience.
- In the VirtualBox menu bar, click Devices and select Shared Folders.
- Click the + icon and choose a folder on your host PC to share.
- Give it a simple name, check Auto-Mount, and select Make Permanent if offered.
- Restart the XP VM and look under My Network Places or a mapped drive letter for your shared folder.
- Adjust screen resolution inside XP after Guest Additions so the desktop scales cleanly in the VirtualBox window.
Method 2: Use A Windows XP VHD Image In VirtualBox (VirtualXP.VHD)
Method 2 uses an existing Windows XP VHD image, such as VirtualXP.VHD from Windows XP Mode, instead of installing from an ISO. This approach gives you a preconfigured Windows XP virtual machine faster, though you must still respect licensing rules for any XP Mode files you use.
Prepare The Windows XP VHD
Before VirtualBox can use a Windows XP VHD, you need to extract or locate the VirtualXP.VHD file. Many users who previously used Windows XP Mode on Windows 7 already have this file.
- Locate the VirtualXP.VHD file on your PC or extract it from a legal Windows XP Mode download if you still have access.
- Copy VirtualXP.VHD to a folder where you store virtual machines so you can find it easily later.
- Confirm that the VHD opens only on systems where you hold the appropriate Windows XP license or XP Mode rights.
Create A New Windows XP VM That Uses An Existing VHD
Instead of creating a blank virtual disk, you tell VirtualBox to attach the Windows XP VHD file as the VM’s primary hard drive. The rest of the VirtualBox setup looks similar to Method 1.
- Open VirtualBox and click the New button to start creating a new VM.

- Click Expert Mode at the bottom if VirtualBox opens the guided wizard.
- Enter a name such as Windows XP VHD so VirtualBox sets the Type to Microsoft Windows and Version to Windows XP (32-bit).
- Set the memory size to at least 512 MB; increase it if you plan to run heavier legacy apps.

- In the Hard Disk section, choose Use An Existing Virtual Hard Disk File.
- Click the folder icon next to the drop-down, then click Add in the Hard Disk Selector window.
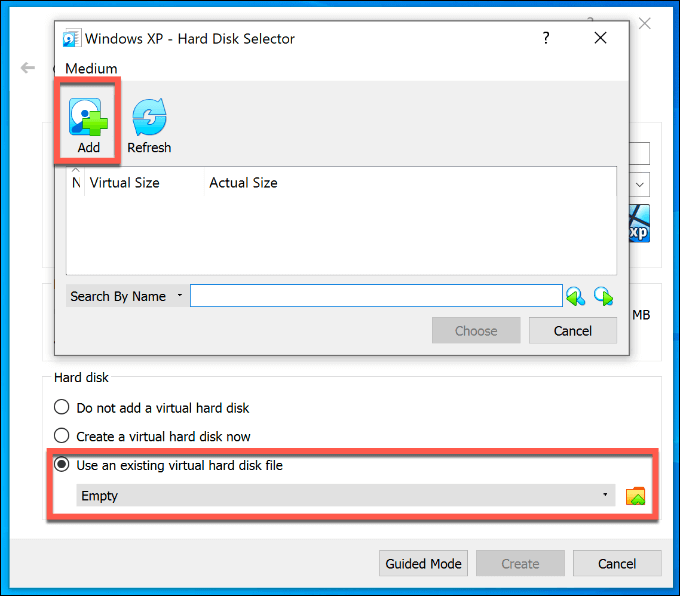
- Browse to the folder that holds VirtualXP.VHD, select it, and click Open.
- Highlight VirtualXP.VHD in the Hard Disk Selector, click Choose, then click Create to finish.
Adjust Virtual Machine Settings For The VHD
Because this Windows XP virtual machine already has an operating system inside the VHD, you mainly refine performance settings and check that VirtualBox presents hardware that XP can handle.
- Select your new Windows XP VHD VM and click Settings.
- On the System tab, confirm the Base Memory value and set the boot order so the hard disk appears first.
- On the Processor tab, assign one or two CPU cores depending on your host system capacity.
- On the Display tab, increase video memory and enable 2D or 3D acceleration only if XP runs stably with those options.
- On the Network tab, choose NAT or Host-Only depending on whether you want this legacy XP environment online.
- Click OK to apply the changes.
Boot The Windows XP VHD In VirtualBox
After you connect the VirtualXP.VHD file, you can boot directly into Windows XP without performing a full installation. The first boot may take longer while XP detects virtual hardware.
- Select the Windows XP VHD VM in VirtualBox and click Start.
- Wait while Windows XP boots from the VHD; you may see hardware detection dialogs and driver prompts.
- Install VirtualBox Guest Additions inside XP if they are not already present so you gain better integration features.
- Restart the VM after Guest Additions to stabilize display, mouse, and folder sharing.
When To Use The VHD Method Instead Of An ISO
Both methods create a working Windows XP virtual machine, but each fits a different scenario. Using the correct method saves time and avoids unnecessary reinstall work.
- Use the ISO method when you want a clean, licensed install of Windows XP that you can configure from scratch.
- Use the VHD method when you already have a legal VirtualXP.VHD from XP Mode and want a faster way to spin up a Windows XP virtual machine.
- Keep security in mind either way, because every Windows XP VM remains unsupported and vulnerable if you expose it to the internet.
Troubleshooting Common Problems
Even when you follow the right steps, a Windows XP virtual machine can fail to boot, crash, or feel slow. These quick checks solve many common VirtualBox and XP issues.
VirtualBox Says It Cannot Open The VHD Or VDI
- Confirm that the path to your VirtualXP.VHD or XP VDI file has not changed or moved.
- Check that the file is not marked read-only in Windows and that you have permission to open it.
- Remove the disk entry from VirtualBox storage settings, re-add it, and try starting the VM again.
Windows XP Freezes Or Runs Very Slowly
- Increase the VM’s RAM allocation while leaving enough memory for the host OS to stay responsive.
- Reduce the number of background apps running on the host when you start the Windows XP virtual machine.
- Disable visual effects inside XP and keep only essential startup programs enabled.
The XP VM Cannot Access The Network
- Make sure the Network Adapter is enabled in the VirtualBox settings for that VM.
- Try switching between NAT and Bridged Adapter to see which option connects more reliably.
- Check that any host firewall or security suite allows VirtualBox networking.
Shared Folders Do Not Show Up In Windows XP
- Confirm that Guest Additions installed successfully and that you restarted the VM afterward.
- Verify the shared folder has Auto-Mount selected in VirtualBox.
- Look in My Network Places or under mapped network drives for the folder name you chose.
Tips
Small adjustments make your Windows XP virtual machine easier to manage and safer to use on a modern PC. These tips help you avoid common mistakes with legacy operating systems.
- Keep important XP apps and data backed up to your host system using shared folders or exported archives.
- Take VirtualBox snapshots before installing new programs or drivers in your Windows XP VM.
- Avoid everyday browsing in Windows XP; use your main OS for the web and the VM for specific legacy tasks only.
- Label each VM clearly in VirtualBox if you create separate Windows XP virtual machines for testing and long-term use.
- Consider disabling USB passthrough for sensitive devices unless you absolutely need hardware access from XP.
FAQ
Can I Run A Windows XP Virtual Machine On Windows 10 Or 11?
Yes. VirtualBox allows you to run a Windows XP virtual machine on Windows 10 and Windows 11 as long as your hardware supports virtualization and you allocate enough RAM and disk space.
Do I Still Need A License To Run Windows XP In A VM?
You should treat a Windows XP virtual machine the same as a physical install and use a legitimate license or a legally obtained XP Mode VHD. Licensing rules still apply even when XP runs inside VirtualBox.
Which Method Is Better, ISO Or VHD?
Use the ISO method if you want a clean installation and full control over setup. Use the VHD method when you already have a VirtualXP.VHD and want a faster way to load a preconfigured Windows XP environment.
Is It Safe To Put A Windows XP Virtual Machine Online?
A Windows XP VM remains vulnerable because Microsoft no longer updates XP. If you must go online, keep sessions short, use NAT or additional firewall rules, and avoid sensitive logins or financial sites.
Can I Share Files Between My Host PC And The Windows XP VM?
Yes. After installing VirtualBox Guest Additions, you can configure shared folders so your Windows XP virtual machine can access files from specific host directories.
Summary
- You can setup a Windows XP virtual machine in VirtualBox using either a Windows XP ISO or a VirtualXP.VHD image.
- Method 1 performs a clean XP install from ISO, while Method 2 boots from an existing XP VHD for faster setup.
- VirtualBox Guest Additions improve graphics, mouse control, and shared folders for every Windows XP VM.
- Snapshots and shared folders help you protect data and recover quickly from bad installs or configuration changes.
- Because Windows XP is no longer supported, you should keep your Windows XP virtual machine as isolated as possible.
Conclusion
Once you know how to setup a Windows XP virtual machine in VirtualBox, you can bring legacy software back to life on modern hardware without reinstalling XP on a physical PC. Whether you follow the ISO method for a clean build or the VHD method for a faster XP Mode-style setup, virtualization keeps old apps contained and easier to manage.
Use this Windows XP virtual machine for specific tasks, keep good backups, and limit its network exposure. With the right balance of performance and safety, you get the benefits of Windows XP when you need them and the protection of a current operating system for everything else.


Discussion (0)
Be the first to comment.