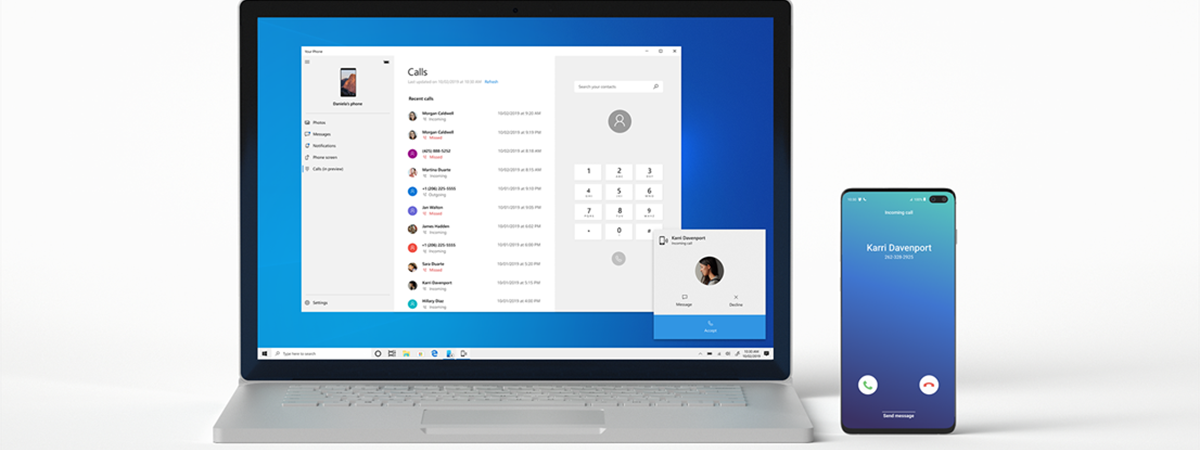
Microsoft is actively working on an ecosystem of apps that allows Windows 11 and Windows 10 users to interact with their smartphones from their PCs. The Windows Phone Link app lets you check your Android notifications, see the pictures on your Android smartphone, and even interact with your Android apps directly from your Windows PC. And, of course, you can also use it to make phone calls and send text messages straight from Windows 11 or Windows 10. Here’s how it all works:
NOTE: The features presented are available in Windows 11 and Windows 10 22H2 or newer. If you are using an older version of Windows, you may not have access to all the features. This guide applies to Android 13, and it was created using a Google Pixel 4a and a Samsung Galaxy S20 FE.
How to install Phone Link and link your Android smartphone with your Windows PC
In order for the Phone Link app to work, you need to link your Android smartphone with your Windows 11 or Windows 10 PC. You can get full instructions on how to do that from this guide: Connect your Android phone to a Windows PC with Phone Link. You also need to log in using a Microsoft account.
Once you’ve got everything set up and configured correctly, launch Phone Link on your Windows 11 or Windows 10 computer or device. You should see something like this:
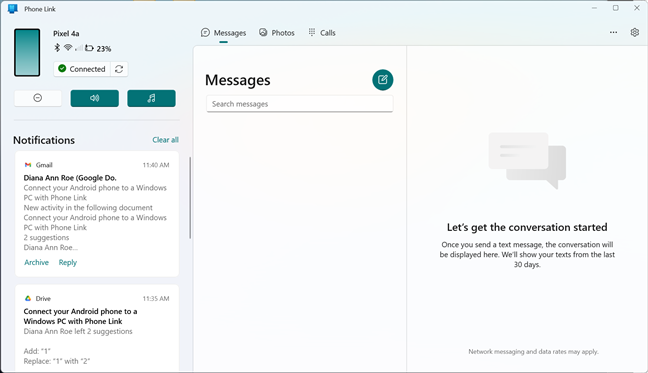
The Phone Link app on Windows
How to check your Android’s status and essential settings
One of the first things you see in Phone Link is the top-left section, named after your Android smartphone. Here, the app lets you know about your phone’s status, while also allowing you to control a few essential settings for it. With just a glance, you can instantly know whether Bluetooth is working fine on your phone, check the Wi-Fi and mobile signal strength, and see the battery level and charging status. Right under those icons, there are two buttons: one tells you if your phone is currently Connected to your Windows PC, while the one next to it can be used to force a sync between the two devices.
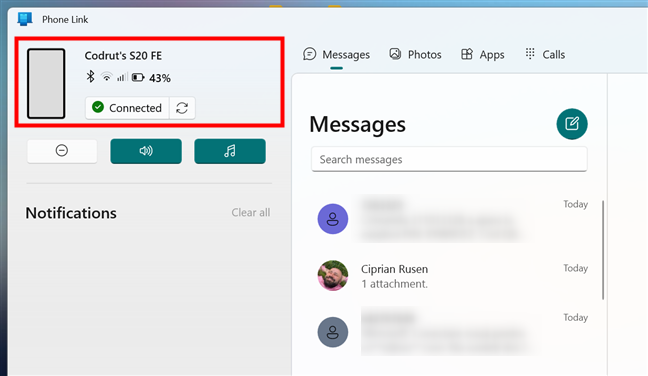
The Android smartphone status section in Windows Phone Link
If Phone Link fails to connect your smartphone to your Windows PC, the icons are grayed out, and the Connected button changes its name to Offline. Pressing it advises you to make sure that both devices are connected to the internet and restart the Phone Link app. In addition to that, you might also want to enable the Connection optimization switch in the Phone Link app, to have the app sync your mobile smartphone over the mobile data connection. Of course, make sure you’re OK with that first, as mobile data use may incur additional costs.
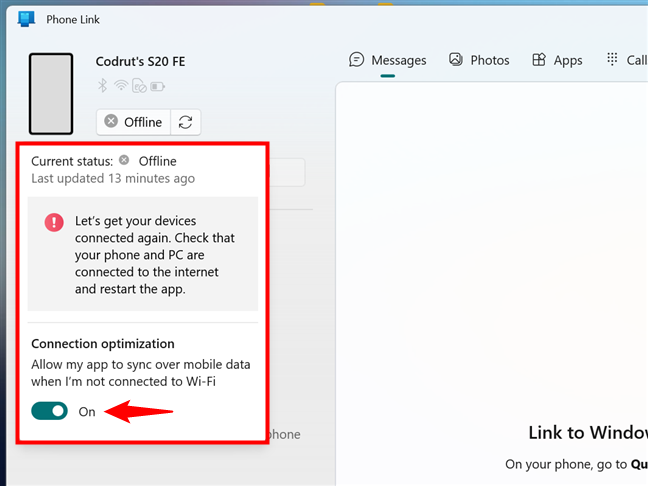
Phone Link failed to connect to the Android device
When you’re connected to your smartphone, you find three buttons under the status panel in Phone Link:
- Do not disturb allows you to set your Android’s phone Do not disturb mode on or off.
- Volume/Vibrate lets you enable or disable the sound on your smartphone or set your device to vibration mode only.
- Audio player allows you to control the music playing on your Android device directly from the Phone Link app.
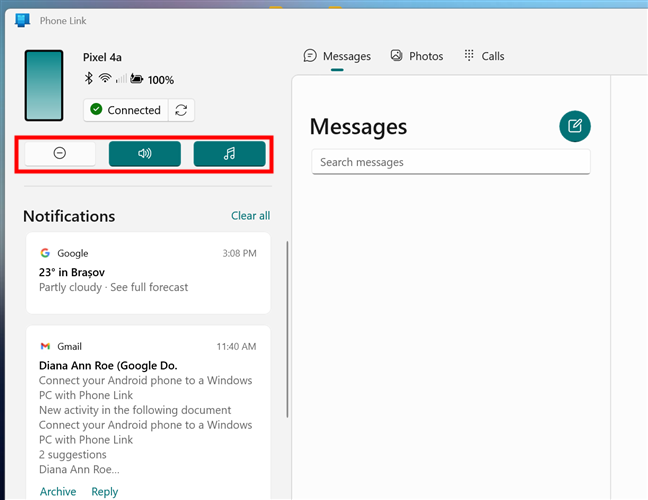
Essential settings for the Android phone in Windows Phone Link
Now let’s see the rest of the app’s interface and what you can actually do with it:
How to check your Android’s notifications on Windows using Phone Link
On the Phone Link app’s left side, there’s a section called Notifications. This is where you can see all the recent notifications you’ve received on your Android smartphone.
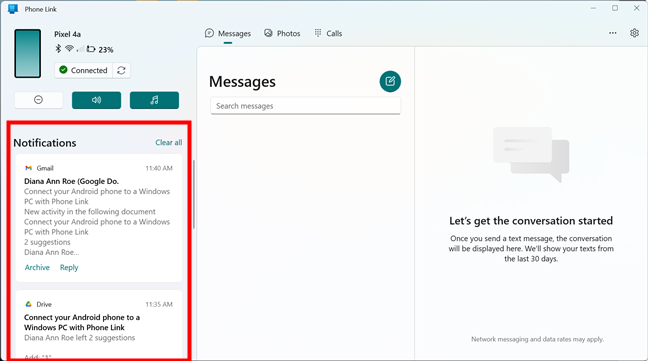
Checking the Notifications in the Windows Phone Link app
If you want to dismiss a notification, click or tap the small X button found in its top-right corner. This deletes that notification from both the Phone Link app and from your Android device.
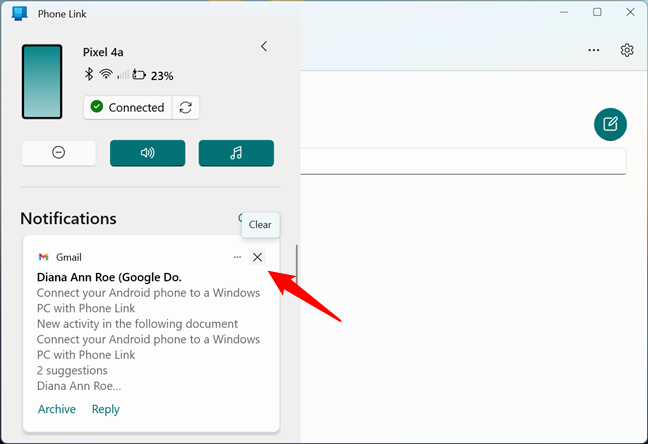
Clearing a notification from the Phone Link app
By default, Windows 11 and Windows 10 also show a banner for each notification you get on your Android device. If a notification ends with the “via Phone Link” text, it came from the Phone Link app. In addition, you can also check your Android notifications in Windows’ Notifications center, where they’re listed in the Phone Link section.
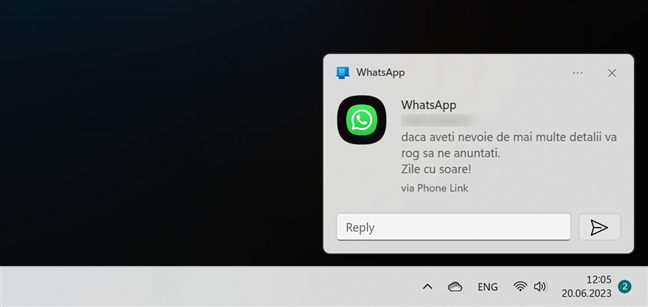
Getting a notification from the Windows Phone Link app
If you want to keep a notification for a while or if you don’t want to receive some Android notifications on your Windows 11 or Windows 10 PC, click or tap the More options button from the top-right corner of a notification in the Phone Link app. Then, you can choose to “Turn off notifications from [the app that sent it],” Pin that notification in the Phone Link app, or “Go to Settings.”
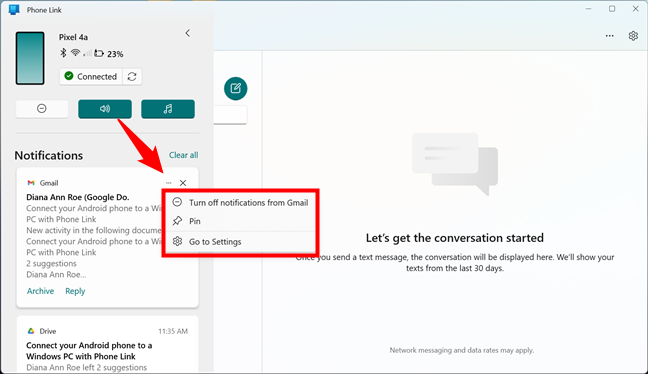
More options for the Notifications received from the Phone Link app
If you choose to Go to Settings, you get access to all the Notifications settings available in the Phone Link app. Note that you can also get here by accessing the app’s Settings (the cogwheel button in the top-right corner of the app) and then selecting Features in the left panel. Either way, these are the notifications settings that Phone Link lets you change:
- Show notifications for all my apps: this is the main switch for Phone Link’s notifications. Turning it Off completely disables the notifications feature/section.
- Show notification banners on my PC: whenever you receive a notification on your Android device, you also get that notification on your Windows 11 or Windows 10 PC.
- Show my notifications in the Phone Link app feed: this enables the Phone Link app to show notifications from your phone.
- Show badge on taskbar: if you’ve pinned Phone Link to your taskbar, you get to see a small badge on its shortcut, with the number of notifications received.
You can turn each of these settings on or off as you please, by enabling or disabling their switches.
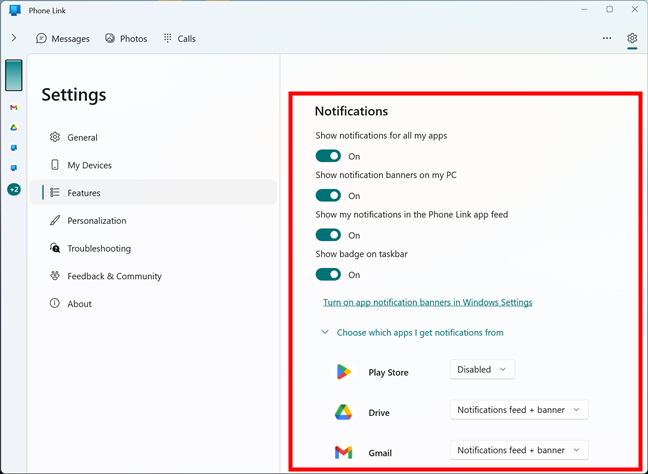
Settings for Phone Link Notifications
Next, you find a link called “Turn on app notification banners in Windows Settings.” Clicking or tapping on it takes you to the Settings app, where you can make sure that Phone Link is allowed to send you notifications.
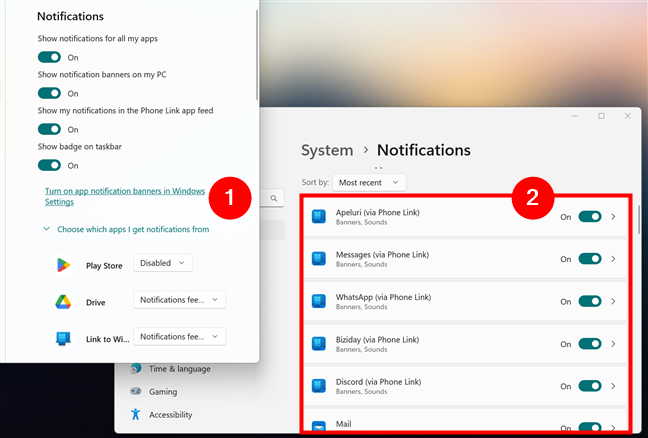
Notifications settings in Windows Phone Link
Then, the Phone Link app lets you “Choose which apps [you] get notifications from.” All your Android apps are listed here, and you can select which can notify you and how they notify you. For each of them, you get a drop-down menu where you can choose whether that app is allowed to send notifications in the Notifications feed + banner, just in the Notification feed, or not at all (Disabled).
![Choose which [Android] apps notify you in the Windows Phone Link app](https://www.digitalcitizen.life/wp-content/uploads/2023/06/phone_link-10-1.png)
Choose which [Android] apps notify you in the Windows Phone Link app
TIP: Unless you want to get all the notifications from every app on your Android in Phone Link, which can quickly add up, I recommend disabling the ones you don’t need.
How to read and send text messages with Windows’ Phone Link
When you select the Messages tab at the top of the Phone Link app, it synchronizes the SMS and MMS messages from your Android smartphone to your Windows 11 or Windows 10 PC. This process can take a while if you have many messages.
To view a conversation, select it, and you should see the entire chat on the right side of the window. To send a reply, type it in the “Send a message” field and press the Send button.
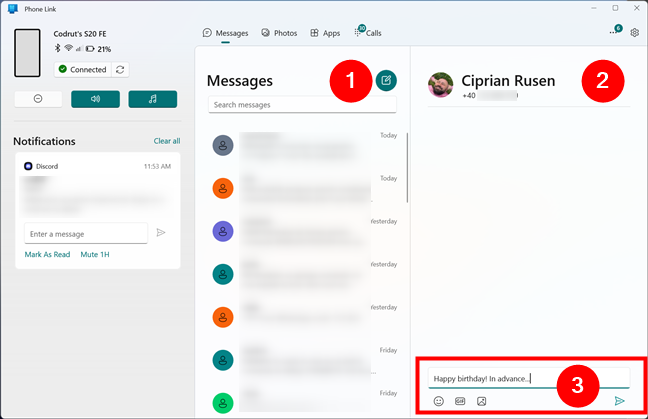
Text Messages in the Windows Phone Link app
To start a new conversation with someone you haven’t previously talked to, press New Message, and, in the To field, type the name or phone number of the person you want to contact. Then, enter your message and press Send.
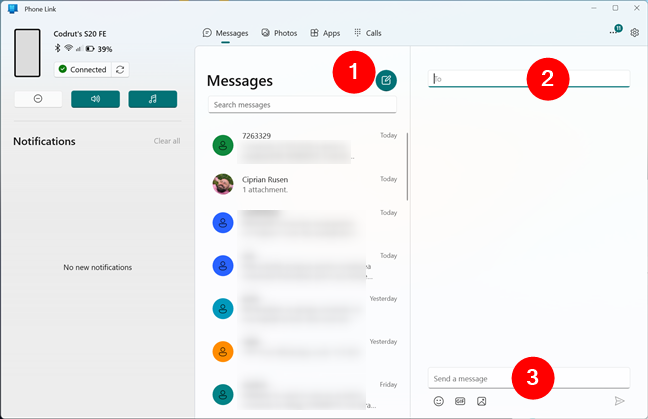
Sending a text message from Windows via Phone Link
You can also use Phone Link to view and send MMS messages, not just standard text messages. When sending an MMS message, you can use emojis, add photos or even GIFs, by using the matching buttons under the text field. 🙂
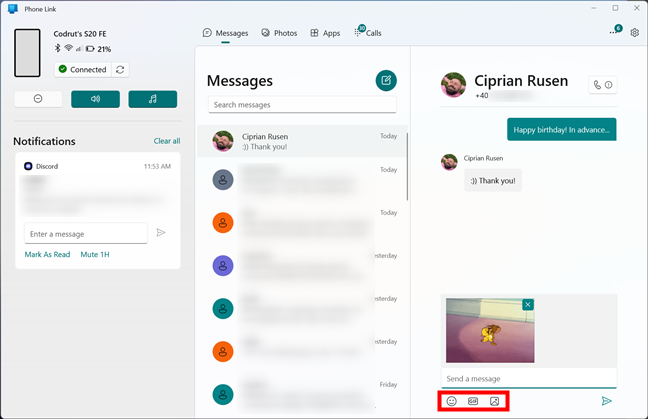
Media options available for text messages
NOTE: If you don’t like how Phone Link works for sending and receiving text messages, you might prefer this solution instead: How to send a text from the computer with Android Messages.
How to view the pictures from your Android smartphone with the Windows Phone Link app
Phone Link also syncs and lets you view the photos found on your Android smartphone. This process can take a while if you’ve taken many photos. They are shown in a gallery with the newer pictures first and the older ones last.
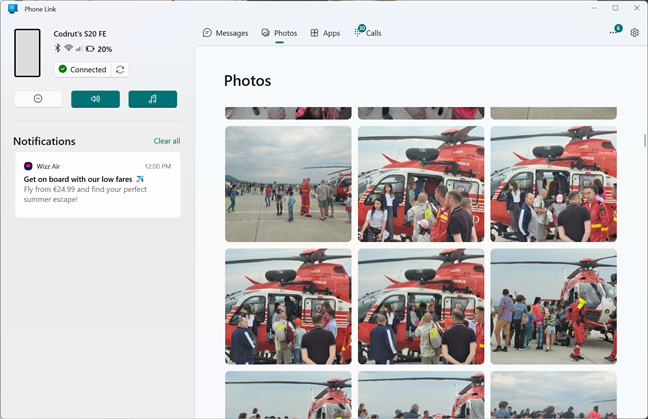
View Photos from Android on Windows, with the Phone Link app
When you click or tap on a picture, it’s displayed in the built-in picture viewer from the Phone Link app. If you want, you can then Open it with the default image viewer app on your Windows 11 or Windows 10 PC, Copy and paste it wherever you like on your computer, directly “Save [it] as” a file on your PC, Share it using the options available on your Windows device, or Delete it from your phone. Additionally, if you click or tap on the … (three dots) button, you can also choose Open with, which lets you open the photo using the app or program you specify.
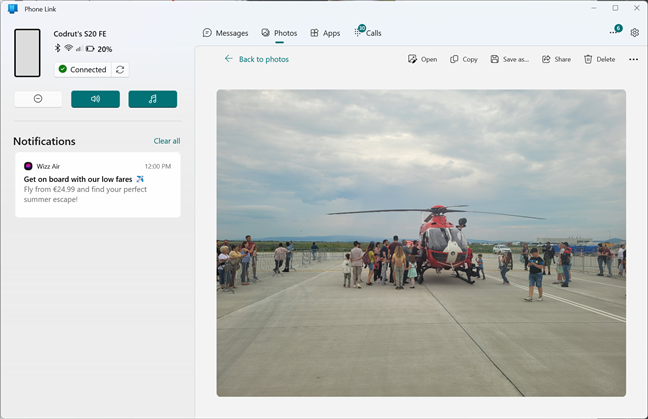
Using the Phone Link app to see a photo from Android on Windows
NOTE: You can also right-click or press-and-hold on a picture and choose from the contextual menu whether you want to copy, share, or save that photo.
How to use Phone Link to make and receive phone calls on your Windows 11 or Windows 10 PC
Phone Link also lets you pick up or make phone calls directly from your Windows 11 or Windows 10 PC. To make a phone call from your computer, select the Calls tab at the top of the Phone Link app. Then, if you see the person you want to call in the list of recent Calls, click or tap on their name and then on the small telephone button next to it.
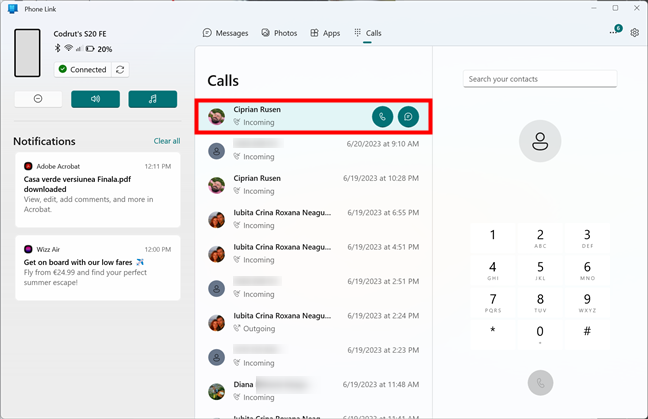
Calling someone from Phone Link's recent Calls list
Alternatively, if the person you want to call isn’t on the list of recent Calls, use the dial pad on the right side of the window to type their phone number or enter their name in the Search your contacts field. Then, start the call by pressing the Dial icon under the dial pad.
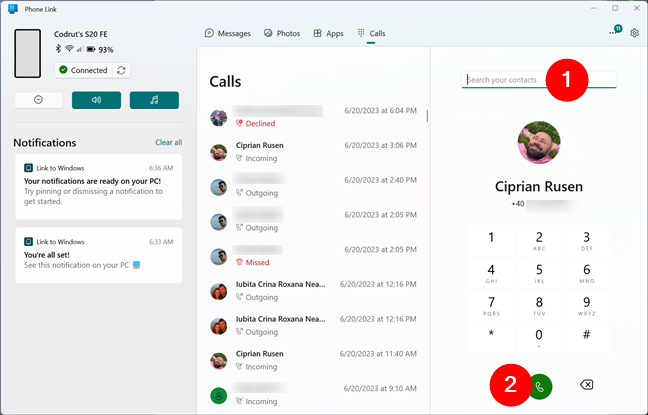
Dialing a phone number in Windows Phone Link
Once you’ve initiated a phone call from Phone Link on your Windows 11 or Windows 10 PC, you should see a small window acknowledging it on the top-right area of the screen. When you want to end the call, press the red button. If you want, you can mute the call, create a conference by adding someone else to the call, or use the dial pad (useful when talking to robots). You can also switch back to using your Android phone instead of your Windows PC.
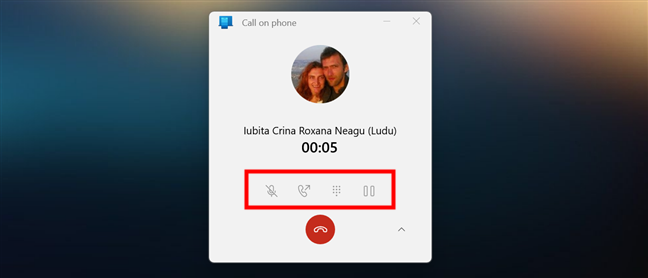
A phone call made with Windows Phone Link
If you don’t need the additional phone call options and you know that your call will take a while, you can shrink the phone call window by pressing the small arrow to the right. And if you need access to those options later on, you can click or tap the arrow again to show them.
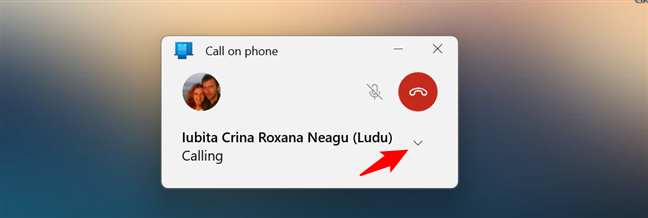
Shrinking or Expanding the Windows Phone Link call window
And that’s it: these are the things you can use Phone Link on Windows for, together with any Android smartphone. But there’s one more neat feature that’s available only on select Android smartphones made by Samsung and HONOR: Apps. Let’s see what it’s all about:
How to use Android Apps on Windows (on select Samsung Galaxy, HONOR, and Surface Duo smartphones)
Some Samsung Galaxy, HONOR, and Surface Duo smartphones support Android apps on Windows, letting you enjoy the convenience of using your mobile apps directly on your PC. The list of phones compatible with this feature is available here: Supported devices for Phone Link app experiences (check the “What devices support Phone screen?” and “What devices support Apps?” sections).
To use Android apps on Windows, select the Apps tab in Phone Link’s dashboard. You will then see a link called Open phone screen and three lists of apps: the Recently used apps on your Android phone, the Favorites apps that you’ve pinned in Phone Link (at first, this list will be empty), and the complete list of All apps installed on your Android smartphone.
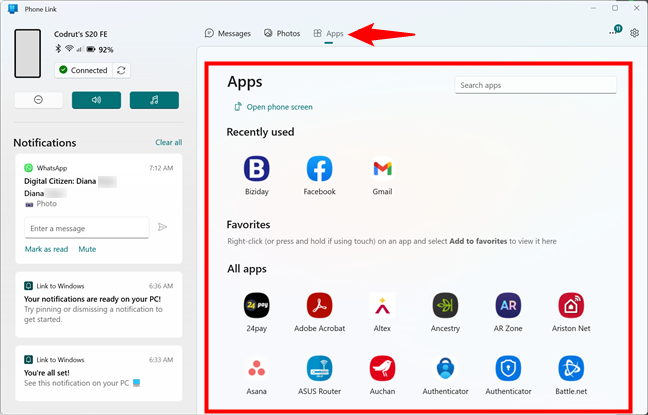
Using Android Apps on Windows with Phone Link
Clicking or tapping the “Open phone screen” link launches a new window where your Android smartphone’s screen is loaded. You can then interact with your phone directly from Phone Link on your Windows PC using the mouse and keyboard. Neat, right?
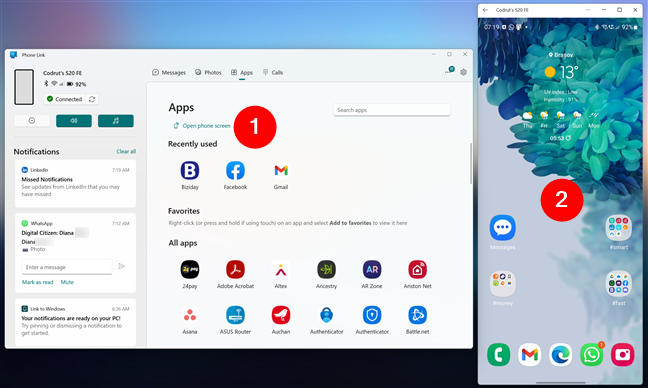
Open the Android phone screen on Windows
You can also use the lists of apps in Phone Link to directly launch any of the apps installed on your Android device. Click or tap the one you want to launch and use your mouse, keyboard, touchpad, or touchscreen to interact with that app on your PC. You can also resize, minimize, maximize, or close the app windows like with any other PC app.
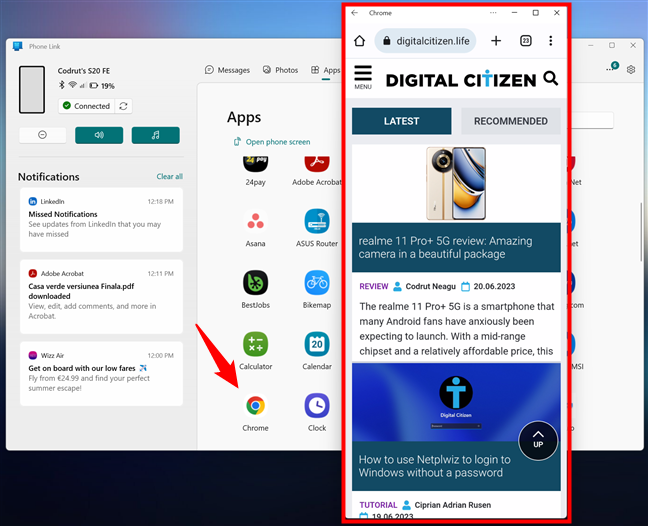
Using an Android app on Windows with Phone Link
To stop using an Android app on Windows, simply close the app’s window. And last but not least, if you have some apps on your Android that you want to be able to access faster because they are your favorites, you can add them to the Favorites list in Phone Link or even to your Start Menu. To do either of these things, right-click or tap and hold on an app’s name and select “Add to favorites” or “Add to Start.”
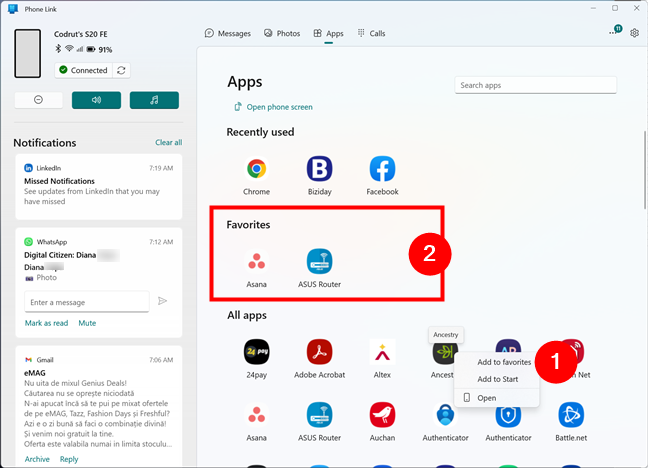
Favorite Android apps in Windows Phone Link
That was it!
Do you use Phone Link on Windows 11 or Windows 10?
Try the Phone Link app for Windows 11 or Windows 10, and see how it works. Do you feel that it offers a good user experience? Which Phone Link feature is useful to you? Is it the Messages, Calls, or easy access to your Android Photos? If you own a Samsung Galaxy, HONOR, or Surface Duo device, do you enjoy using your Android Apps on your PC? Let me know what you think in the comments section below.


 23.06.2023