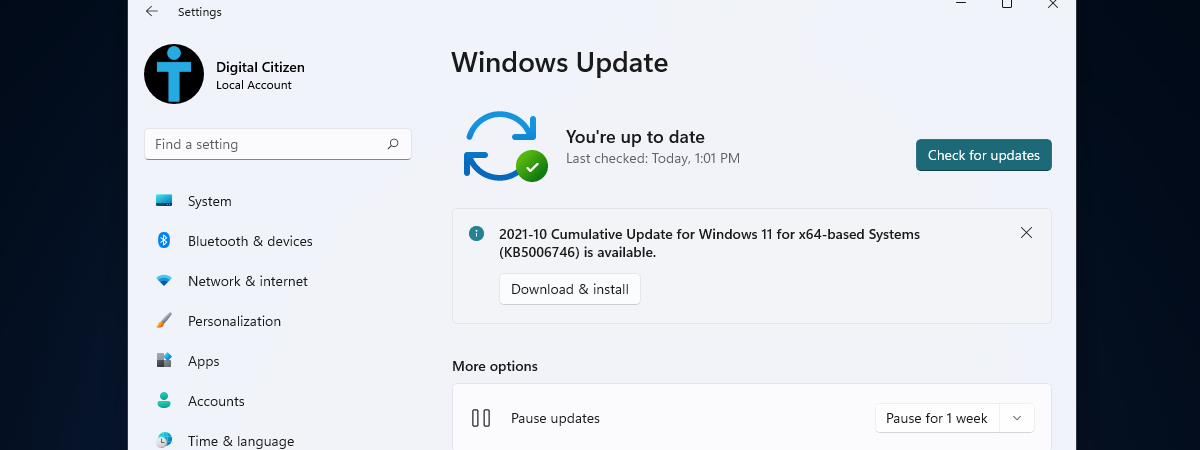
Windows 11 is the latest operating system from Microsoft, and it comes with many new features and improvements. However, to have the best user experience and enjoy the best performance and security, you must keep your Windows 11 device updated. In this guide, I’ll show you how to check and download Windows 11 updates, how to see Windows 11’s update history, and how to configure all the bits and pieces that make Windows Update work. Without further ado, let’s begin:
How to find Windows Update in Windows 11
By default, Windows 11 does a good job of handling system updates automatically. However, from time to time, you may want to check and download Windows 11 updates manually. Or maybe you want to configure the way updates are downloaded and installed or even see the Windows 11 updates history. For any of these reasons (or others), you first have to access Windows Update by following these steps:
Launch the Settings app. While there are many methods to do this, a fast one is to press Windows + I on your keyboard, or click/tap the Settings icon in the Start Menu.
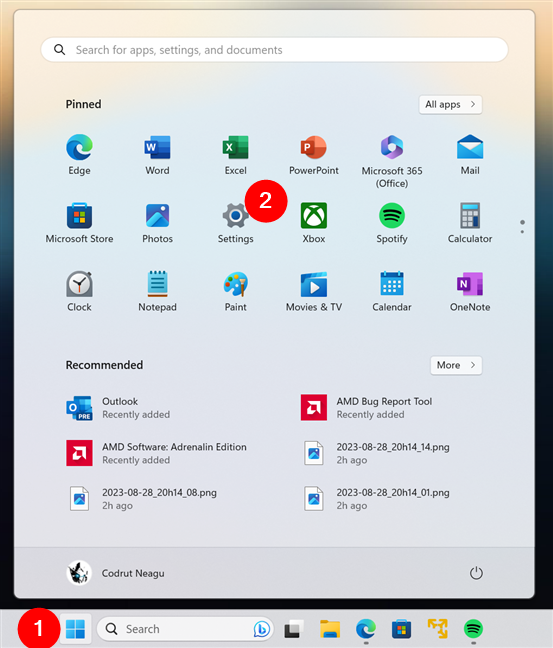
How to open Settings in Windows 11
In the Settings app, select Windows Update in the left sidebar. You should now see the current update status of your Windows 11 computer in the right pane.
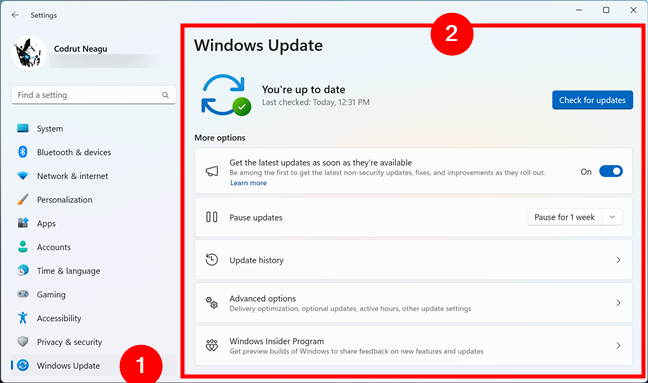
How to get to Windows Update
Let’s now see how to get Windows 11 updates:
How to check for and download Windows 11 updates
If you want to trigger a manual check for any available Windows 11 updates, click or tap the Check for updates button.
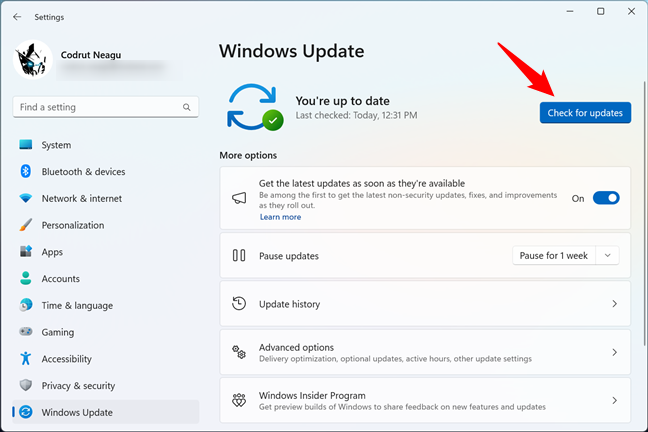
Check for updates in Windows 11
Windows 11 then starts looking for any available updates to install. This shouldn’t take long, but it depends on how fast your internet speed is.
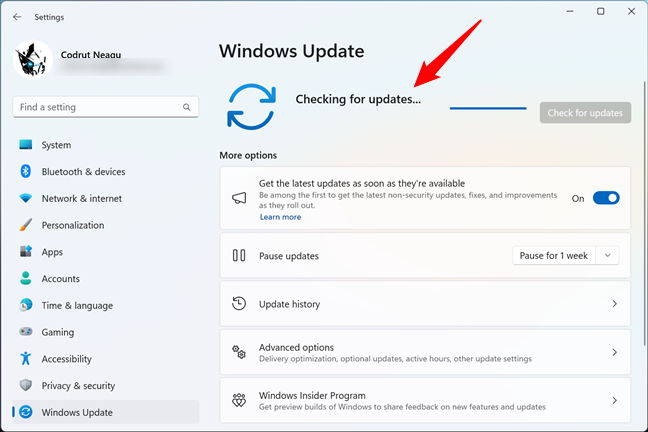
Windows 11 is Checking for updates
If any regular, quality updates are available, Windows 11 automatically starts downloading and installing them.
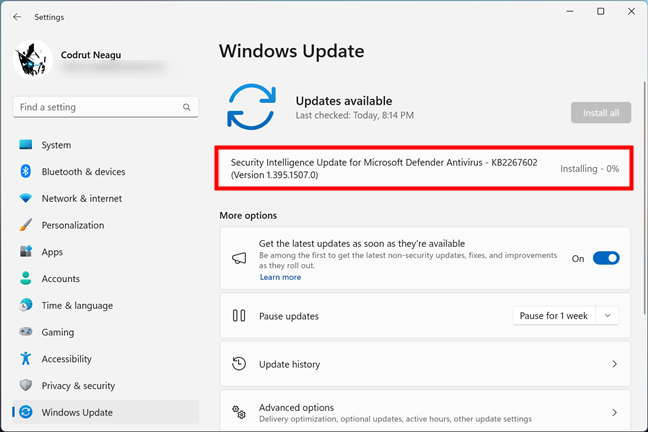
An update is automatically downloaded and installed
If feature updates are available too, the Settings app shows them to you but doesn’t necessarily start downloading and installing them automatically. There are two situations in which you may find yourself:
- If your version of Windows 11 is approaching its end of servicing, the feature updates are automatically downloaded and installed.
- If you have a recent version of Windows 11 that’s still in its servicing period, the feature updates are not installed automatically. In this case, the latest feature updates are listed by Windows Update, but you have to manually trigger their installation by pressing the Download & install button.
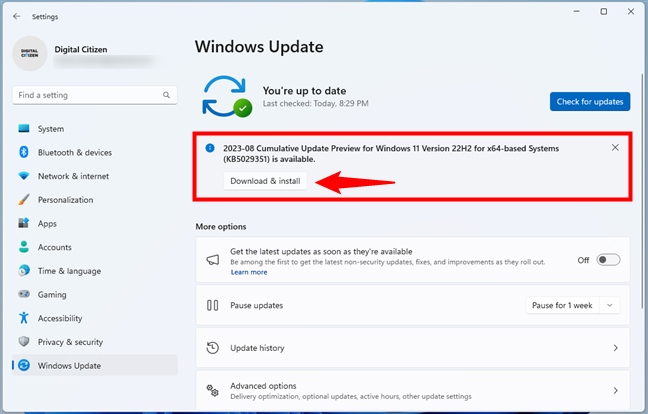
Download & install a feature update
Depending on what the new updates bring to the table, Windows 11 might require you to reboot your computer to complete the installation. In this case, the restart can be scheduled by Windows 11 for a later time, or you can manually reboot your PC right away by pressing the Restart now button if you want to install the updates as soon as possible.
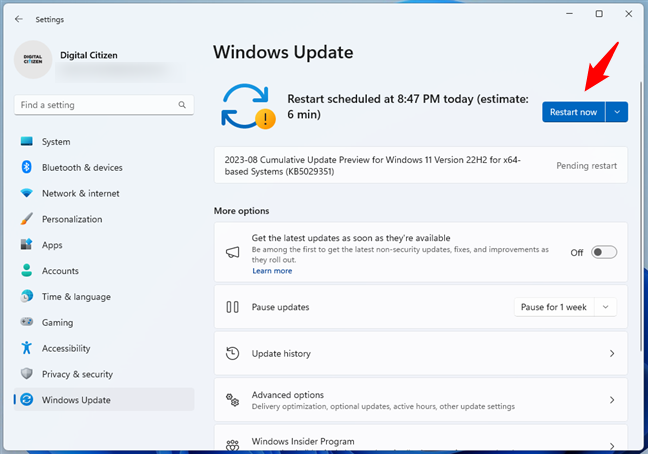
Restart now to apply the updates
After rebooting, the updates are installed, and you can enjoy all the new features they bring.
How to get the latest Windows 11 updates as soon as they’re released
As previously mentioned, in Windows 11, some feature updates are not treated the same as regular ones. The newest updates are not always installed on devices as soon as they are released. Instead, their installation is postponed automatically by Microsoft until the servicing time of your Windows 11 version is approaching its end. However, if you want to be among the first to receive all the latest feature updates, you can instruct the operating system to get them as soon as possible. To do that, on the Windows Update page from the Settings app, enable the “Get the latest updates as soon as they’re available” switch.
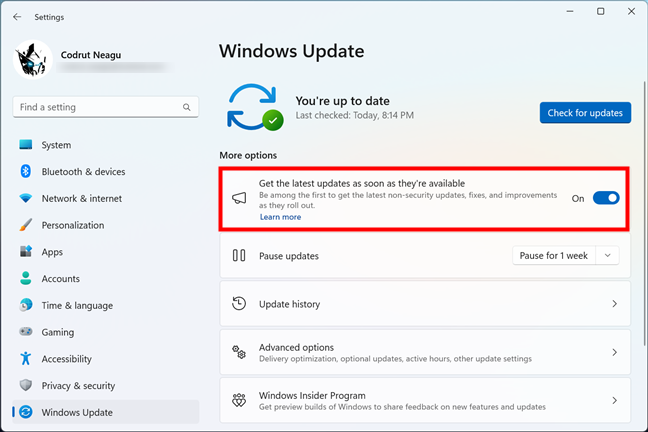
Get the latest updates as soon as they're available
How to see the history of Windows 11 updates
Windows 11 updates are important for keeping your system secure and up to date. However, sometimes, you may want to see the history of the updates installed on your computer.
To know more about the last Windows 11 updates on your PC, on the Windows Update page from the Settings app, click or tap the Update history entry in the right pane.
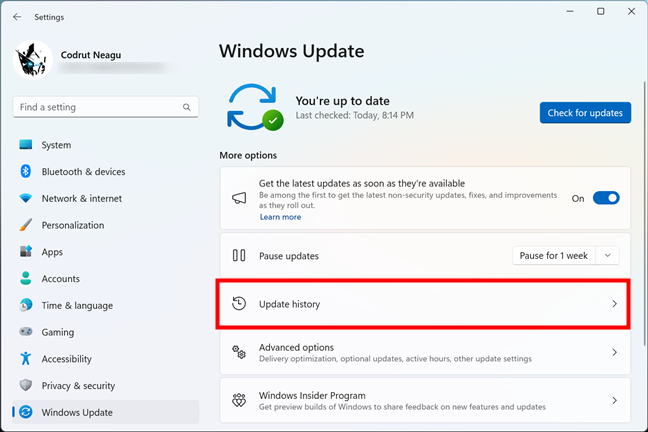
How to get to Windows 11's Update history
Then, Settings opens a new page called Update history. On it, you get to see a couple of Windows 11 updates lists that have been installed on your computer, organized by category and sorted by their installation date.
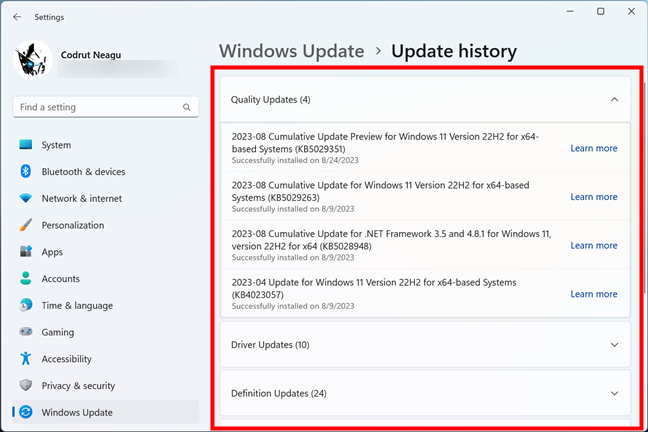
Windows 11 Update history
If you want to see more details about a certain update, you can click or tap on it or the Learn more link next to it.
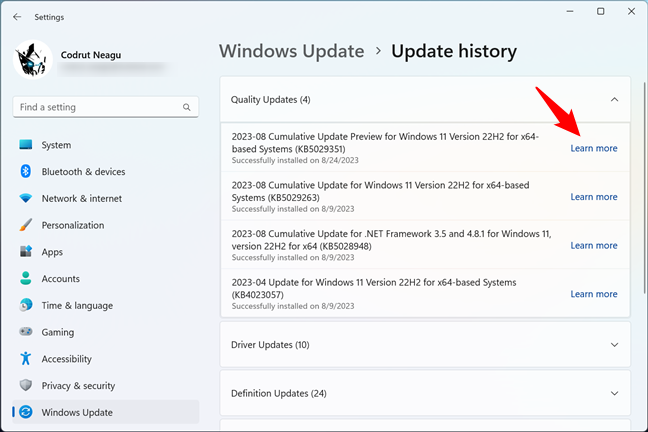
Learn more about a Windows 11 update
However, not all updates have direct links with descriptions about what they did. For instance, while all the Quality updates installed on my Windows 11 computer have Learn more links that lead to Microsoft webpages with details about them, the Driver updates don’t.
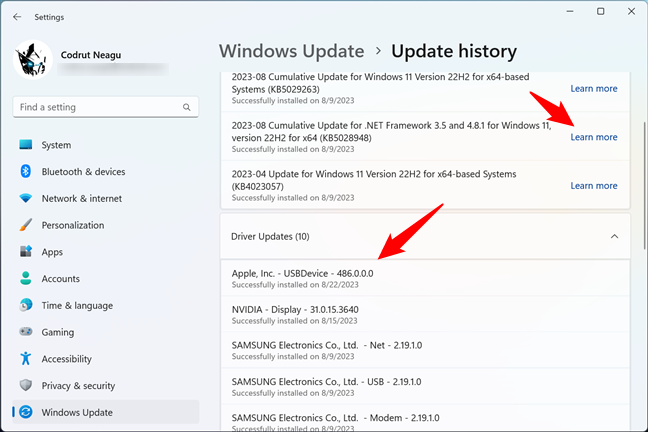
Some updates don't have detailed descriptions
If you want information about a Windows 11 update that doesn’t have a Learn more link, you should search for it on the internet using your favorite search engine (Google, Bing, etc.).
How to pause Windows 11 updates
In certain situations, you may want to pause Windows 11 updates. Reasons can vary from things like avoiding potential bugs, saving bandwidth, or simply the desire to keep your current settings for as long as possible. If you want to postpone Windows 11 updates, you can pause them from the Settings app. On the Windows Update page, under More options, look for the Pause updates setting and use the dropdown menu on the right to Pause for 1 week, two weeks, and so on, up to a maximum of 5 weeks.
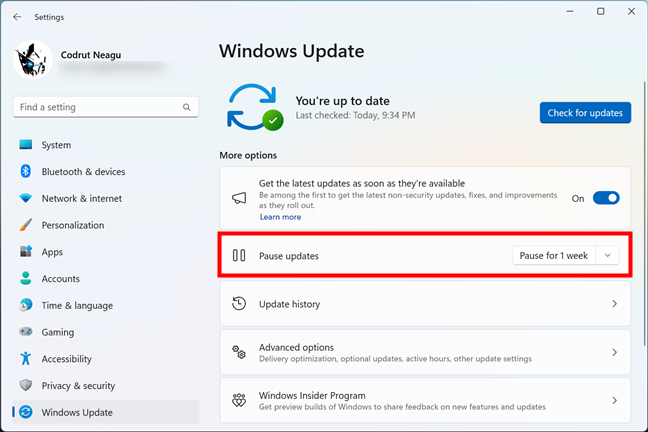
How to Pause updates in Windows 11
TIP: For more details on how pausing Windows 11 updates works, as well as additional methods, read this dedicated guide: How to pause Windows 11 updates.
How to uninstall Windows 11 updates
While Windows 11 updates should improve your security and experience, sometimes they can cause issues and make things worse. Fortunately, if you need to uninstall a Windows 11 update, you can do so by following the next steps:
On the Windows Update page from the Settings app, click or tap on the Update history entry.
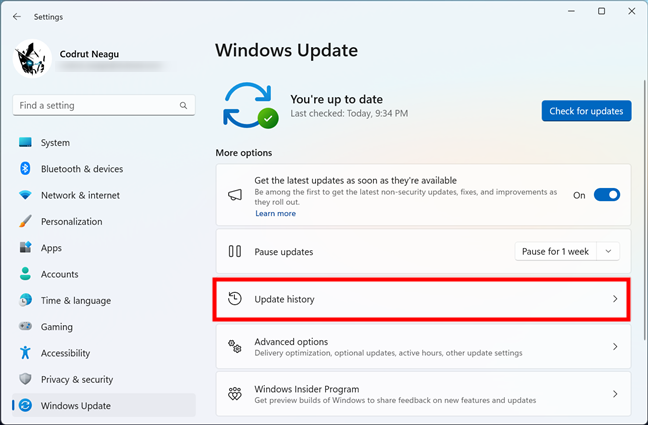
Head to Update history in Windows 11
Next, instead of just checking the Windows 11 updates you’ve installed (like I’ve shown you earlier), scroll down to the bottom of the page. There, you should find an option called Uninstall updates, under Related settings. Click or tap on it.
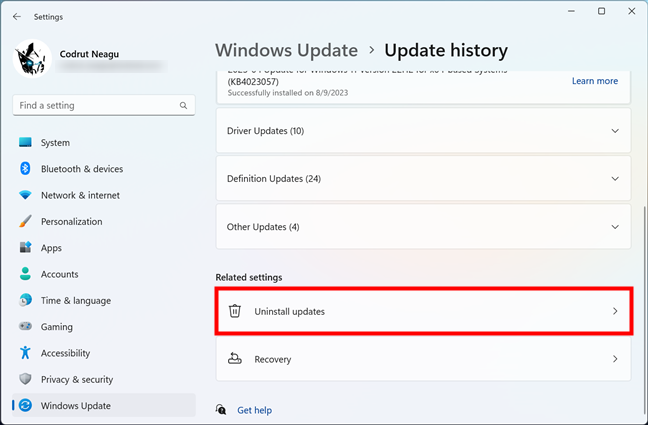
Click or tap in Uninstall updates
Settings then shows you the list of Windows 11 updates that can be uninstalled. Select the one you want to remove and click or tap Uninstall next to it.
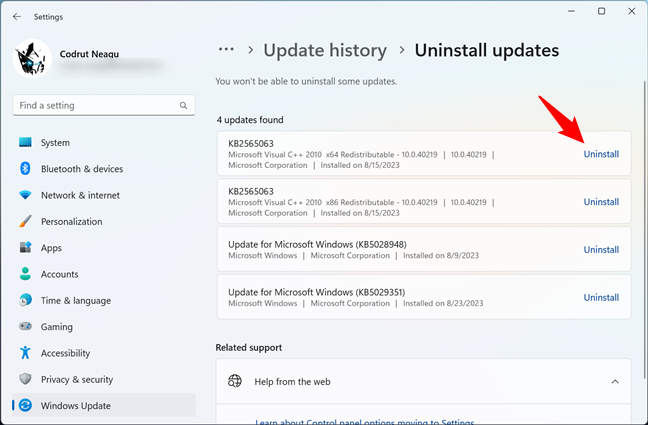
How to uninstall a Windows 11 update
Wait for the uninstallation to be done and, to be sure that it’s removed completely, reboot your Windows 11 computer, even if it may not ask you to do so.
TIP: Some Windows 11 updates can’t be uninstalled, and some require additional steps to get rid of. For more detailed information about all that, check this guide: 5 ways to uninstall Windows 11 updates.
How to optimize the delivery of Windows 11 updates
Just like Windows 10, Windows 11 has a built-in feature called Delivery Optimization. This feature allows the operating system to use peer-to-peer technology to download updates from other devices running Windows 11, that are connected to the same local network, or even from other computers on the internet. Delivery Optimization is enabled by default in Windows 11, but you can customize it according to your preferences. To find its settings, first click or tap the Advanced options entry from the Windows Update page in the Settings app.
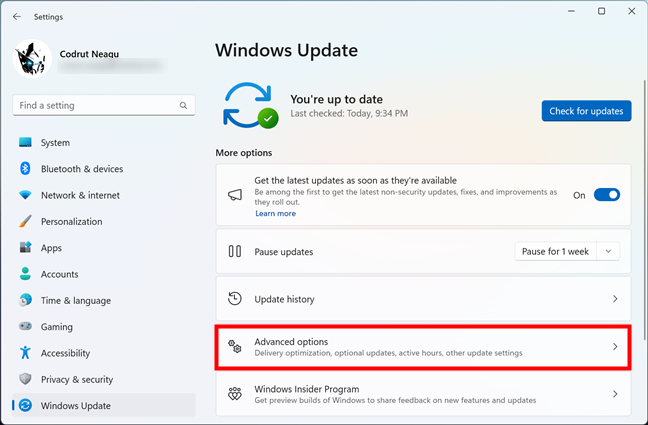
Advanced options in Windows Update
Then, click or tap on Delivery Optimization under Additional options.
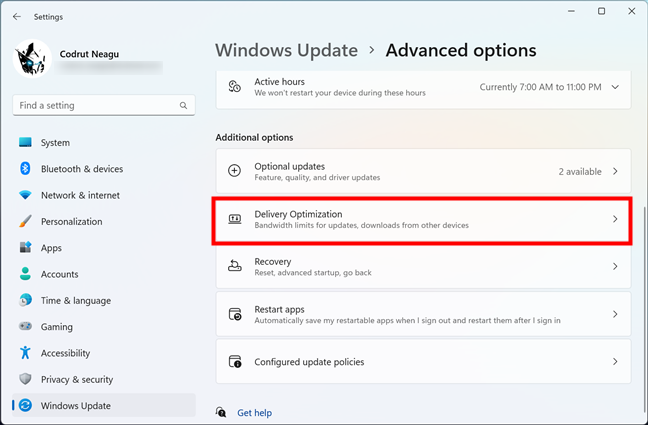
Delivery Optimization in Windows 11
Now you’ve arrived on the Delivery Optimization settings page. Here, you can turn Off (or back On) the “Allow downloads from other PCs” switch to disable (or enable) Delivery Optimization. Additionally, you can also choose which devices to share updates with.
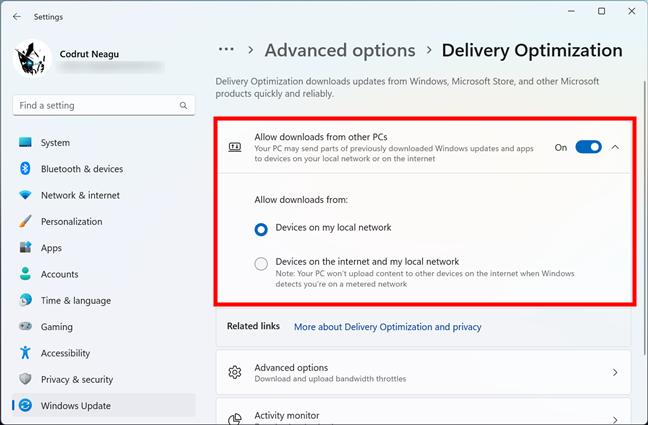
Allow downloads from other PCs in Windows 11
If you decide you want to keep Delivery Optimization on for Windows 11 updates, you can also control how much bandwidth this feature is allowed to use. For that, click or tap the Advanced options entry on the Delivery Optimization page.
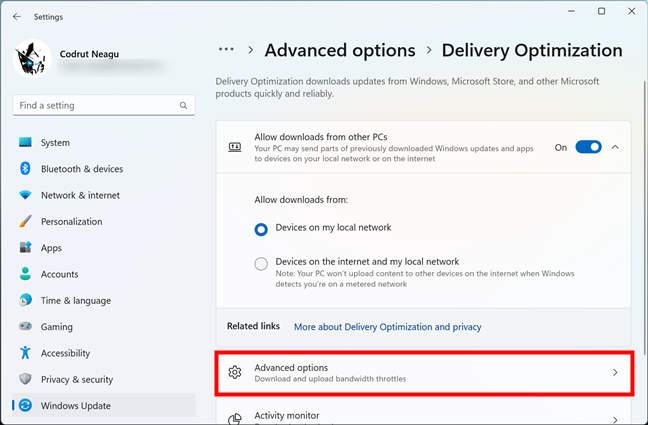
Advanced options for Delivery Optimization
Then, you can limit how much bandwidth is used for downloading updates and uploading updates by entering values in Mbps (megabits per second) or as percentages of your bandwidth.
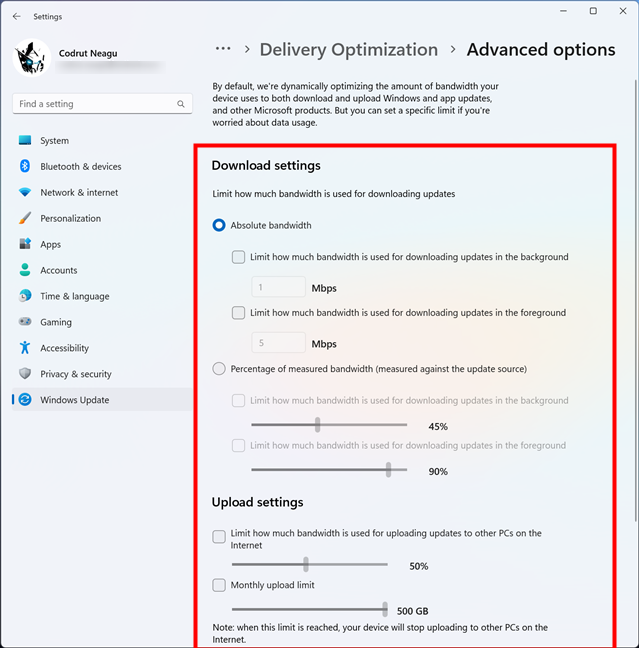
Delivery Optimization controls
TIP: For more details on how Delivery Optimization works, read this guide: Update Windows 10 from another PC on the local network or the internet. Although it’s written for Windows 10, everything is identical in Windows 11.
Other advanced options for Windows 11 updates
Having covered all the main settings that you can change regarding the way Windows 11 updates work, there are still a few others that don’t really fit in any of the chapters in this guide. Let’s go through them:
First, access the Advanced options page from the Settings app, because that’s where these settings are found.
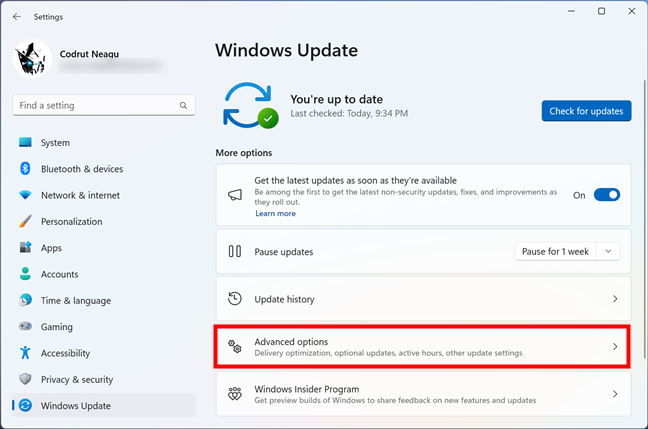
Advanced options for Windows Update
The Advanced options list contains five settings related to Windows 11 updates:
- Receive updates for other Microsoft products: this switch instructs Windows Update to search for, download, and install updates for other Microsoft products besides the ones for Windows 11. For example, if this setting is on, you can get updates for Microsoft Office apps.
- Get me up to date: sets Windows 11 to restart as soon as possible after an important update, bypassing the regular schedule. Still, you’re notified 15 minutes before the reboot, which gives you plenty of time to save your work and have your computer ready (turned on and plugged in).
- Download updates over metered connections: turning this option on makes Windows 11 get updates even when you’re using a metered connection. Take care with this one, as this may mean additional charges for every megabyte Windows Update downloads.
- Notify me when a restart is required to finish updating: if a Windows 11 update that was recently installed on your PC requires a system reboot to complete, you’re notified about it.
- Active hours: allows you to set working hours when Windows 11 shouldn’t bother you with restarts required by updates.
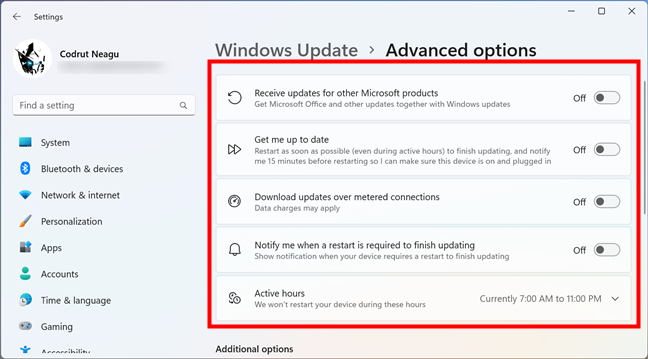
Other controls for Windows 11 updates
And that’s pretty much everything there is about Windows 11 updates.
Do you get Windows 11 updates as soon as possible?
Windows 11, Microsoft’s latest operating system, offers regular updates that almost always come with new features and improvements over previous versions. However, not all users are keen on getting Windows 11 updates as soon as possible. Some prefer to wait for more stable releases. Furthermore, there are also many settings that you can change to control how Windows 11 updates are downloaded, and many options come with both pros and cons. In the end, the best way to handle Windows 11 updates depends on your personal preferences and needs. So do you get Windows 11 updates as soon as possible or do you prefer to wait? Let me know in the comments section below.


 30.08.2023