Ever wondered what XMP means and does? Did you read about memory modules that support XMP? Or maybe you’ve heard a friend talk about RAM SPD, JEDEC, overclocking, and XMP? Read on if you want to know more about XMP, what it is, and how to use XMP profiles on your computer. In this guide, we’re explaining everything, including how to check whether your RAM is XMP-compatible and how to boost your memory speed for free by selecting the fastest XMP profile available in your computer’s UEFI or BIOS:
What is RAM SPD?
During the manufacturing process, every RAM module is set to run at a certain speed that’s a result of its default frequency and timings. When you power on your computer, the first thing that happens is a boot check, also called POST (power-on self-test). That’s a series of basic tests for the hardware, performed under the instructions of the computer’s UEFI or BIOS. Among other checks, the RAM is also initialized and tested. The initial speed of the RAM modules - frequency, timings, voltage - are set according to their SPD values. The SPD (Serial Presence Detect) is a chip found on each memory module. It allows your motherboard to know that the RAM is present, as well as tell it what settings to use in order to access the RAM. Both the JEDEC and XMP memory profiles are extensions of SPD. Read on to find out more about what they mean and what they do:
What is JEDEC?
Starting with DDR3 RAM, memory settings including frequency, timings, and voltage are stored on modules under a standard called JEDEC (the naming comes from Joint Electron Device Engineering Council). When you install a DDR3, DDR4, or DDR5 memory module in a computer, its motherboard automatically enables the default JEDEC profile for it, allowing the RAM to run at its default speed. For example, a DDR4-3000 module will run by default at 3000 MHz, while DDR-5200 RAM will run at 5200 MHz. However, besides JEDEC, some if not most RAM memory kits these days also support XMP profiles. “What’s that?” you may ask.
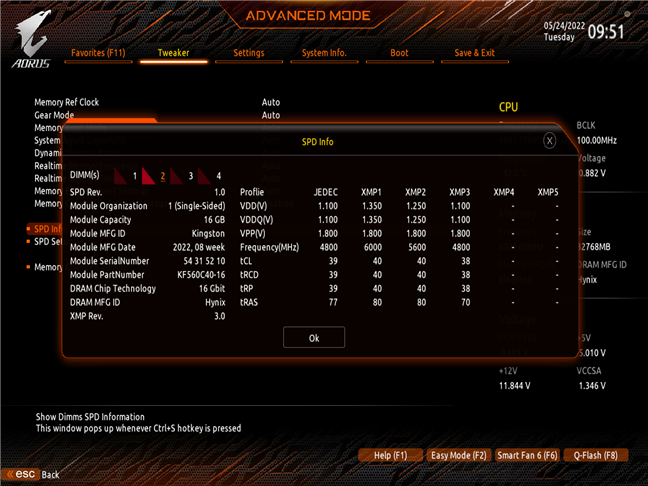
SPD information showing JEDEC and XMP profiles
What is XMP?
XMP, an acronym for Extreme Memory Profile, is another memory standard originally created by Intel for DDR3 RAM. It represents a set of enhanced frequencies and timings that a RAM module can use to deliver higher performance. While JEDEC memory profiles offer great compatibility (all manufacturers use them), XMP profiles allow RAM modules to run at higher frequencies and with faster timings. And they also compensate for the amount of additional voltage required. RAM modules that support XMP have already been tested by their manufacturers, and they’re guaranteed to be able to run flawlessly at the speeds saved in their XMP profiles.
If you want, you can think of XMP profiles as memory overclocking settings that are already configured, tested, and saved directly on the RAM modules. All you have to do to make your RAM run faster is enable the fastest XMP profile available for it. That’s quite easy, as you’ll later see in this article. Still, you should keep in mind that, in order to be able to use XMP RAM, both your motherboard and CPU (processor) must be capable of using your RAM at the XMP frequency and timings.
How to enable XMP for your RAM to increase its speed
Now that you know what XMP is, you might want to know how to enable it on your computer motherboard to boost the speed of the RAM. After all, most of us won’t say no to a free increase in performance, right? Here’s how to select XMP profiles and enable them:
XMP profiles are turned on and selected in your motherboard’s BIOS or UEFI. This means that you’ll first have to access your computer’s firmware. Usually, you can do that by pressing a key like Del, Esc, or F2 immediately after you start your computer. However, the required steps differ depending on the motherboard’s manufacturer. If you don’t manage to enter UEFI/BIOS right away, you’ll find help in one of these guides we’ve published:
- How to enter the UEFI/BIOS from Windows 11 (7 ways)
- How to enter BIOS in Windows 10
- Shortcuts for the UEFI BIOS & Windows 10’s Recovery Environment
Once you’ve entered your UEFI/BIOS, you’ll need to look for the setting called XMP. Some mainboard manufacturers use the exact XMP term, while others adhere to the full name: Extreme Memory Profile. In most cases, at least on the newer motherboards, you’ll find it on the first page of your UEFI/BIOS. In other cases, the XMP settings might be listed on the Tweaking page, on the Advanced page, or any other location from the UEFI/BIOS.
For example, on a Gigabyte Z690 Aorus Master motherboard, XMP is shown on the first page of the UEFI if you choose to use the Easy Mode view.
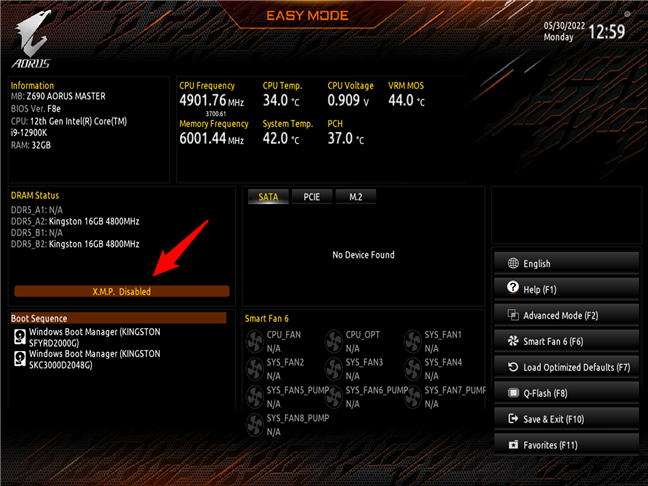
The XMP setting (disabled)
And you can also find it on the Tweaker page if you enable the Advanced Mode interface. Unlike in Easy Mode, where it was simply called XMP, the Advanced Mode lists the memory profiles under their full name: Extreme Memory Profile (X.M.P).
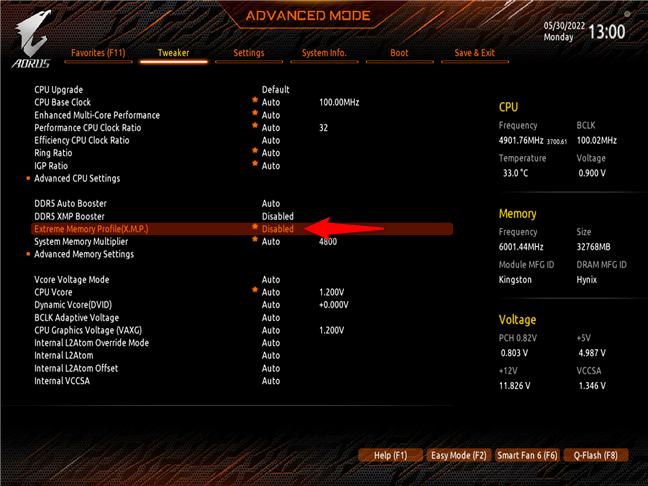
Extreme Memory Profile setting in UEFI
To enable an XMP profile for your RAM, click or select and press Enter on the XMP setting. Then, you should see the list of available XMP profiles.
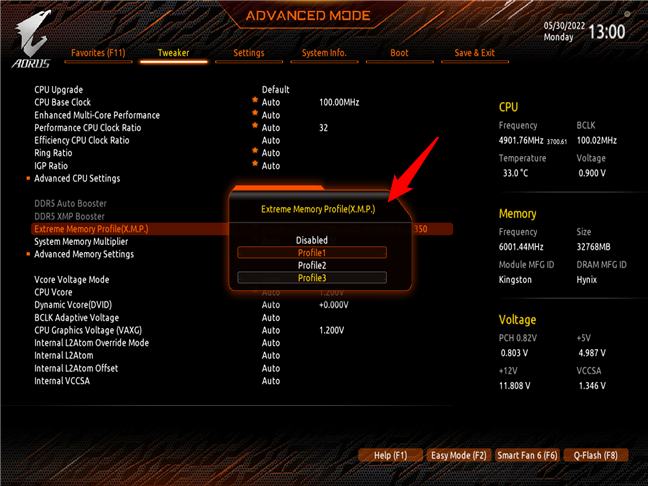
Select and enable an XMP profile in UEFI
Although you can choose to use any of them, you’ll probably want to go with the fastest one, the one that specifies the highest frequency. For instance, a 32GB DDR5 memory kit from Kingston that we use comes with three XMP profiles, each allowing it to run at different speeds: 4800, 5600, and 6000 MT/s. To get the maximum performance from it, we opt for the fastest XMP profile: DDR-6000.
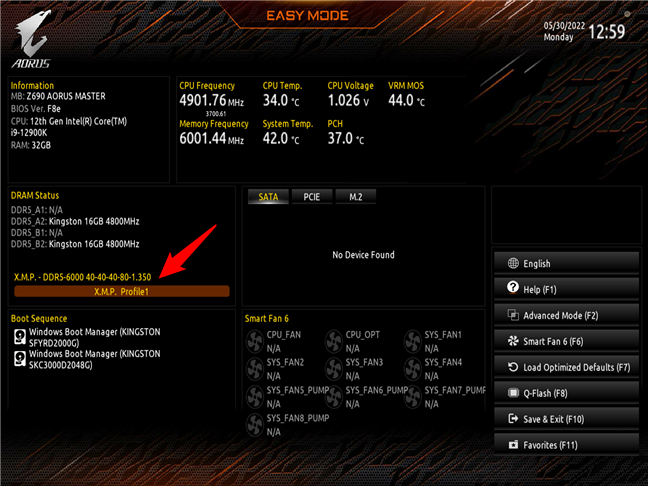
XMP profile set and in use
Once you’ve enabled the XMP profile you want to use for your RAM, all that remains to do is save the settings and exit UEFI/BIOS to reboot your computer. Then, your computer’s memory modules will run at the frequency, timings, and voltage specified by the selected XMP profiles. Voila: speed! 🙂
XMP alternatives & How to enable XMP on AMD systems
As XMP was developed by Intel, AMD was not so quick to follow and implement it. Their alternative to XMP was called AMP (AMD Memory Profile). In fact, it’s practically the same thing as XMP. However, as Intel’s XMP was widely more popular, both people and manufacturers wanted it. So, as a result, many manufacturers created their own equivalent technologies to XMP, that would allow reading and using XMP profiles on AMD motherboards. Unfortunately, that also means different terminologies and different names for the settings you have to change in order to enable XMP. For instance, MSI has A-XMP, ASUS has DOCP (Direct OverClock Profile), and Gigabyte has EOCP (Extended OverClock Profile). These settings are the ones you should look for in your motherboard’s UEFI or BIOS for AMD processors, and these are the ones you should tweak to enable XMP for your RAM.
While we don’t have motherboards from all manufacturers, we do have an ASUS ROG Crosshair VIII Hero (Wi-Fi). It’s designed to work with AMD Ryzen processors, it’s compatible with DDR4, and it can use XMP profiles, but you won’t find them bearing this name in its UEFI. To enable XMP on an ASUS motherboard like this one, you must select one of the D.O.C.P profiles available. And yes, you guessed it: the RAM we have has two XMP profiles, and they are identical to the two DOCP profiles listed in the UEFI. Here’s how to enable the highest performance RAM profile from the EZ Mode UEFI view:
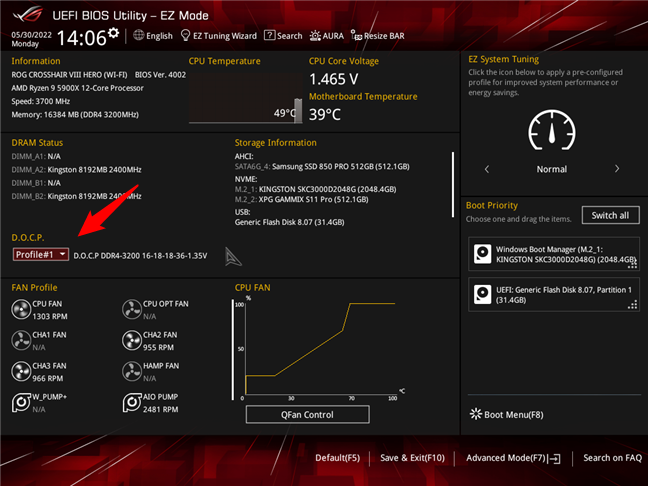
On ASUS motherboard, XMP is enabled with DOCP profiles
And here’s where to find the DOCP profiles on an ASUS motherboard if you prefer to use its UEFI in the Advanced Mode view:
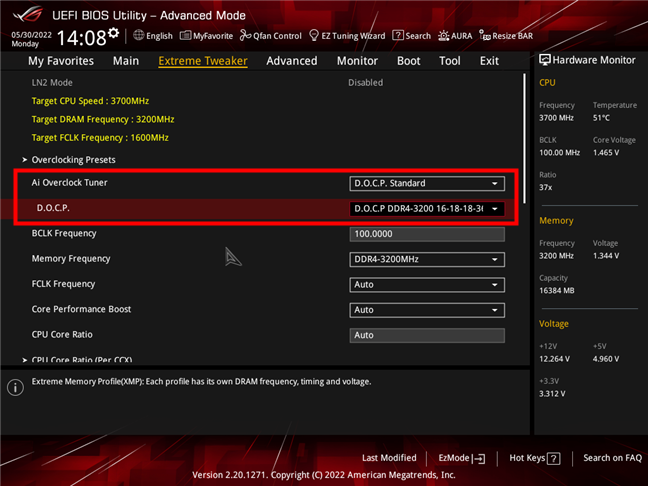
Choosing a DOCP profile in ASUS UEFI
As you can see, enabling XMP is quite easy. The hard part is to figure out what your motherboard manufacturer chose to name it. 🙂
How to check if your RAM supports XMP
Obviously, you could check whether your RAM supports XMP by reading its manual or by looking at its technical specifications on its manufacturer’s support website. But both ways are cumbersome, right? The easiest method to find out if you have XMP RAM is with the help of the small and very popular tool called CPU-Z. Download and run it on your Windows PC, and then switch to its SPD tab. On any (relatively) modern computer using DDR3 or DDR4, the SPD Ext. field should have the value XMP 2.0.
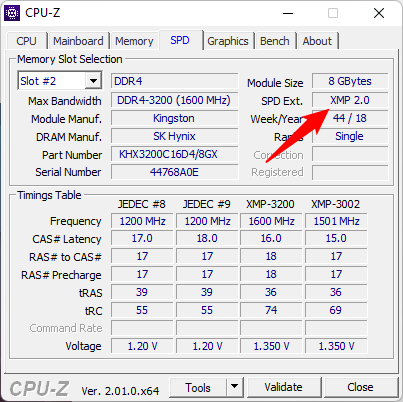
How to see if a DDR4 module supports XMP
If you have a really new computer running on DDR5, the SPD Ext. field should say XMP 3.0.
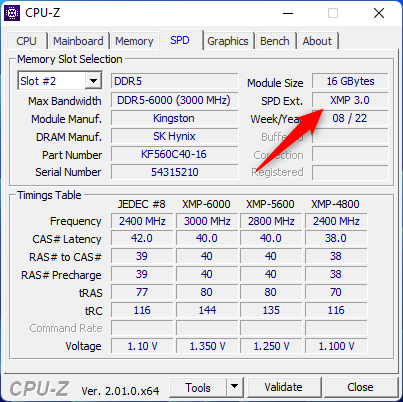
How to see if a DDR5 module supports XMP
NOTE: The only meaningful difference between XMP 2.0 and XMP 3.0 standards, at the present time, is that the first one can store only two memory profiles, while the latter allows for three built-in profiles and another two that can be customized.
How to check if XMP is enabled on your computer
You could check whether your computer uses XMP for its RAM by accessing its UEFI or BIOS, where you can look for the XMP profiles and see which one is set. However, you might not want to go to UEFI/BIOS for that, or you may want to know for sure that the settings you made are actually applied in Windows. CPU-Z comes to the rescue once again. On its SPD tab, look at the Timings Table to see what XMP memory profiles are available. Then, compare their values with the active RAM timings shown on the Memory tab. The active ones will be similar or identical to those set in one of the XMP profiles. The XMP profile that matches is the one used by your memory. Here’s an example of how we know that our computer’s DDR4-RAM is set to use an XMP-3200 profile:
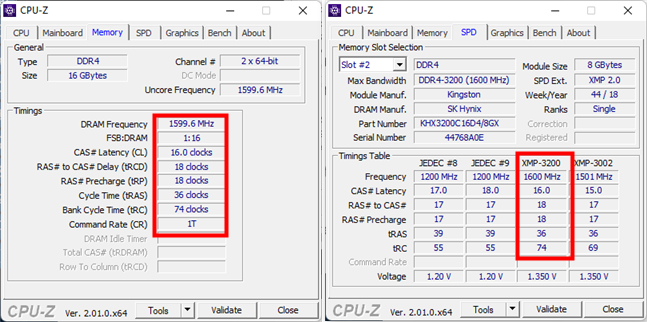
How to check what XMP profile is in use
If you find that your RAM doesn’t use XMP but supports it, why not turn it on? Just follow the steps we’ve shown earlier to enable XMP from UEFI/BIOS, and you’ll get a free boost for your memory.
Did you enable XMP on your PC?
As you’ve seen, XMP is quite useful, allowing you to increase the speed of your memory without having to pay a dime. It’s a widely popular standard for RAM these days, and most memory modules support it. Did you enable XMP on your computer? Do you have any other questions regarding XMP? Let us know in the comments section below.


 08.06.2022