ReadyBoost is a component of Windows operating systems, that was first available in Windows Vista. Its purpose is to help the SuperFetch service in making your system run smoother, by using a fast USB flash drive that helps reduce number of read and writes to your hard drive. If you would like to learn what SuperFetch and ReadyBoost are and how they work together, don't hesitate to read this article.
NOTE: This article applies to Windows 7, Windows 8 and 8.1. Using with these technologies is the same in these three operating systems. However, the screenshots we used were made in Windows 8.1.
How does SuperFetch works?
SuperFetch is one of memory management services found in Windows, that decides what data should be passed from the main RAM memory to the hard disk drive when there is no memory left, without slowing down the system. It also stores information about what files and applications are accessed more often and makes sure that, at a given time, the required information is located into the Random Access Memory (RAM) rather than on the Hard Disk. SuperFetch replaced the old Prefetcher service from earlier versions of Windows, which was pretty basic in the way it worked: it cached files that were used more recently, so if they were accessed again, the access would be quicker. However, after the system was turned off, previous activity would not be analysed. SuperFetch also improves boot times because it learns the user's routine after the system is powered on and loads only the files and applications that are accessed more often on startup, while Prefetcher was passive on boot. You should keep in mind that SuperFetch has low hard disk input/output priority, so it will not slow down other applications using the same storing device.
How does ReadyBoost works?
In order to make SuperFetch more efficient, ReadyBoost uses fast flash memory storage in addition to the slower hard disk storage available on your computer. I say fast, because not every USB flash drive is compatible with ReadyBoost, only the ones that meet the required performance characteristics. Fast is also relative, because flash memory has fast access times while hard disks are faster when reading sequential data. SuperFetch uses this information and stores small files on the flash memory, while loading the large files on the hard disk, ideally on sequential sectors.
Despite the fact ReadyBoost makes a difference on systems with low amounts of RAM, it doesn't use your USB flash drive as additional Random Access Memory, but as a faster storage device. The reason ReadyBoost does not seem to help very much on systems with large amounts of RAM is that the main memory is rarely full, so the hard disk is not accessed too often. Knowing that, we can understand the reason why ReadyBoost is not enabled on computers using Solid State Drives (SSD): it can't improve performance when using fast storage devices.
The limitations of the ReadyBoost technology
ReadyBoost can use any type of flash memory (USB flash drive, SD card, CompactFlash) that has an access time of 1 ms or less and at least 2.5 MB/s in read speed and 1.75 MB/s in write speed.
In Windows 7 and later Windows operating systems, ReadyBoost can use up to 8 USB flash drives, not smaller than 256 MB each, with a maximum of 32 GB storage each and a total flash storage of 256 GB.
If you want to learn more technical details about ReadyBoost, please check this link on Wikipedia.
How to enable ReadyBoost in Windows
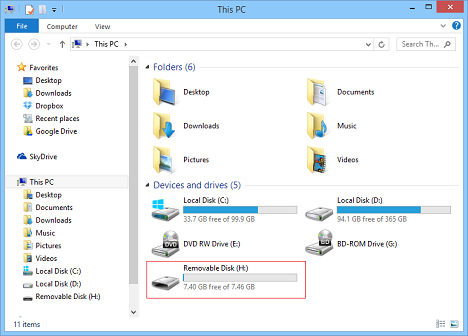
Insert the flash drive you want to use for ReadyBoost and start File Explorer (in Windows 8 or 8.1) or Windows Explorer (in Windows 7). In Windows 8 and 8.1, go to the This PC section, where you will see all the devices and drives that are available on your Windows PC or device. In Windows 7, go to the Computer section.
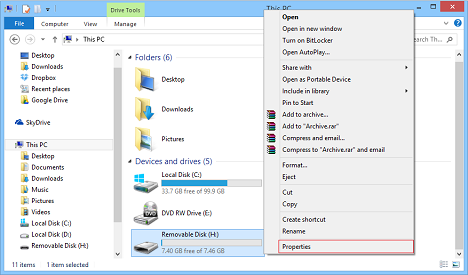
Then, right - click or press and hold the plugged in flash drive to open the contextual menu. Click or tap Properties, at the very bottom of the menu.
If you would like to use the ribbon in Windows 8 and 8.1, go to the Computer tab after selecting the removable drive you plugged in. Then. click or tap Properties in the Location section.
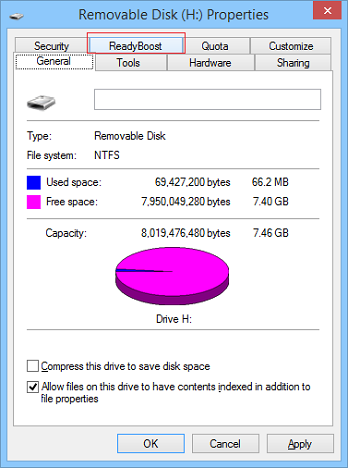
The Properties window opens for the select removable drive.
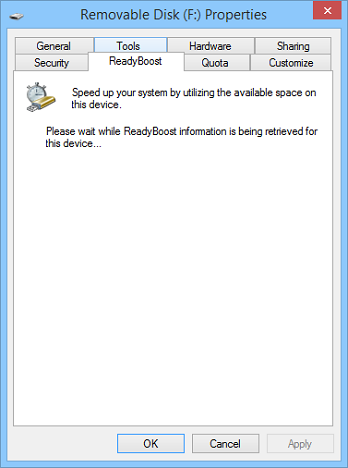
Here you can change lots of settings regarding this drive. To get to the ReadyBoost related options click or tap the ReadyBoost tab.
If your flash drive was inserted for the first time, the operating system will first test whether it is fast enough to be used by ReadyBoost or not.
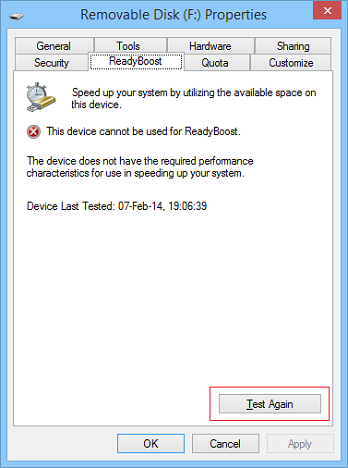
If this drive is not compatible with ReadyBoost, a message is displayed, sharing the reason why your device cannot work with ReadyBoost and the last time the device was tested. You can also test the flash drive again, if you think the previous test's results are not correct, by clicking or tapping Test again.
If you have a very fast PC or device, it is very likely that you will see a message saying that "ReadyBoost is not enabled because this computer is fast enough that ReadyBoost is unlikely to provide additional benefit".
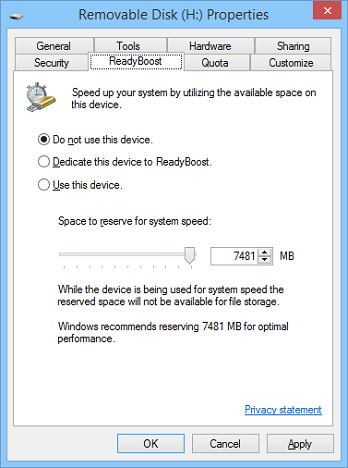
If your flash drive is compatible and your PC can benefit from using ReadyBoost, you get 3 options for using it on this drive.
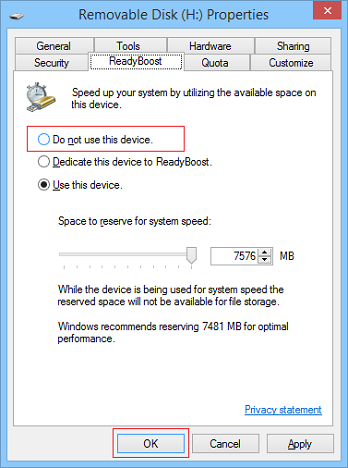
The default option when the device is not already used ReadyBoost, is "Do not use this device". As you can imagine, this option is for turning off the use of ReadyBoost.
To turn on ReadyBoost, you can choose:
-
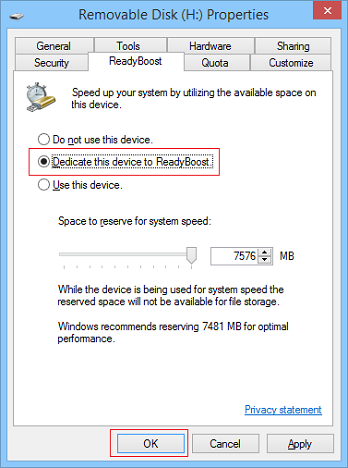
"Dedicate this device to ReadyBoost" - the entire remaining storage capacity of your flash drive is filled with cached files.
-
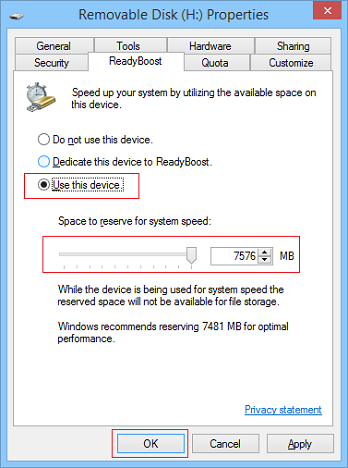
"Use this device" - you can choose how much storage you want ReadyBoost to use on this device, by using the slider below or by typing the amount of memory you want to use, in the corresponding box. Please keep in mind that you can't always use all the storage on your device for ReadyBoost, because there are also flash drives that contain both slow and fast memory, so only the fast part of your device can be used.
After you have made your choice, click or tap OK and wait until ReadyBoost configures your cache.
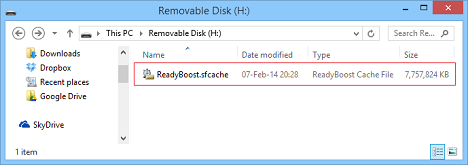
You device is now used by ReadyBoost. If you open your flash drive, you will see that the cached files are compressed into the ReadyBoost.sfcache file, that has the size you selected when you configured ReadyBoost. You can use your ReadyBoost flash drive just like any other device, you can still copy files on it if you have enough space left or you can delete any files, except the ReadyBoost.sfcache file that is currently used by your system.
If you eject your device when it is used by ReadyBoost, no errors will occur because the flash drive is only used for safe files. The worst thing can happen is that your system will become slow again. However, when you insert your flash drive again, it will still be used by ReadyBoost, with the settings used the last time ReadyBoost configured your device.
How to disable ReadyBoost?
If you don't want ReadyBoost to use your device anymore, you have to open the Properties window again.
Go to the ReadyBoost tab, click or tap "Do not use this device", then click or tap OK.
ReadyBoost configures your cache again, to work without your flash drive. When done, the drive will look just like any other removable storage device.
Conclusion
ReadyBoost was very useful when it was first made available in Windows Vista because, at that time, hard disks were slower than today and systems with more than 1GB of RAM were not that common. Today, most hard disks are fast enough to keep up with the rest of the system and 4GB of RAM is the norm even for affordable PCs or device. ReadyBoost won't make a huge difference on these systems. However, if you are using an older device, you can still use ReadyBoost to make your system run a bit faster.


 10.02.2014