Metered connections are essential for users with limited data plans, as they allow you to put limits on how much data you’re using. In Windows 10, you can set any Wi-Fi, Ethernet, or cellular connection as metered, and this setting helps you control data usage by limiting background data and postponing some non-critical updates. If you want to have a way to control how much data you’re using and benefit from a more cost-effective internet experience on a Windows 10 computer, read on. I’ll tell you more about what metered connections mean, how to enable one on your computer, and how to turn off a metered connection in Windows 10 when you no longer need it:
NOTE: This guide is about setting up and turning off metered connections in Windows 10. If you want to do the same on a Windows 11 device or an Android phone, check these guides instead: How to enable or turn off a metered connection in Windows 11 and How to check the data usage and limit it on Android.
What is a metered connection?
A metered connection means a network connection that has limited data usage per a specified period of time, like a month or day. If you go over its allotted amount, you may get billed extra. Landline phones were the first to offer this. Today, metered connections are mostly used when referring to smartphones and mobile devices with a cellular connection from a telecom provider. Most telecom providers offer monthly data plans of several (tens of) gigabytes, and when you exceed the limit, they automatically charge you for each gigabyte or megabyte.
A metered network connection
The same concept can be applied to other devices, including tablets (with Windows, Android, or iOS), hybrid devices, and more. Also, wireless network connections can be metered, especially public Wi-Fi networks that enforce all kinds of limits, including maximum data usage per day, week, or month. Sometimes, even wired (Ethernet) internet connections can be metered, like the ones found in some hotels.
What kind of connections can be set as metered in Windows 10?
In Windows 10, you can set any network as metered. This includes both Wi-Fi networks, Ethernet networks, and cellular connections.
What happens when a network is set as a metered connection in Windows 10?
When you set your active network connection as metered in Windows 10, the following things take place:
- Windows Update stops downloading most updates. Only the critical ones are automatically downloaded and installed. Instead, you get a Download button that you can use to install all the updates.
- Apps from the Microsoft Store are no longer automatically updated. However, desktop apps act as usual and are updated based on their settings.
- App tiles on the Start Menu may not update themselves automatically. The Windows 10 apps with live tiles on the Start Menu might not update themselves while connected to a metered connection.
- The peer-to-peer download of Windows updates is disabled. As long as you connect to a metered network, Windows 10 stops delivering updates in the background through peer-to-peer connections. This feature is also called Windows Update Delivery Optimization, and Windows 10 turns it off when you use metered connections.
- Apps may behave differently. Depending on the apps you’re using, some may stop downloading data in the background or update their data less often. For example, OneDrive stops automatically synchronizing your files in the background to save on bandwidth costs. This behavior varies from app to app, depending on how it was programmed.
Obviously, it’s always better to get an unmetered data plan, but unfortunately, sometimes you don’t have the option to do so. In such a case, you’ll want to know how to configure your Windows 10 device to treat a network as a metered connection. Here’s…
How to set a network as a metered connection
If you connect to a wireless network you want to set as metered, start by opening the Settings app and going to Network & Internet.
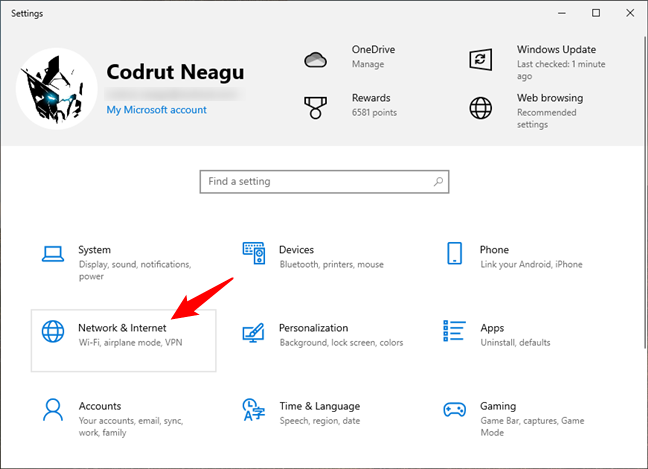
The Network & Internet category from Windows 10 Settings
Depending on the type of network you want to set as metered, select Wi-Fi, Ethernet, or Cellular in the left sidebar. I’ll take Wi-Fi as an example, as that’s what I’m using on both my laptop and desktop PC and what most people probably use, too. Just keep in mind that the next steps are the same for all three situations. Once you’ve chosen the type in the left sidebar, click or tap your network connection’s name on the right-hand pane of the Settings window.
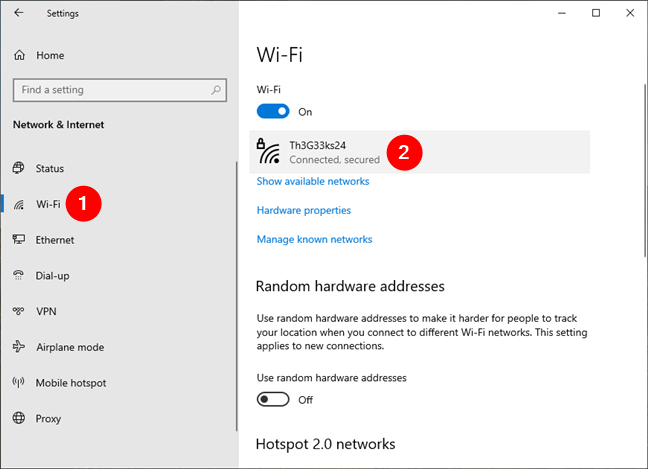
The Wi-Fi section in the Windows 10 Settings
Then, you see a summary of all the settings and properties of the network you are connected to. Scroll down and look for the Metered connection section.
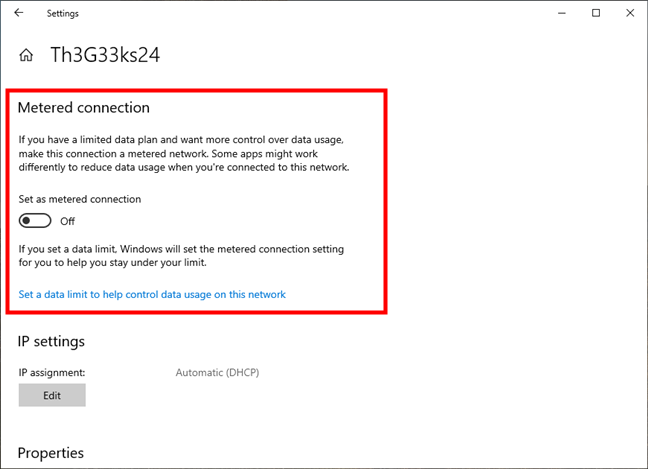
The Metered connection settings from Windows 10
Now turn On the “Set as metered connection” switch.
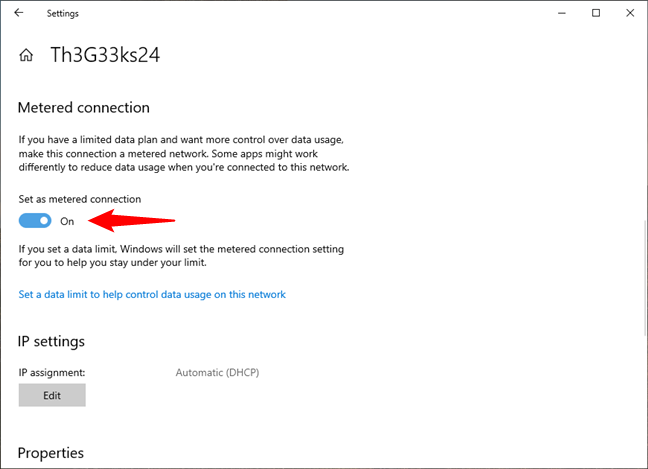
Setting a Wi-Fi connection as metered
After you’ve set your network as metered, you’ll likely want to configure its data limit too. This can be useful if you know how much data your internet plan allows you to use before having to pay extra. Here’s how that goes:
How to set a data limit for a metered connection
To enforce a data cap, click or tap the “Set a data limit to help control data usage on this network” link under the Metered connection switch.
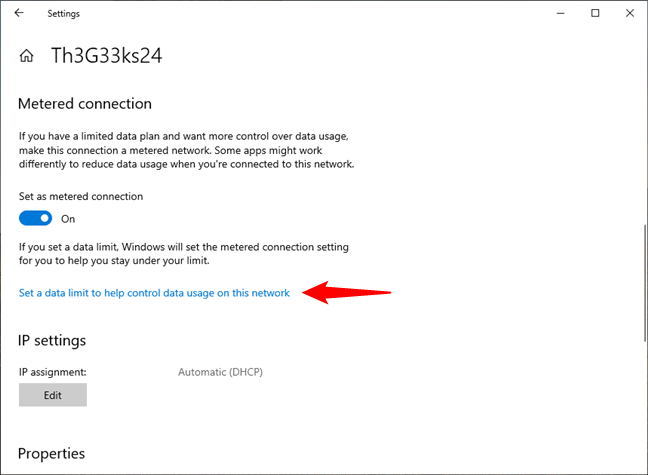
Set a data limit to help control data usage on this network
That brings you to the Status page from the Network & Internet section of the Settings. Here, click or tap the Data usage button under your network.
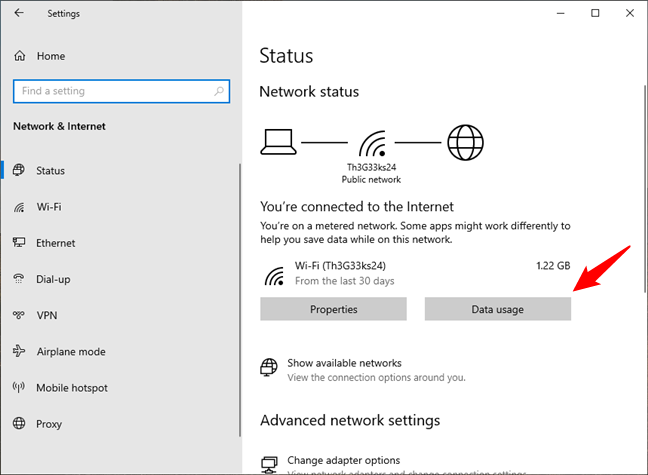
Click or tap the Data usage button
Then, you’ll see a page called Data usage, listing usage statistics for the apps on your computer. The apps are automatically sorted in descending order according to the bandwidth they used in the last 30 days. At the top of the list, there’s a button called Enter limit: click or tap it.
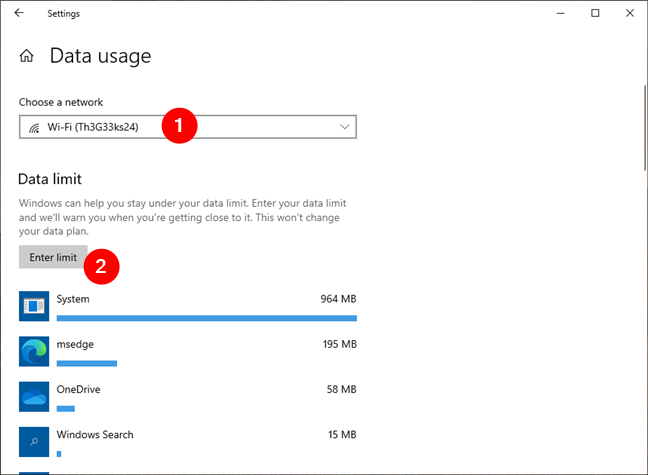
Press the Enter limit button
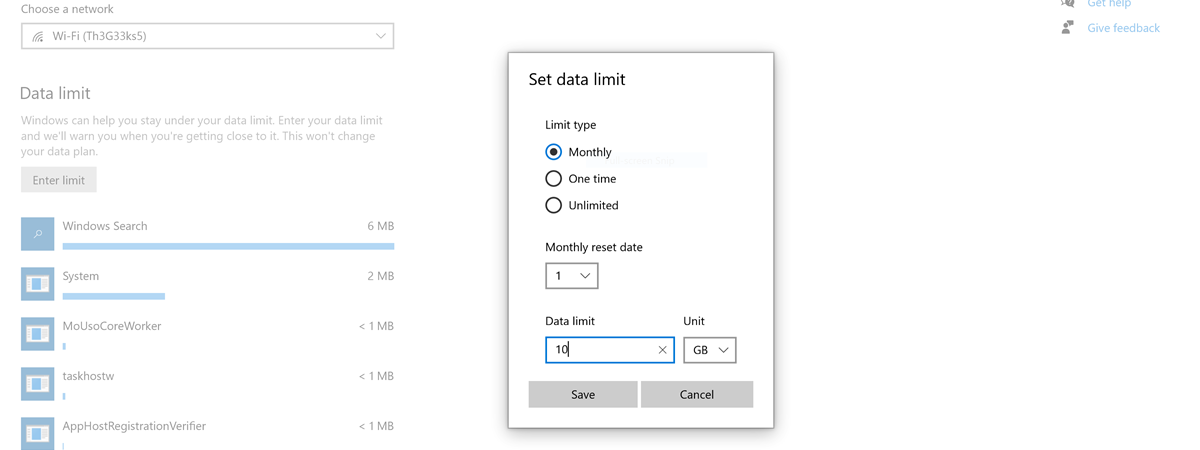
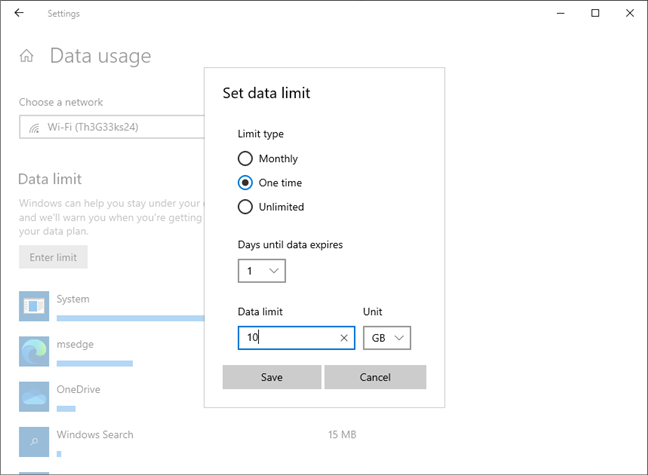
The previous action triggers a popup window where you can set a data cap for your connection. Select the type of limit (Monthly, One time, Unlimited), the reset date for monthly limits or the days until the limit expires, and the data cap number in megabytes or gigabytes. Be careful to input the correct data allowance in your internet plan to avoid extra charges for exceeding this limit. Then, when you’re done, press the Save button to apply the new limit for your metered connection.
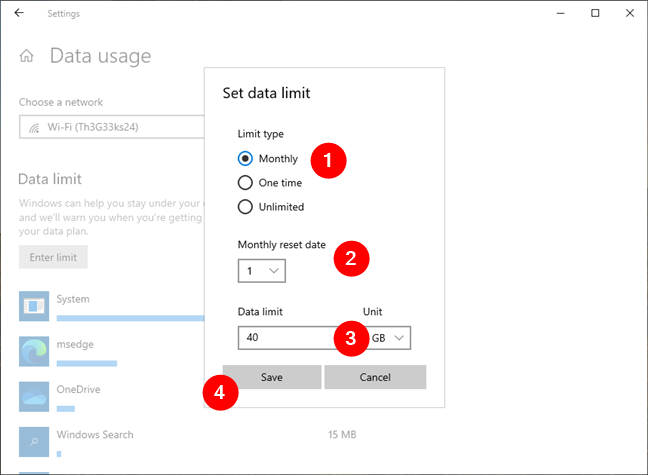
Set data limit for the metered connection
From now on, Windows 10 enforces the data limit you set, and the operating system will let you know when you’re close to reaching it.
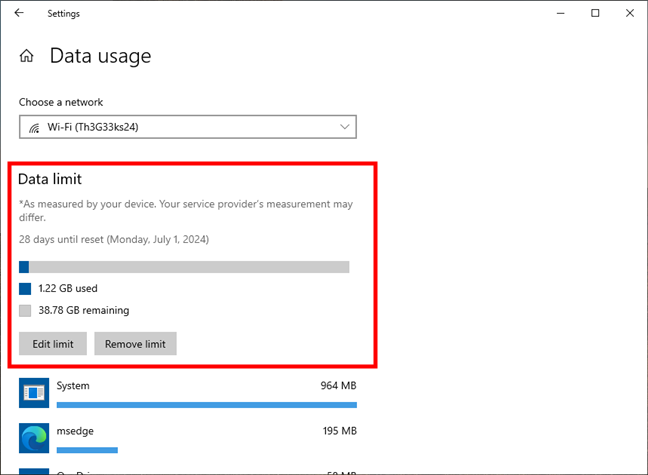
The Data limit is now set for the metered connection
TIP: Later, if you change your data plan to include more or fewer gigabytes, or if you no longer need to cap your usage, you can use the Edit limit or Remove limit buttons on this page.
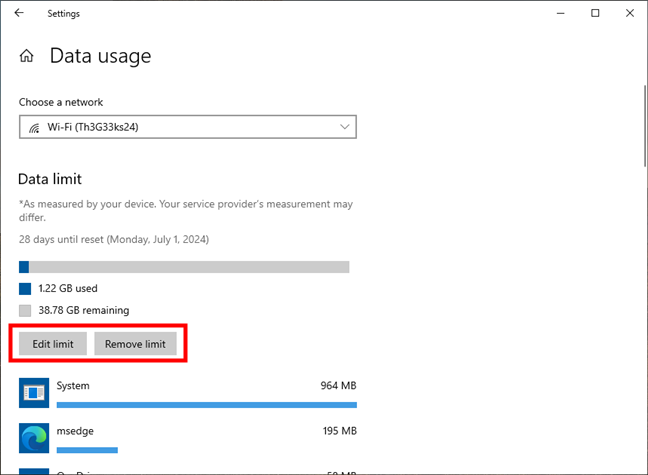
Edit limit or Remove limit for a metered connection
What about turning off a metered connection? Let’s see:
How to turn off a metered connection in Windows 11
If you no longer want a metered connection to be, well, metered, disabling this setting is quite easy. To begin, open Settings (Windows + I), go to Network & Internet, and make sure you’re on the Status page. Then, on the right-hand pane, click or tap the Data usage button under your metered connection.
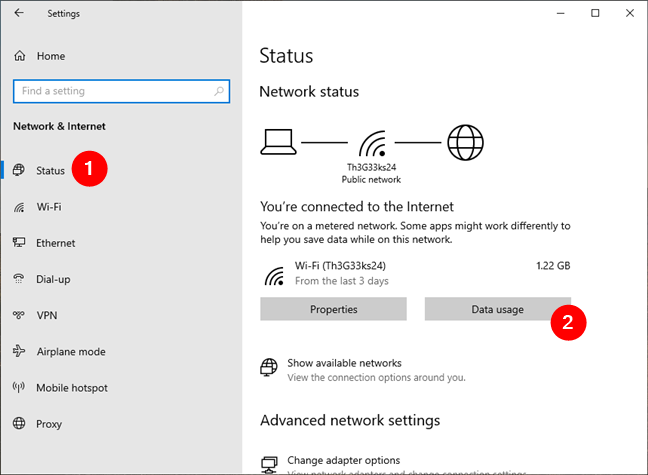
Access the Data usage settings
Next, on the Data usage page in Settings, click or tap the Remove limit button. This is a mandatory step to take. If you don’t do it, you won’t be able to disable the metered connection switch later, as it will be grayed out by Windows 10.
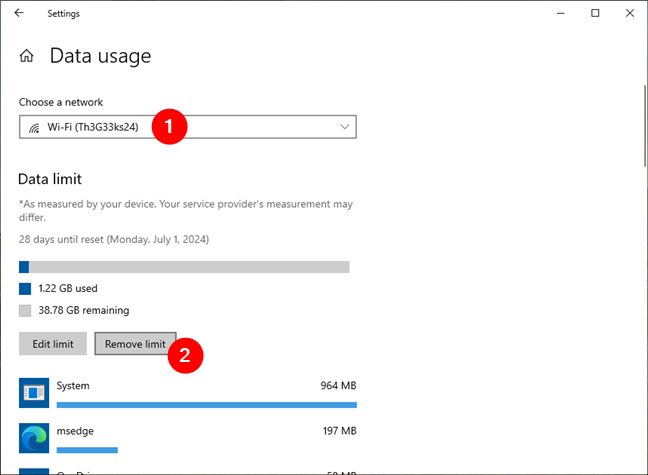
Remove limit for a metered connection
Windows 10 then asks you if you’re sure you want to eliminate the data cap for the metered connection. Choose Remove to continue.
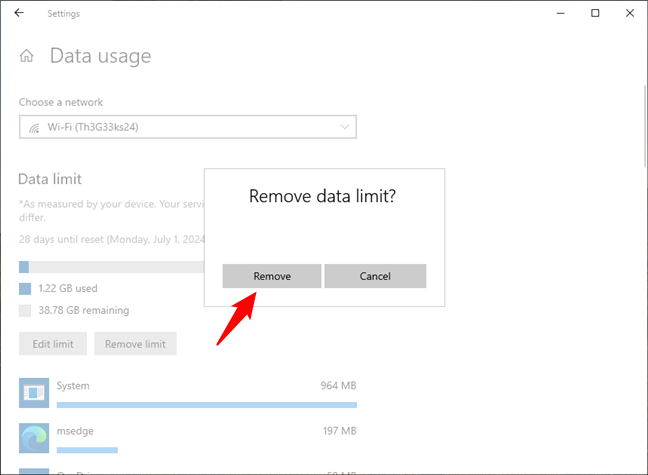
Confirm that you want to remove the data limit
Next, go back to the Wi-Fi, Ethernet, or Cellular page in the Settings app, depending on what type of metered connection you’re using. Once you’ve gotten there, click or tap its name.
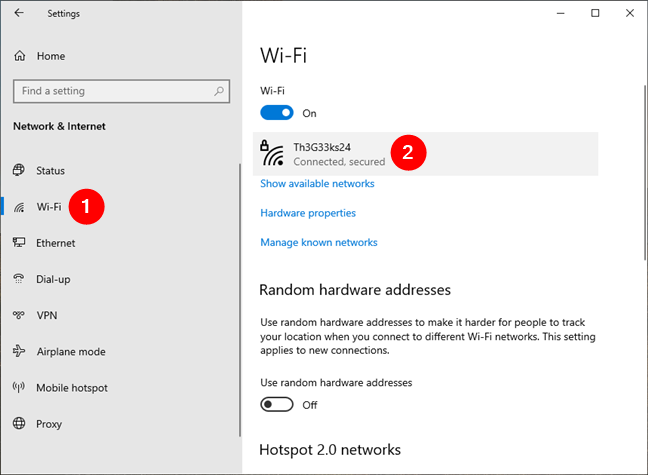
Go to the metered connection in Settings
As you want to turn off the metered connection, on the network’s page, find and make sure that the “Set as metered connection” switch is disabled.
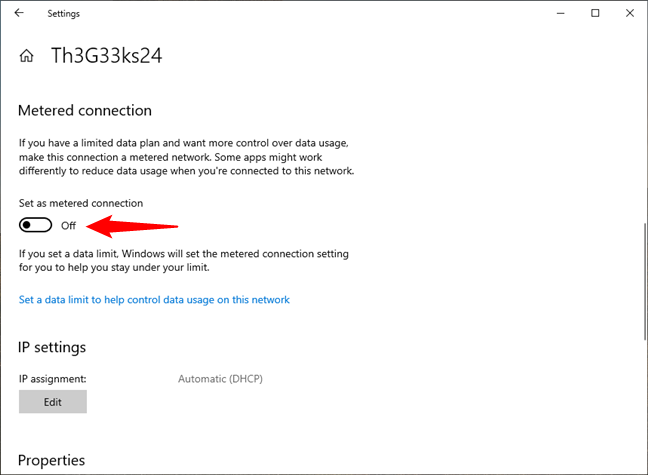
How to turn off a metered connection in Windows 10
That was it!
Do you have issues with metered connections in Windows 10?
Now you know what metered connections mean and how they can help you manage data usage on networks with limited internet traffic. You’ve learned how to enable and enforce data caps on metered connections, and you’ve seen how to turn off metered networks. These are all pretty straightforward processes with steps that should be easy to take for anyone. However, if you encounter any problems along the way, don’t hesitate to let me know in a comment, and I’ll do what I can to help you.


 05.06.2024
