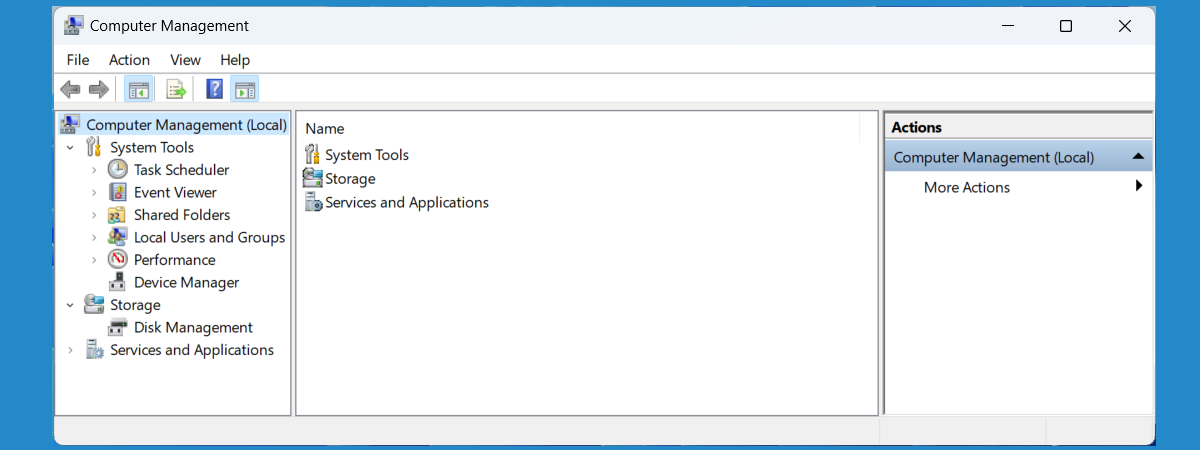
Device Manager is a useful tool that allows you to do things like: find unknown hardware devices, update drivers, disable hardware components from inside your computer, and so on. To use it, you must first know how to open it. To help you, we have compiled fourteen methods that you can use to open the Device Manager in Windows 10 and Windows 11, including using commands, shortcuts, and search. Here they are:
Preamble: You can see Device Manager as a standard user, but you can only use it as an admin
In both Windows 10 and Windows 11, you can open and view the information in Device Manager regardless of what type of user account you’re using. However, you can only work with the devices, change their properties, or add or remove devices if you have a user account with administrative rights. If you want to run Device Manager as an admin, then log in to Windows with an administrator account; otherwise, Windows warns you that “You can view device settings in Device Manager, but you must be logged on as an administrator to make changes.”

Opening the Device Manager in Windows while logged in with a standard user account
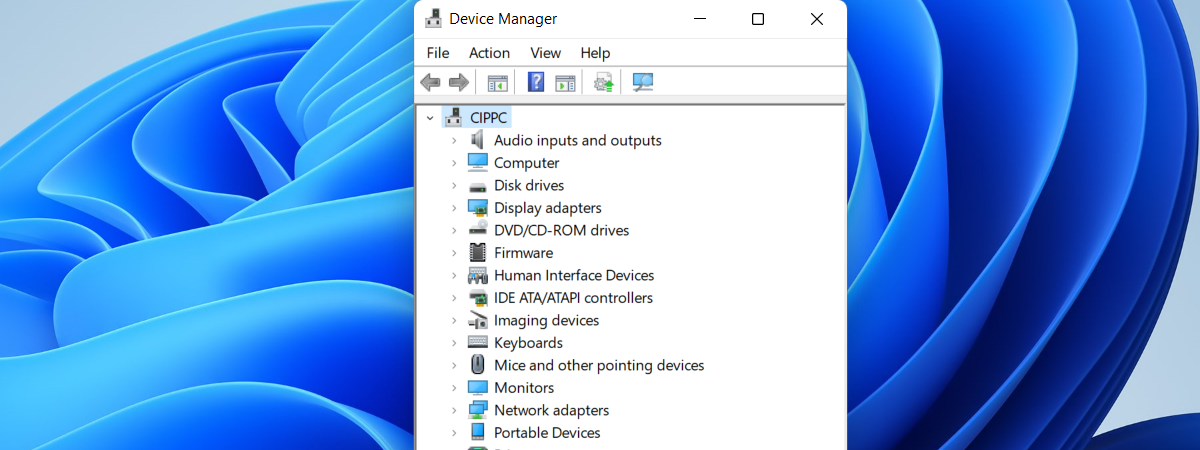
Before we show you all the methods we know for opening the Device Manager, here’s what it looks like in Windows 10 and Windows 11, so that you know what to expect:
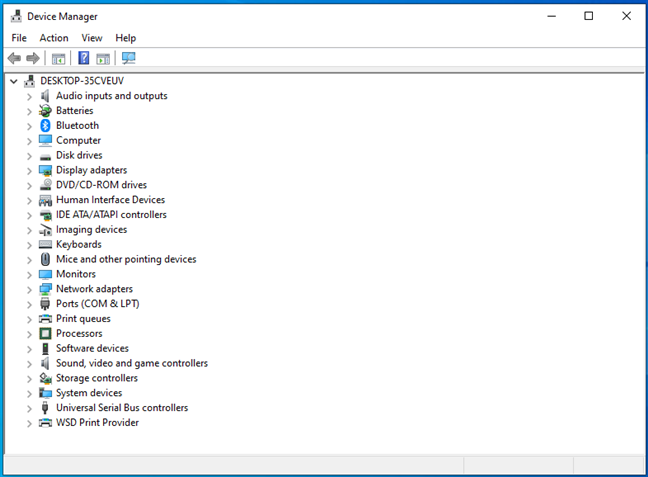
The Device Manager from Windows 10 and Windows 11
If you want to learn how to use it, read this guide: 7 things you can do with the Device Manager from Windows.
Now let’s get to work and see the ways in which you can open Device Manager, both in Windows 10 and Windows 11:
1. How to open the Device Manager using search
One of the fastest ways to run Device Manager in Windows 10 is by using the search box near the Start button. In it, type “device” or “device manager” and click or tap on the appropriate search result.
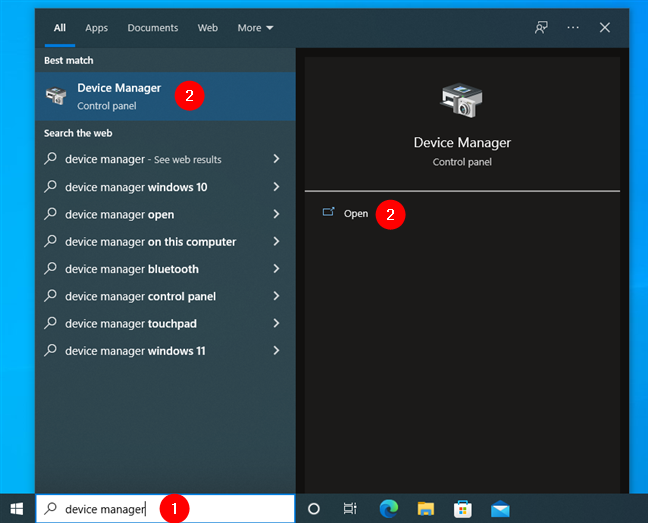
Searching for the Device Manager in Windows 10
In Windows 11, press the Windows key on your keyboard or click/tap the search button on your taskbar, type “device manager,” and press Enter or click the Device Manager search result.
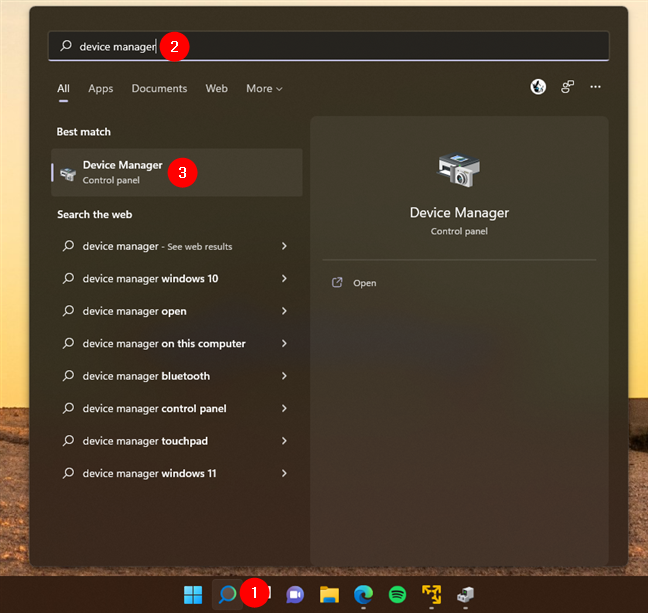
Searching for the Device Manager in Windows 11
TIP: Learn more about the search in Windows 11 from this guide: How to use Search in Windows 11.
2. How to launch the Device Manager from the WinX menu
Open the WinX menu by simultaneously pressing Windows + X on your keyboard. Alternatively, you can also right-click the Start button for the same result. Then, click or tap on the Device Manager shortcut. Here’s what it looks like in Windows 10:
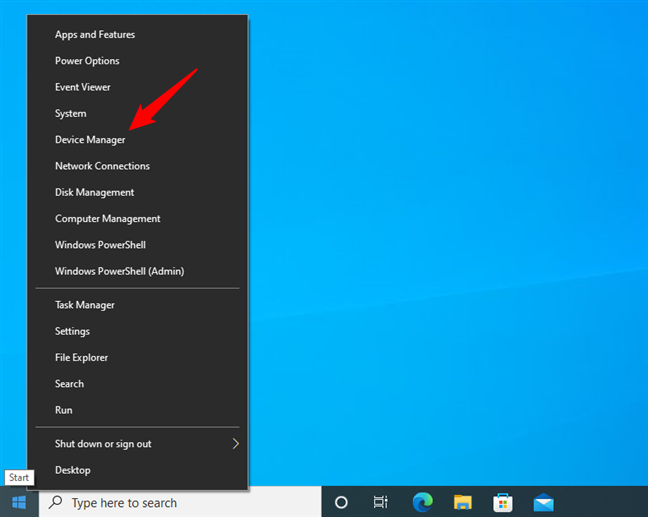
Opening the Device Manager from the WinX menu in Windows 10
…and where Device Manager is found in the WinX menu from Windows 11:
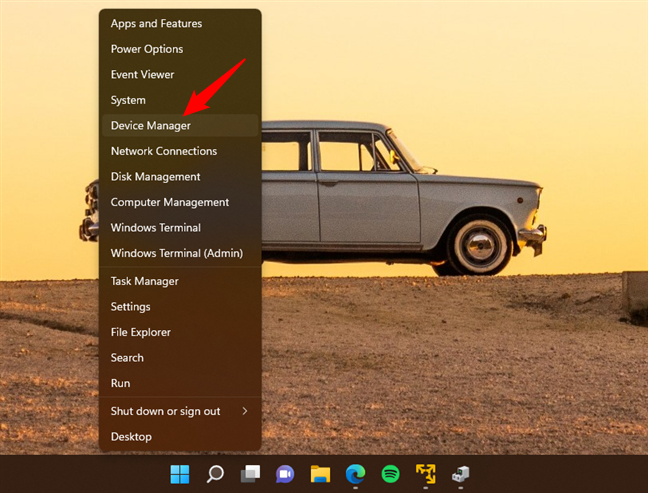
Opening the Device Manager from the WinX menu in Windows 11
3. How to start the Device Manager by running commands (in Terminal, PowerShell, or CMD)
If you prefer command-line environments, first launch Terminal, PowerShell, or open Command Prompt (also known as CMD). Then, in the window of your favorite app, type one of these three commands and press Enter:
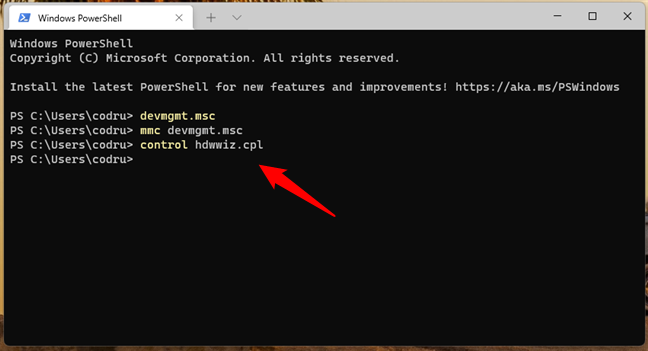
Device Manager commands
All these Device Manager commands work the same.
4. How to launch the Device Manager using Run commands
Open the Run window (press Windows + R on your keyboard), and then type one of these three commands in its Open field:
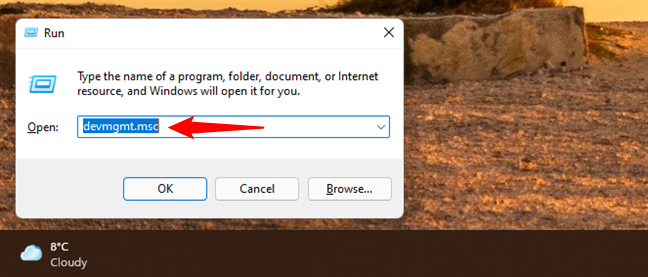
Run Device Manager
Once you’ve typed any of the three Device Manager commands, press Enter or click or tap on OK, and the Device Manager opens immediately.
5. How to open the Device Manager from Task Manager
You can also open Device Manager from the Task Manager. First, press Ctrl + Shift + Esc on your keyboard to launch Task Manager. If it opens up in its compact mode, press the “More details” button. Then, go to the File menu and click or tap on “Run new task.”
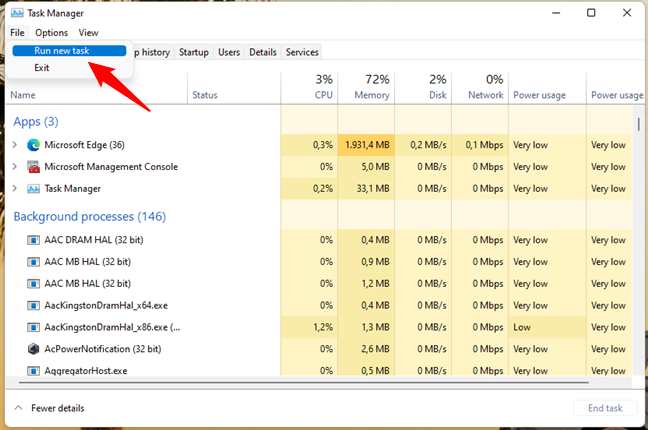
Run new task in Task Manager
Next, in the “Create new task” window, type one of the three commands we’ve shown you:
Finally, press Enter or OK, and Device Manager will immediately open.
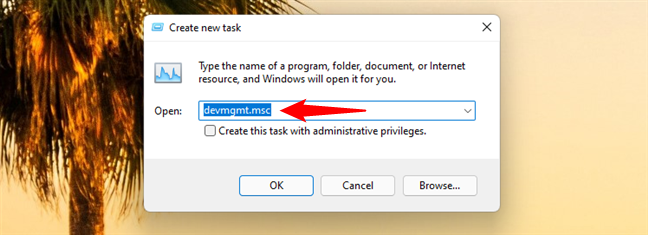
How to run Device Manager in Windows
6. Access Device Manager using our Device Manager shortcut
We’ve made one, if not the most extensive, collection of shortcuts for Windows. Download it, extract it, and you’ll find a Device Manager shortcut in the Windows Shortcuts -> Hardware and Sound subfolder.
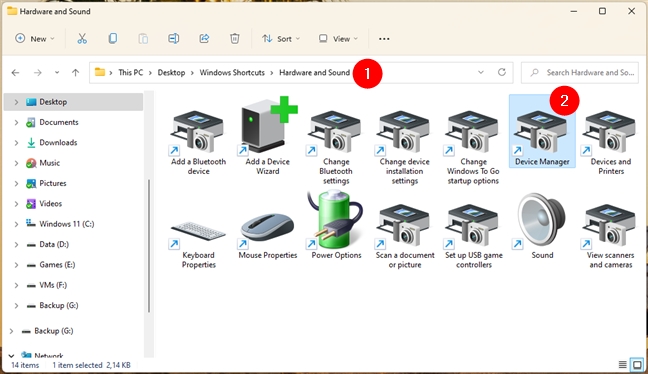
A Device Manager shortcut created by Digital Citizen
Place this shortcut wherever you want and use it as often as you need.
7. Create your own Device Manager shortcut
You can always make a shortcut that opens Device Manager. Follow the steps from this guide to start the Create Shortcut wizard, and when it asks you about the item’s location, enter devmgmt.msc. It doesn’t matter if you’re using Windows 10 or Windows 11, the resulting shortcut is the same, and it will open Device Manager in both cases.
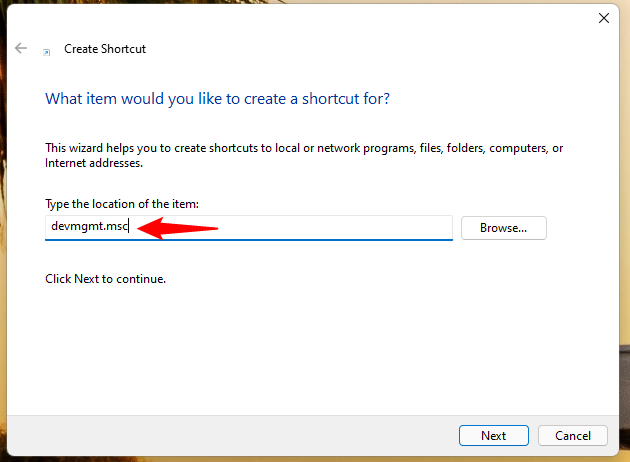
Create a Device Manager shortcut
8. Launch Device Manager using the devmgmt.msc file
As you’ve probably guessed from the previous method, the file that launches Device Manager in Windows is called devmgmt.msc. This means that you can use it directly by double-clicking (or double-tapping) on it to launch Device Manager. But where is it found? The answer: in the System32 subfolder of the Windows folder on your computer.
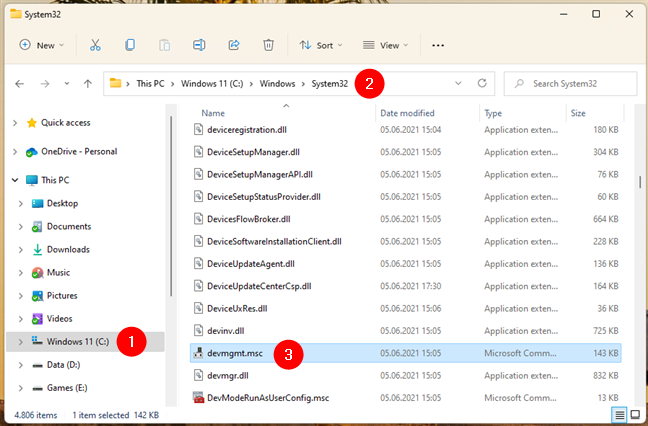
The location of devmgmt.msc in Windows
9. Pin Device Manager to the Start Menu or taskbar and use the shortcut to open it
If you intend to use Device Manager often, you might want to pin a Device Manager shortcut to your taskbar or Start Menu. And now that you know where the devmgmt.msc file is, you can do that. Go to the “Windows > System32” folder that we’ve shown you in the previous section, and locate the devmgmt.msc file. Then, right-click or press-and-hold on it.
Next, if you’re using Windows 10, in the context menu, click or tap on “Pin to Start” or “Pin to taskbar,” depending on where you want to pin Device Manager.
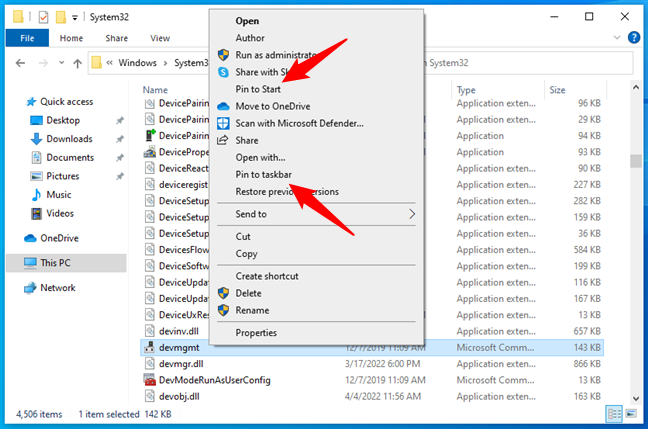
How to pin Device Manager to Windows 10's taskbar or Start Menu
If you’re using Windows 11, in the context menu, click or tap on “Pin to Start” if you want to pin Device Manager to your Start Menu.
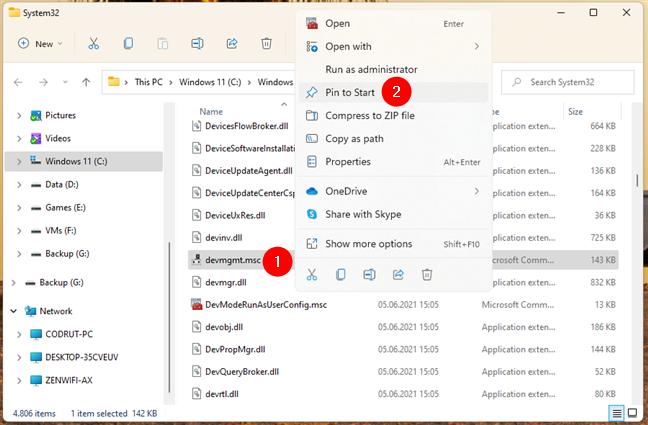
How to pin Device Manager to Windows 11's Start Menu
If you want to pin it to your taskbar, in the context menu, select “Show more options” first.
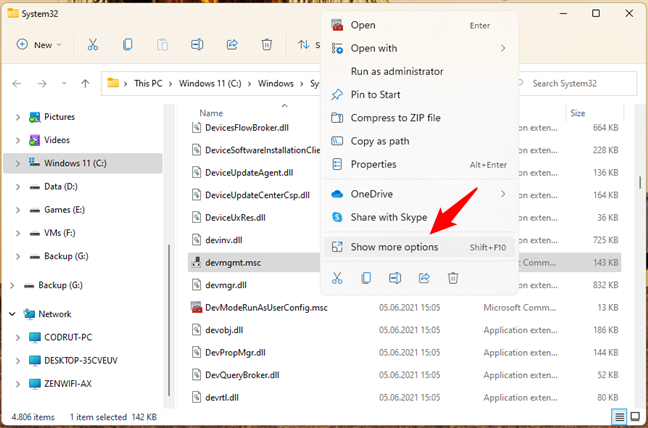
Show more options in Windows 11's context menu
Then, in the expanded Windows 11 context menu, choose “Pin to taskbar.”
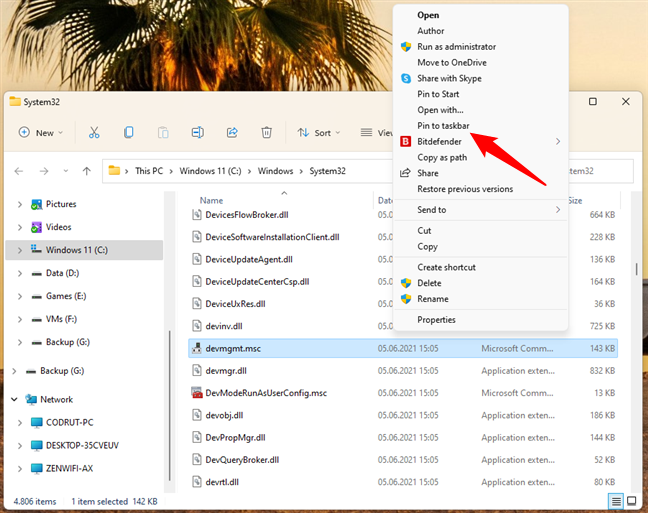
How to pin Device Manager to Windows 11's taskbar
10. How to open the Device Manager from Windows Settings
Windows 10 and Windows 11 alike also let you open the Device Manager from the Settings app. In Windows 10, open Settings and navigate to “System > About.” Then, scroll to the bottom of the page, and click or tap the Device Manager link under Related settings.
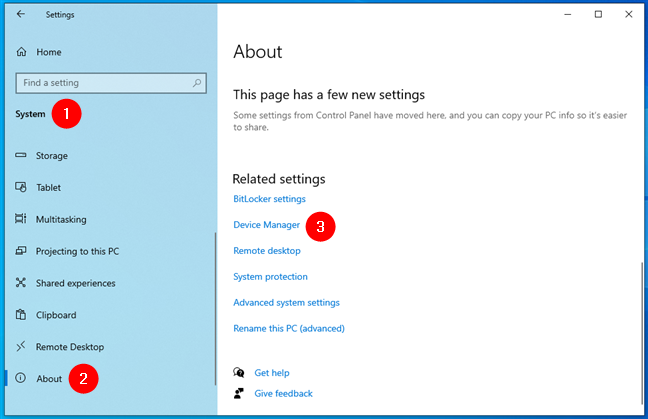
Device Manager shortcut in Windows 10's Settings
If you’re using Windows 11, launch Settings (Win + I), and make sure that System is selected on the left sidebar. Then, click or tap About on the right side of the window, scroll down, and press the Device Manager link found in the Related settings section.
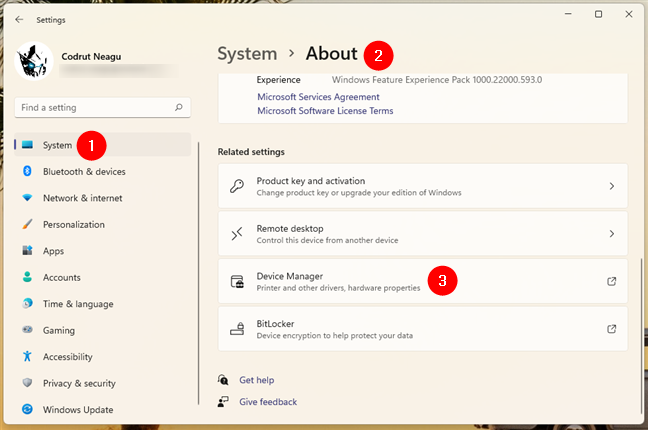
Device Manager shortcut in Windows 11's Settings
11. Run the Device Manager from Control Panel’s Devices and Printers section
If you like the old-style Control Panel, open it and navigate to its Hardware and Sound settings category. Then, click or tap the Device Manager link found under Devices and Printers.
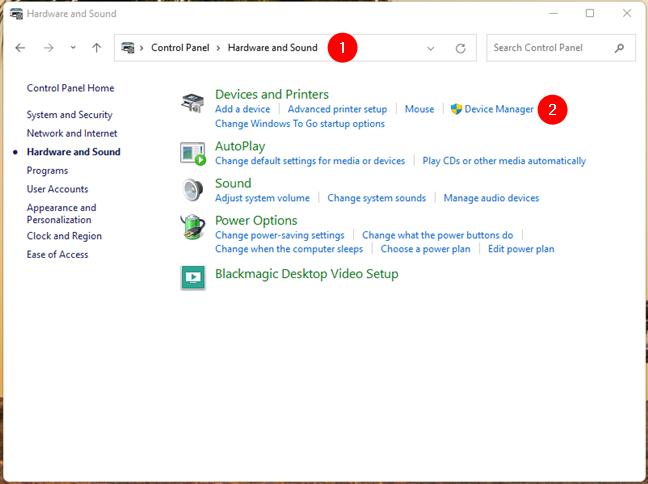
Device Manager shortcut in Control Panel
12. Open the Device Manager from the Control Panel using its icons view
There is also another method of accessing the Device Manager using the Control Panel. After opening the Control Panel, click or tap “View by Category” in the top-right corner. In the drop-down menu that opens, choose Large icons or Small icons, depending on what you prefer.
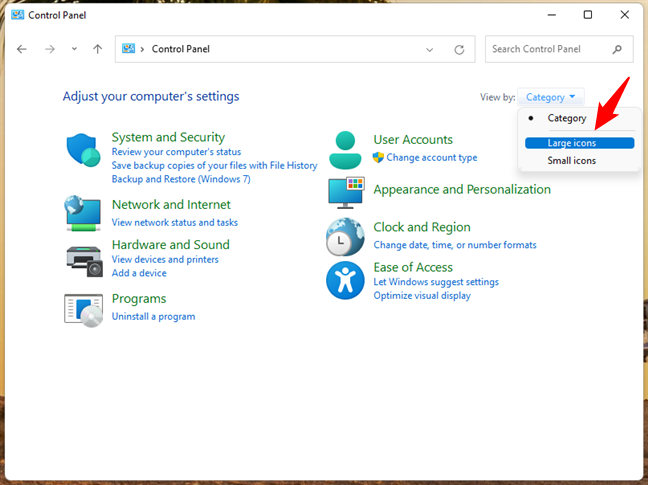
Icons view in Control Panel
You are shown a list of shortcuts, and one of them is Device Manager. Click or tap on it.
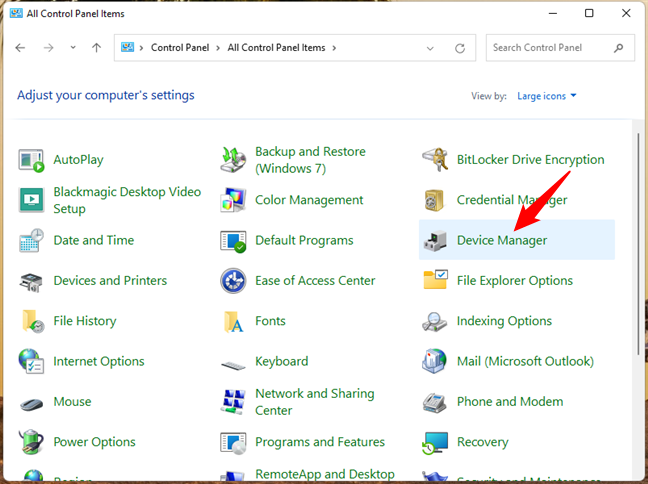
Device Manager shortcut in the icons view from Control Panel
13. How to open the Device Manager from Computer Management
You can access the Device Manager from inside another Windows tool named Computer Management. Open Computer Management and, in the navigation pane on the left, select Device Manager under “Computer Management -> System Tools -> Device Manager.”
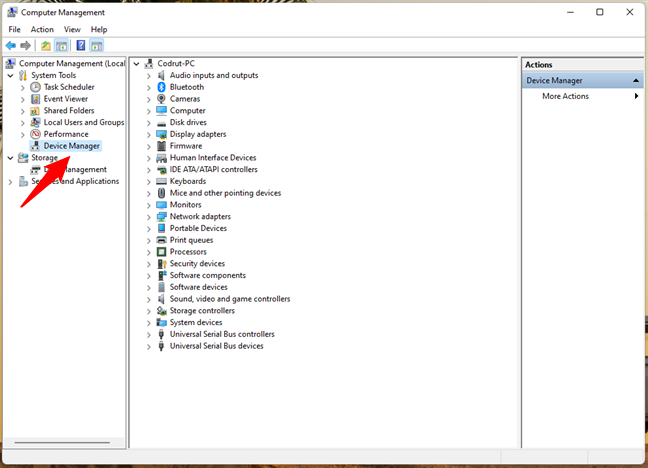
The Device Manager in Computer Management
14. How to launch Device Manager from This PC
The last method we know is based on using This PC. If you’re using Windows 10, open File Explorer and, on the navigation pane from its left side, right-click (or tap and hold) on This PC. Then, click or tap on Manage in the contextual menu that shows up.
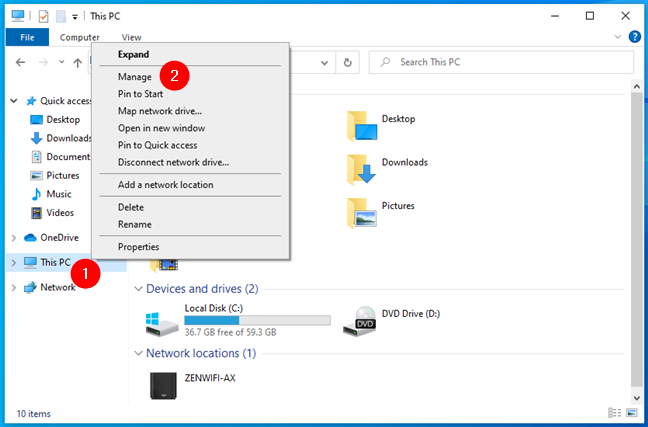
The Manage option from the right-click menu of This PC in Windows 10
The previous action opens Computer Management. All you have to do next is select Device Manager on the left side of the window.
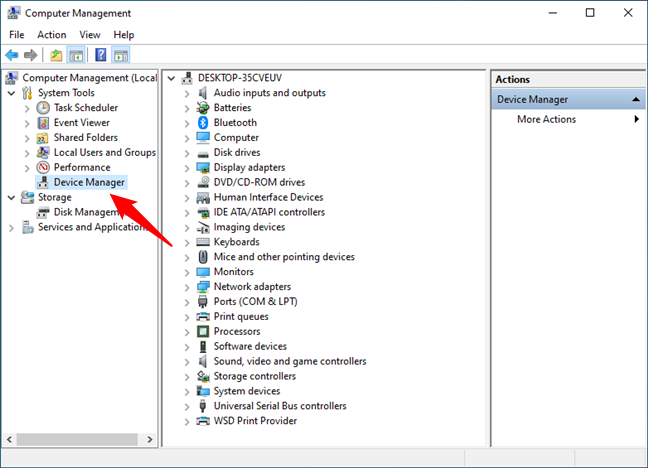
Device Manager in Windows 10's Computer Management
If you’re using Windows 11, in the navigation pane from File Explorer’s left side, right-click (or tap and hold) on This PC. Then, expand the context menu by clicking or tapping on “Show more options.”
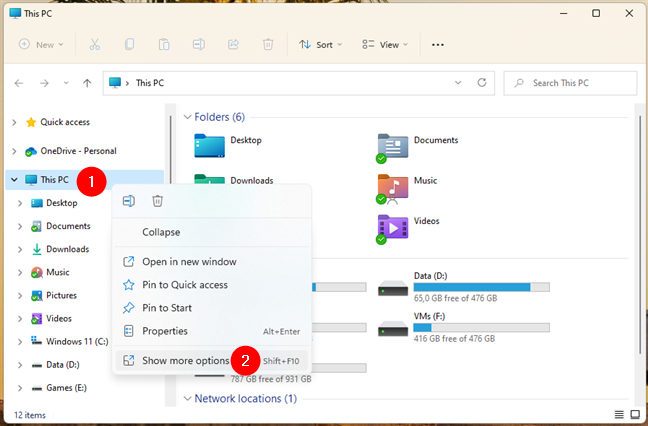
Show more options for This PC in Windows 11
Finally, click or tap on Manage in the expanded right-click menu.
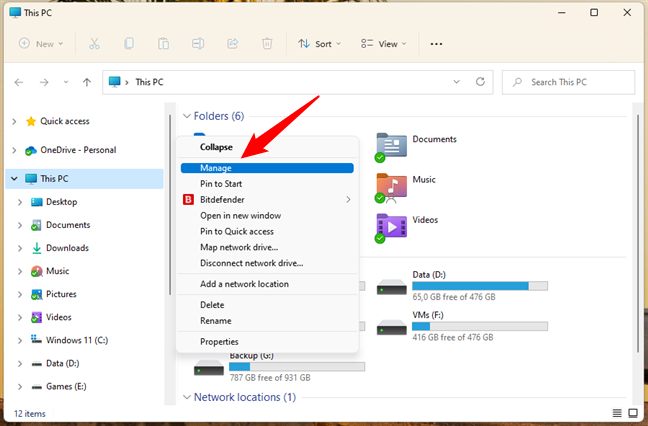
Manage in the expanded context menu from Windows 11
Then the Computer Management opens. In it, select Device Manager on the left navigation panel.
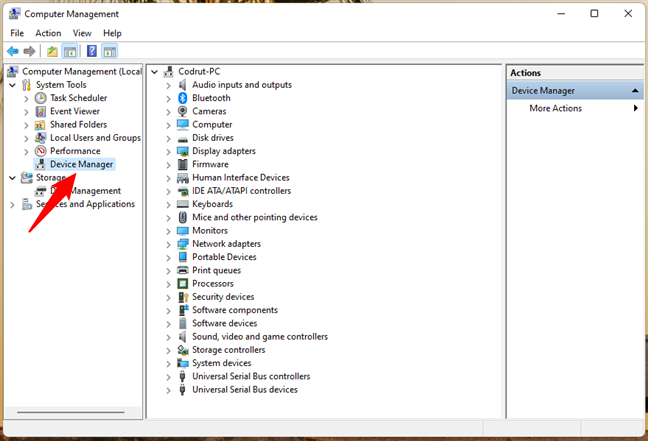
Device Manager under Computer Management in Windows 11
Neat, right?
Which method for opening the Device Manager do you prefer?
Now you know that you can only run the Device Manager as admin, and you know several methods of launching it. Try them out, and let us know which one is your favorite. Also, if you know other ways of opening the Device Manager, don’t hesitate to share them in a comment below. We promise to update this guide based on your feedback.


 13.04.2022
