Windows 11’s Task View is a powerful feature that lets you manage multiple app windows across different virtual desktops. With it, you can organize your work into separate categories and also switch between them easily. In this article, I’ll tell you more about what Task View is, how to access it using its dedicated taskbar button, and how to open Task View with a keyboard shortcut. I’ll also show you how to use Task View to boost your productivity in Windows 11. Without further ado, here’s how to use and customize Task View in Windows 11:
What is Task View in Windows 11?
Task View is a feature that was introduced with Windows 10, present in Windows 11, too, which is designed to enhance multitasking. It enables you to access and organize your open apps and windows. This also includes the ones found across multiple virtual desktops, which are separate workspaces that you can create and switch between.
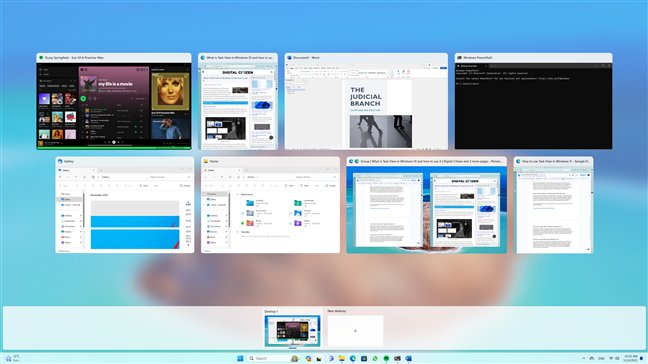
Task View in Windows 11
If you’ve used Windows 10, you might remember that you could also use Task View to resume past activities that you started on any device connected to your Microsoft account, such as browsing a website or editing a document. In Windows 11, Task View no longer includes Timeline, focusing instead on giving you quick and easy access to your open apps and virtual desktops.
How to open Task View in Windows 11
Now you know that the Task View screen lets you see and manage your open windows and virtual desktops. But how do you access it? There are two methods, and they’re both pretty straightforward:
How to open Task View from Windows 11’s taskbar
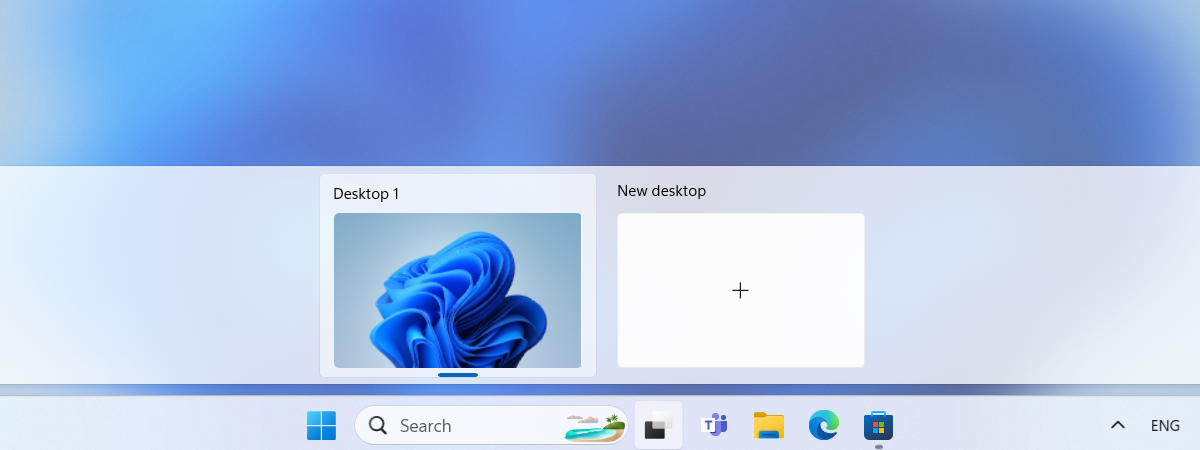
You can find the Task View button on the taskbar. It’s right next to the Windows Copilot or the search field on your taskbar. Task View’s icon shows two rectangles (black & white) stacked together. To open Task View, just click or tap on this button.

The Task View button in Windows 11
This immediately makes Windows 11 show the Task View interface, where you can see and manage your virtual desktops and windows.
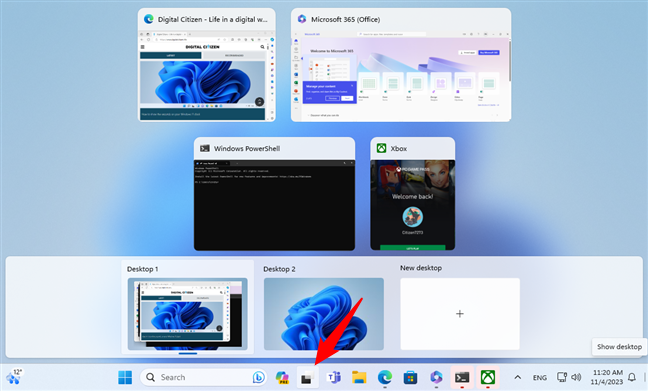
What happens when you click the Task View taskbar icon
If you don’t see Task View on Windows 11’s taskbar, you need to ensure the button for it is enabled. In some situations, the button may be hidden or disabled, but you can enable it easily by following these steps:
Find an empty space on the taskbar and right-click on it. Alternatively, you can press and hold on the taskbar if you are using a touchscreen device. A menu will pop up with two options: Task Manager and Taskbar Settings. Click or tap the latter to access the taskbar’s customization settings.

Access the Taskbar settings
This opens the Settings app on the Personalization > Taskbar page. Here, look for the option called Task View and enable the switch to its right.
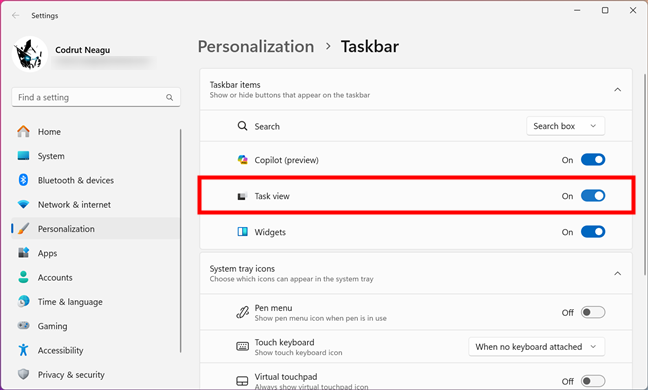
Enable the Task view button
The Task View button will now appear on the taskbar, next to the search box or Windows Copilot icon.
TIP: Here are more details on how to add or remove icons or apps from the Windows 11 taskbar.
How to open Task View using a keyboard shortcut
Windows 11 also allows you to access Task View using only your keyboard. In case you were wondering what is the shortcut for opening Task View in Windows 11, it’s this:

The Task View keyboard shortcut in Windows 11
Simply press and hold the Windows key and then tap the Tab key on your keyboard. Just like when using the Task View shortcut on the taskbar, this keyboard shortcut will bring up the Task View screen, where you can see all your windows and desktops in a thumbnail view.
How to use Task View in Windows 11
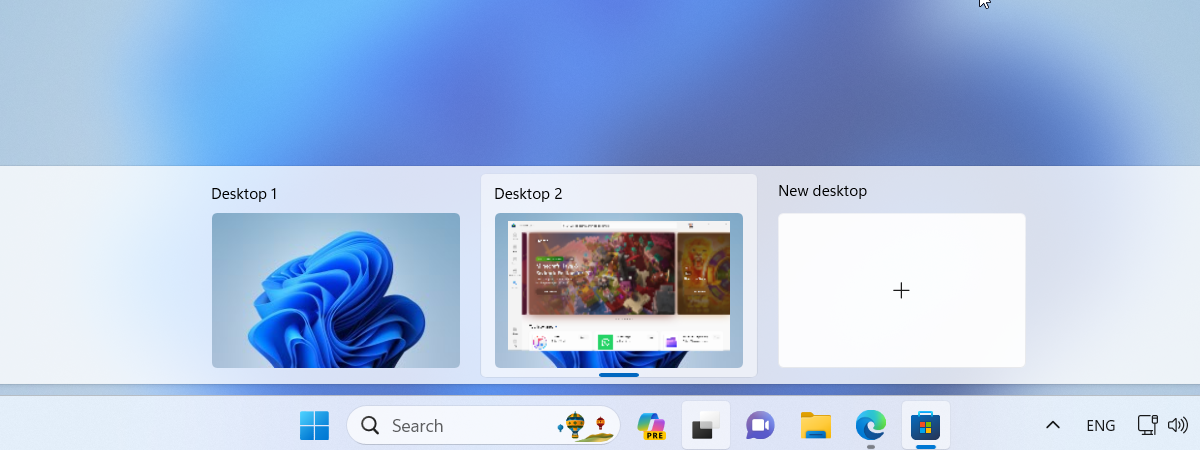
The main purpose of Task View is to allow you to get a quick overview of your open apps and easily switch between them. When you open the Task View, you see a thumbnail preview of all your open windows, as well as all the virtual desktops you have created on your Windows 11 computer.
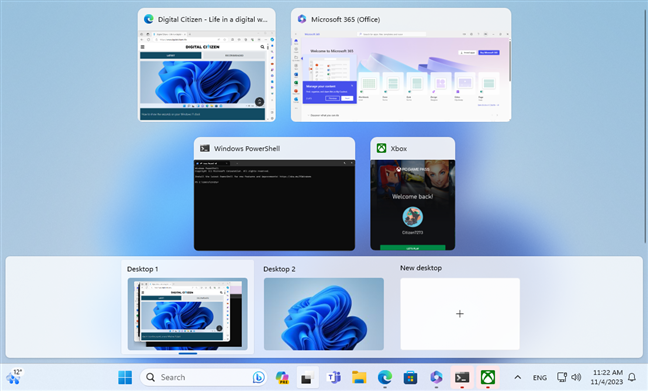
Task View gives you an overview of your apps
How to use Task View in Windows 11 to focus on an app
To select the window you want to work on, you can use your mouse to click on it or simply tap on it if you have a touchscreen.
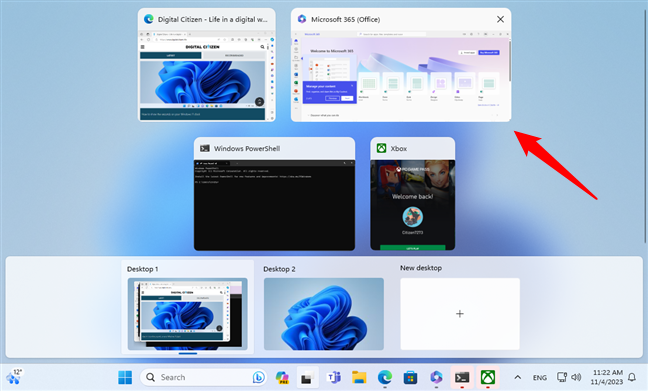
Using Task View to focus on an app
Alternatively, if you prefer using your keyboard over your mouse or touchscreen, you can press the arrow keys on your keyboard to move the highlight over the app. Once the window you need is highlighted, press Enter on your keyboard to bring it into focus.
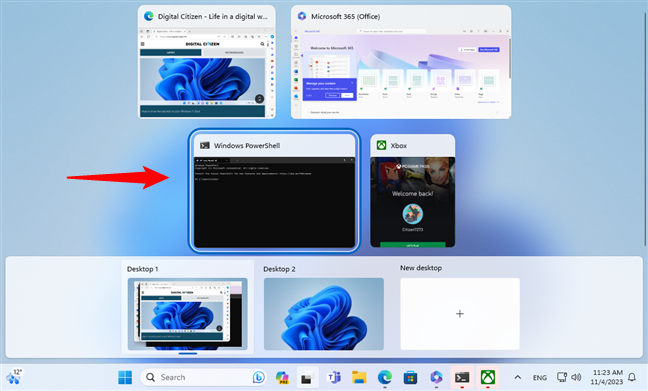
Switching between apps using the keyboard
How to use Task View in Windows 11 to switch between virtual desktops
Virtual desktops are a feature of Windows 11 that lets you create and manage multiple workspaces on your computer. Each virtual desktop can have its own set of open apps and windows, which you can switch between using the Task View screen. This can help you multitask more efficiently, as you can dedicate each desktop to a specific task or purpose.
For example, you can have one virtual desktop for your personal activities, such as browsing social media and chatting with friends, and another one for your work or school projects, where you have all the documents and tools you need. By using virtual desktops, you can reduce clutter and distractions on your screen and focus better on the task at hand. Virtual desktops are a great way to boost your productivity in Windows 11. If you’d like to know more about using them, I recommend reading this guide: How to use multiple desktops in Windows; it was written for Windows 10, but things are the same in Windows 11.
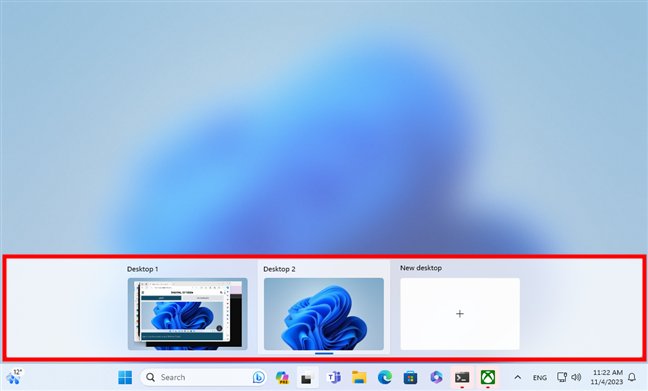
The virtual desktops are shown in Task View
To switch between different virtual desktops and access their open windows, move the mouse cursor over the desktop that you want to view. This will give you a preview of the app windows that are open on that desktop. You can then select the window that you want to work with by clicking or tapping on it.
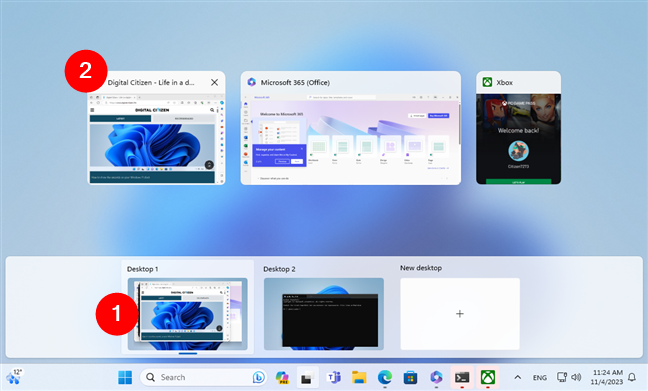
Switching to an app from a virtual desktop
This way, you can easily switch to any open app, even if you’re using multiple virtual environments on your Windows 11 computer.
How to snap windows and split screen with Task View
Task View also allows you to easily organize your windows on the current desktop by snapping them to the left or right side of the screen. To use this feature, on the Task View screen, you need to right-click or press and hold on the window that you want to snap. Then, select Snap left or Snap right from the context menu, depending on your preference.
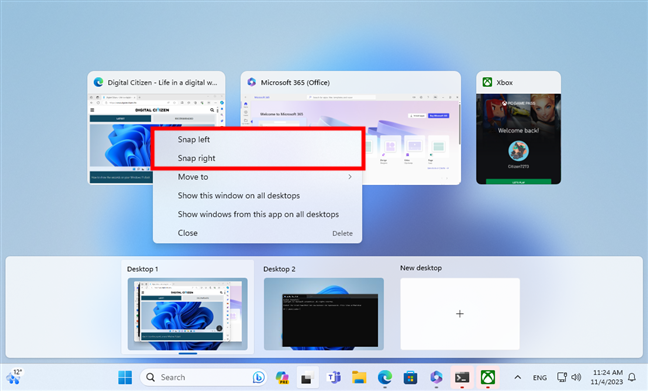
Snap a window using Task View
This resizes and positions the window to occupy half of the screen, leaving the other half available for another window.
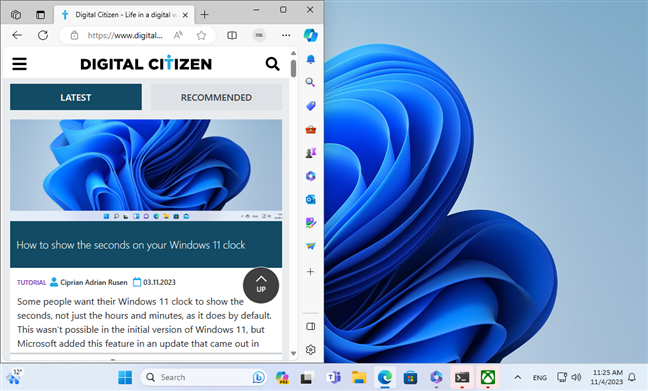
How snapping windows with Task View works
TIP: Here’s more insight on how to split screen on Windows 11 with Snap layouts.
How to use Task View to move an app to another virtual desktop
Windows 11’s Task View also lets you move an app from one virtual desktop to another. To do that, you can drag and drop its thumbnail from the current desktop to the desired one.
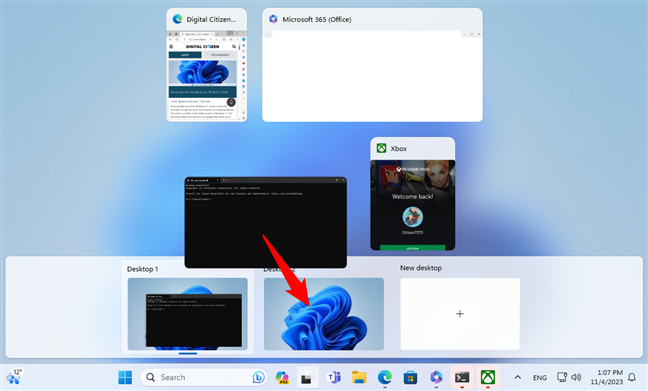
Using Task View to move an app to another virtual desktop
You can also right-click on the app thumbnail and select Move to > Desktop X, where X is the number of the virtual desktop.
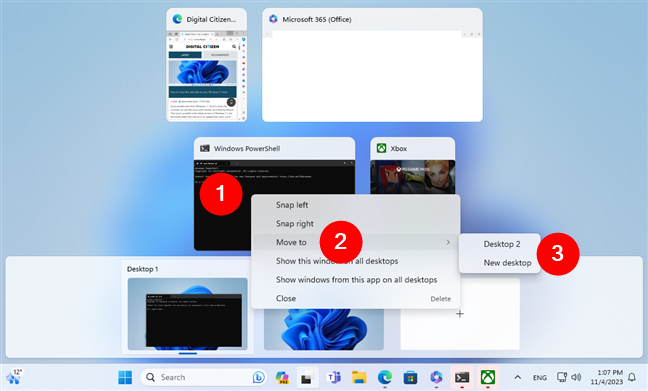
Moving an app to a virtual desktop using the context menu
How to use Task View to show windows on all desktops
To show an app’s window on all your virtual desktops, in Task View, right-click on the app thumbnail and select “Show this window on all desktops.” This will make that window visible on every virtual desktop you switch to.
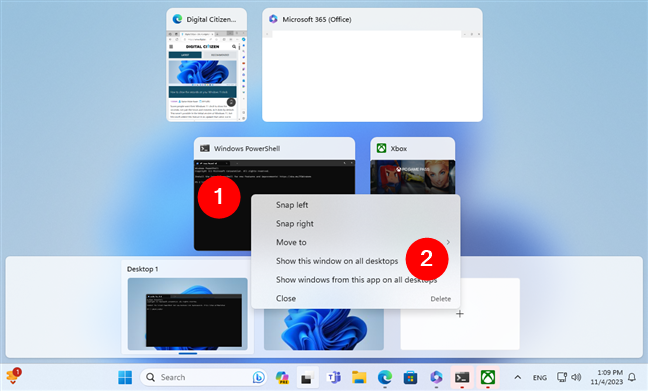
Show this window on all desktops
To show all the windows of a certain app on all your virtual desktops, the process is similar: right-click on the app’s thumbnail in Task View and select “Show windows from this app on all desktops.”
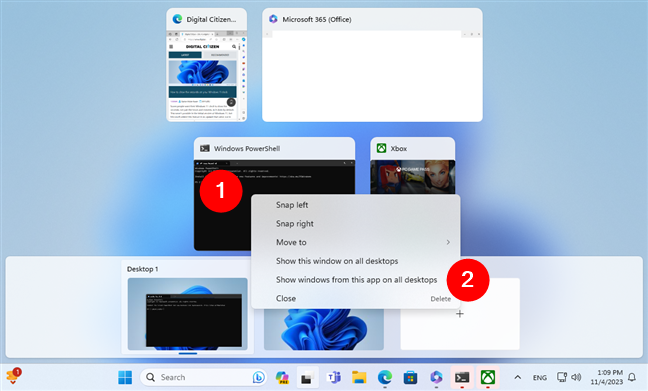
Show windows from this app on all desktops
How to close an app from the Task View
If you want to close an app while in Task View, hover your mouse over it. You will see a small X icon on the top-right corner of the app’s thumbnail. Click the X button to close the app.
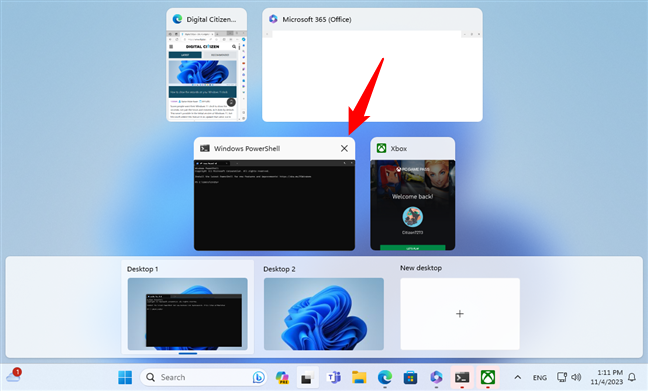
How to close an app from the Task View
You can also right-click the app thumbnail and select Close from the context menu.
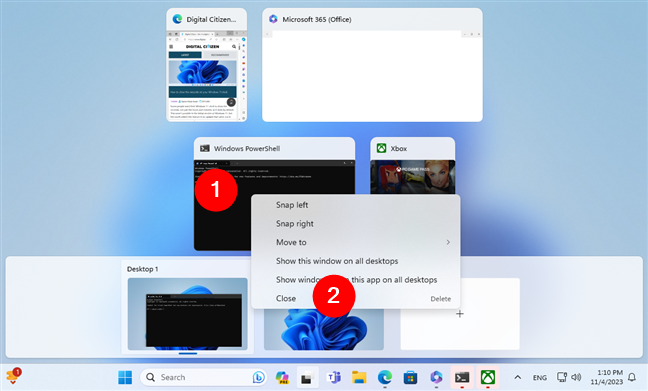
How to close an app using the Task View context menu
Be careful, though, not to close any apps that you are still using or that contain unsaved work. This can lead to unwanted loss of data.
Are you using Windows 11’s Task View?
Task View is a powerful and useful feature in Windows 11, one that helps you manage your work efficiently. You can use it to quickly focus on the apps you need to work with, as well as switch between your virtual desktops easily. What do you think about it? Do you make the most of Task View’s capabilities? Don’t hesitate to share your opinions and feedback in the comments.


 21.11.2023