Do you need to know when you installed Windows on your computer? You may require this information for work or you may want it just to brag about how stable your operating system is after all these years of abuse. Or perhaps you just don’t want your Windows to run for more than six months without reinstalling it. Whatever the reason, here’s how to check the Windows installation date:
Things to keep in mind when checking the Windows installation date
Before I show you how to find the installation date of your Windows, there are a couple of things you should be aware of:
- While the screenshots in this tutorial are made in Windows 11 and Windows 10, the commands shared in this guide work for all modern Windows versions, including Windows 7 or Windows 8.1.
- If you made a clean Windows install, from scratch, without applying any major updates, all the methods in this tutorial work and deliver good results.
- When you install Windows 10 or Windows 11, the operating system retains its correct installation date. However, when you install a major update like Windows 10 version 22H2 or Windows 11 version 22H2, the build number changes, and the installation date is changed to the date when the latest major update/build was installed. The same change to the installation date happens when you upgrade your old version of Windows to a newer one, like installing Windows 11 as an update to your old Windows 10. Because of this, most of the methods in this guide give you the installation date of your current version. To find out when the first Windows installation was made, skip to the BONUS section at the end of this article.
1. How to check the Windows installation date from CMD, PowerShell, or Windows Terminal
Many similar guides on the internet recommend you to open Command Prompt, type this command, and press Enter:
You can also use PowerShell or Windows Terminal to run this command, not just CMD. Unfortunately, it returns tons of data, and finding the Original Install Date field is tricky. However, it is there, alongside other information like the Windows version you’re using, registered owner, or processor used.
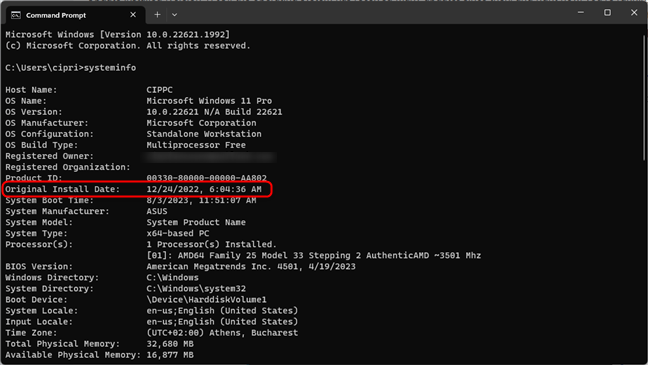
Running the systeminfo command
If you want this command to display only the operating system’s (OS) installation date, use the following variation of it:
After you press Enter, it displays only the Original Install Date field, showing you the exact date and time when Windows was installed or upgraded on your computer.
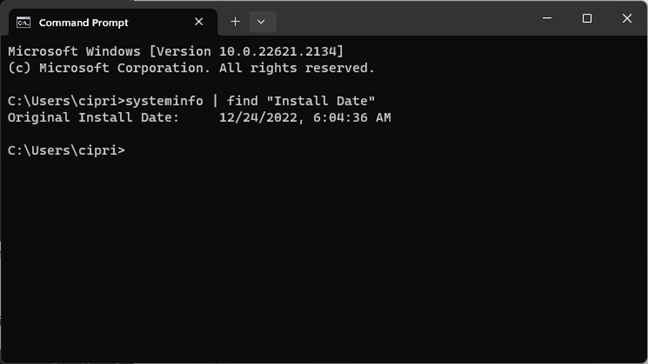
How to check the Original Install Date
Also, an equivalent command is:
However, the way it displays the Windows installation date is not helpful. It first displays the year, then the month, then the day, followed by the exact time when it was installed, all one after the other, without any spaces.
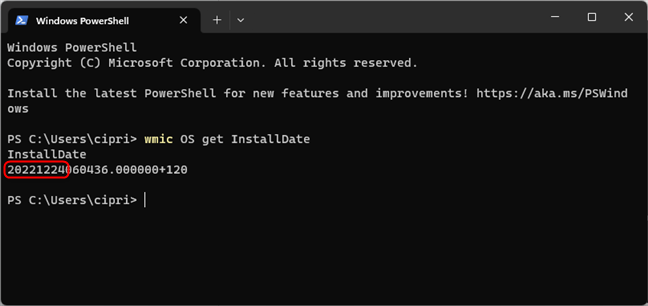
The install date is not easily readable with this command
If you compare the screenshot above with the one prior to it, you can make out the same installation date. Because of this formatting issue, I don’t recommend this command, and I avoid using it.
2. How to check the Windows installation date in the Settings app
Both Windows 10 and Windows 11 display their installation date in their Settings app. Here’s how to find this information, first in Windows 10, and then in Windows 11:
2.1. When did I install Windows 10? Where to check in the Settings app
The OS installation date can be checked by opening Settings (Windows + I). Go to System > About. On the right side of the Settings window, you should see a section named Windows specifications. There, look for the line that says “Installed on,” followed by the installation date.
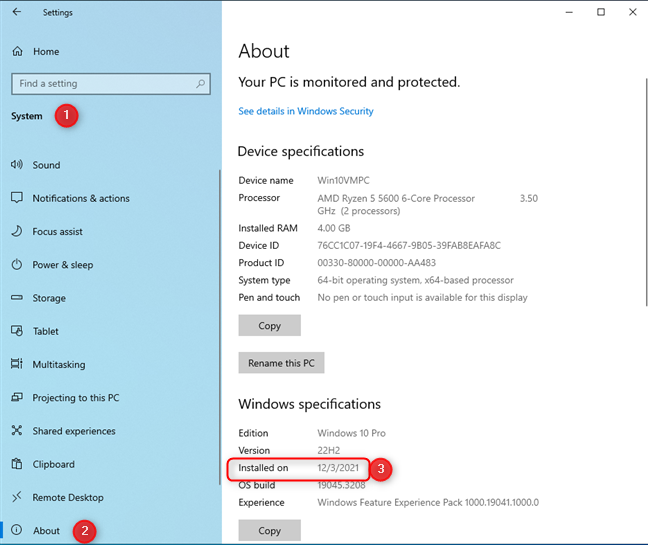
Checking the Windows 10 installation date
You can even press the Copy button and have this information stored in the clipboard to paste it elsewhere.
2.2. When did I install Windows 11? Where to check in the Settings app
In Windows 11, the process is similar: start by opening the Settings app (Windows + I). In the left sidebar, choose System. On the right, scroll down to About and click or tap on it.
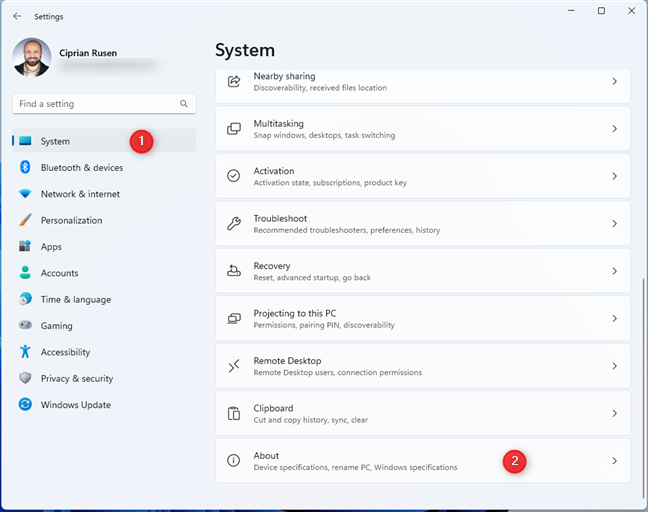
In Windows 11 Settings, go to System > About
Look for the Windows specifications section on the right side of the Settings window. There, you find the information you need, next to Installed on.
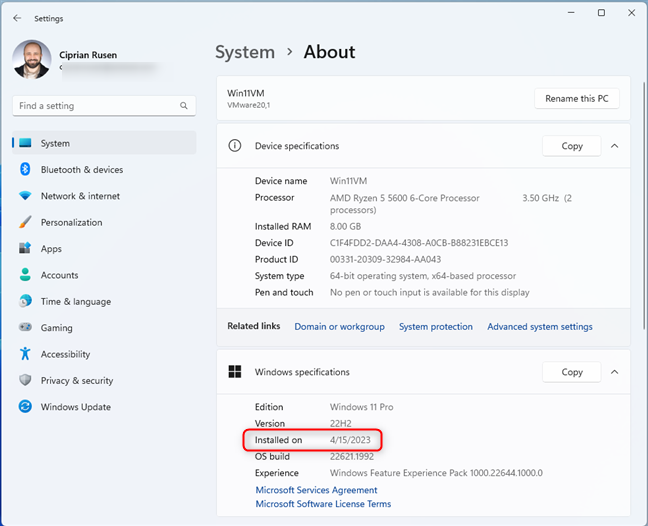
Checking the Windows 11 installation date
Here too, you can press the Copy button next to Windows specifications and have the information stored in the clipboard.
3. How to check the Windows install date in File Explorer
If you use Windows 10 or Windows 11, open File Explorer. Even if the File Explorer app looks different in Windows 10 compared to Windows 11, the process for checking the OS installation date is the same. Click or tap This PC in the navigation pane on the left, open the C: drive (where Windows is installed), and right-click (or press and hold) the Windows folder. In the contextual menu, choose Properties.
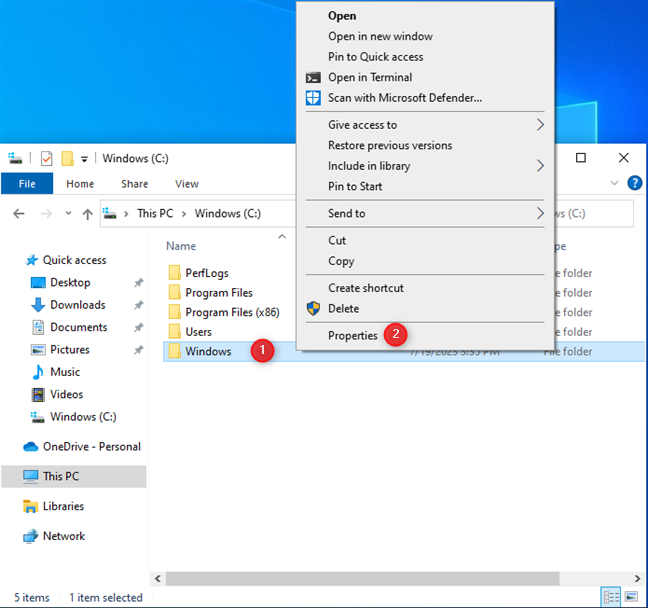
Right-click on the Windows folder and choose Properties
In the General tab of the Windows Properties window, look for the Created entry. It shows when the Windows folder was created on your computer or device - when you first installed Windows.
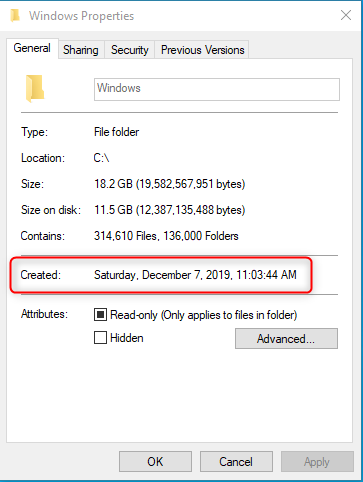
See the Created field
IMPORTANT: The problem with this method is that it can display a very different date than the other methods shared in this guide. This happens when you install Windows, but your computer is not connected to the internet. In this situation, your Windows installation doesn’t know the exact date and time when it is installed until you finish the installation and connect the PC to the internet. However, after the operating system logs this date, it doesn’t modify the Windows folder’s Created field with the correct date.
4. How to find the Windows installation date using PowerShell or Windows Terminal
This method involves opening PowerShell or starting Windows Terminal. In either of these command-line apps, copy and paste the command below and press Enter:
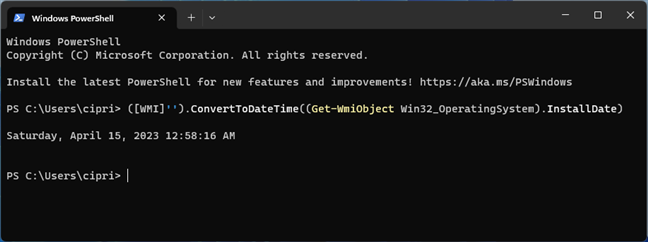
Check the Windows installation date in PowerShell
After a few seconds, you will see the installation date in a readable format, just like in the previous screenshot.
5. How to find the Windows installation date from the Registry
This method is a bit more complicated and it starts with opening the Registry Editor and navigating to this path:
Then, on the right side of the Registry Editor, look for the InstallDate registry key. If you double-click on it, the value you see is the Windows installation date. Unfortunately, it’s shown in hexadecimal format, which is not helpful for most users, unless you convert it using a tool like Hexadecimal to Decimal Converter.
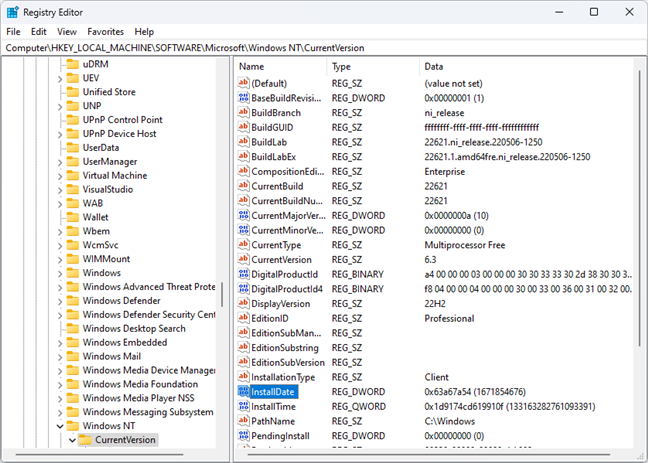
Check the Windows installation date in Registry Editor
A simpler way of reading the Windows installation date from the Registry is to open PowerShell or start Windows Terminal, copy and paste the command below, and press Enter:
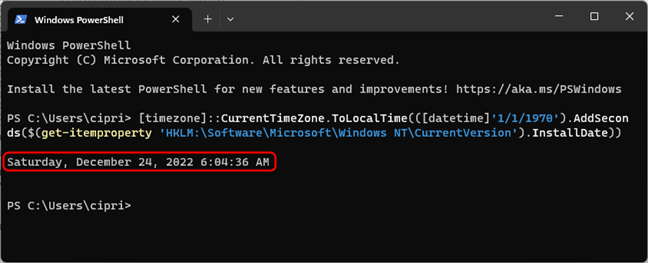
A better alternative is to use PowerShell
So, while the InstallDate you want is stored in the Windows Registry, you have to use PowerShell or Windows Terminal to display the OS installation date in a readable format. It’s much easier than navigating through the Registry Editor, right?
BONUS: What is the original install date? How do I determine when Windows 10 or Windows 11 was installed/upgraded?
Microsoft released several major updates for both Windows 10 and Windows 11. Except for the method that involves File Explorer, all the others will show you the most recent “installation date,” meaning when the latest major update or Windows build was installed. But what if you want to know when Windows was installed for the first time on your computer? You can have a PC with Windows 11 now, but maybe it was running Windows 10 initially. Or, as is the case in my example below, while I installed the 19043 build of Windows 10 initially, later on it received an update to build 19045. If you want to know the original installation date for Windows, open PowerShell or Windows Terminal and first run this command:
After you press Enter, copy/paste this second command and execute it:
Now you finally see when each version of Windows was installed on your computer.
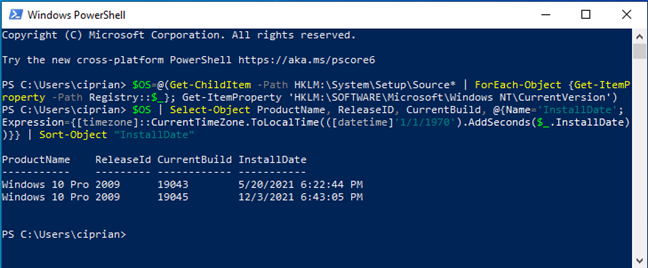
See when all Windows builds were installed
In the screenshot above, you can see that I first installed Windows 10 on the 20th of May, 2021. Then, on the 3rd of December, 2021, it received a major update. If you have a similar situation, read this guides to match your build numbers with the actual Windows versions you have installed:
- What is the latest version of Windows 10? Check the version you have
- How to check the Windows 11 version and edition
Do you know other methods to find out when Windows was installed?
These are all the methods I know for checking the OS installation date on any Windows computer. As you can see, some methods are super fast and easy to use, while others are more complicated. The information shared by each method may be different, so try them out, understand what each method does, and choose the one that fits your needs. Before closing this tutorial, if you know other methods that give you the Windows installation date, share them in a comment below. I’m sure other readers will appreciate them.


 10.08.2023