Have you ever heard of the Windows Registry or the Registry Editor tool? Did a geeky friend of yours tell you that you can do certain things in Windows only from the Registry? Did you wonder what the Windows Registry is and what it does? In this article, I’ll try to shed some light on these notions and explain the basics of the Windows Registry and the Registry Editor tool. If I managed to pique your curiosity, read on:
What is the Windows Registry?
All Windows operating systems, including Windows 11 and Windows 10, store their configuration information in a database. This database is called the Windows Registry. The Windows Registry contains profiles with configuration options for each user account on your Windows computer or device to separate settings between users.
What is the Windows Registry used for?
Windows uses the keys and values from the Registry to know what settings to apply for all tools and features, hardware devices, and some software applications.

The Windows Registry in Windows 11
The Windows Registry database stores settings that control the following:
- How the drivers of hardware devices work in Windows
- How the operating system features and options are configured in Windows 11’s Settings app and Windows 10’s Settings, as well as in the Control Panel
- Which are the default programs set to open certain file types or protocols in Windows 11 or Windows 10
- How some of the applications installed on your PC work, etc.
How to open the Windows Registry
Next, I’d like to show you how to get to the Windows Registry and how to use it. However, before any of that, a word of caution: toying with the settings inside the Windows Registry is not something everyone should do. If you’re messing with the wrong keys and values, you can make your Windows operating system unstable or even break it so badly that you’ll have to reinstall it. As such, take great care in how you deal with the settings from the Windows Registry, and only change things for which you have documentation beforehand.
Opening and editing the Windows Registry is done with a tool called the Registry Editor. This tool is built into the operating system and works the same in Windows 11 and Windows 10. While there are many ways to open the Registry Editor, one of the fastest is to use search.
In Windows 11, click or tap on the search box/button on the taskbar, and type regedit. After the search results show up, click or tap on the Registry Editor app shortcut.
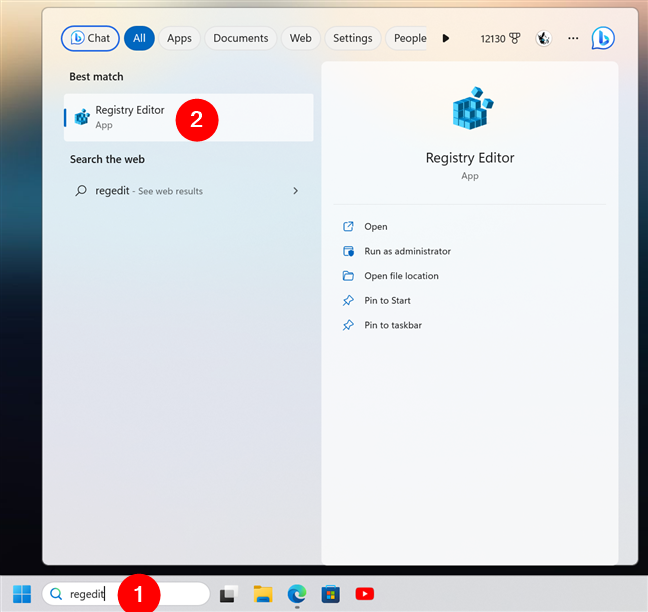
How to open Registry Editor in Windows 11
If you’re using Windows 10, write regedit in the search field on your taskbar, and then click or tap the Registry Editor search result.
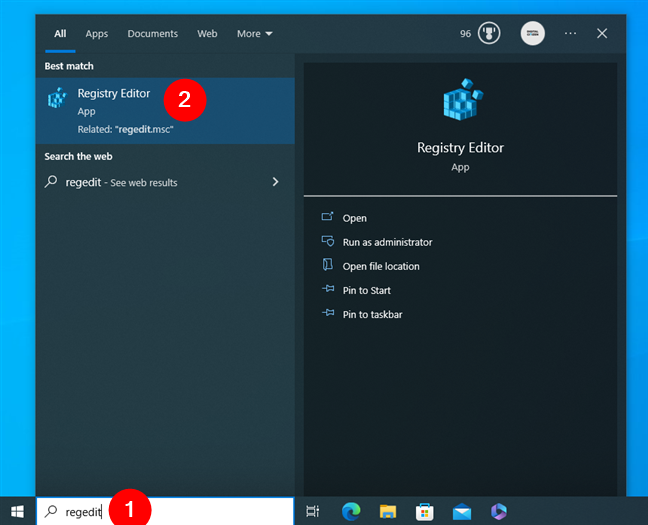
How to open Registry Editor in Windows 10
An alternative to access the Registry Editor, which works the same in Windows 11 and Windows 10, is to use a command. To do that, open Command Prompt, PowerShell, or Windows Terminal and run this command:
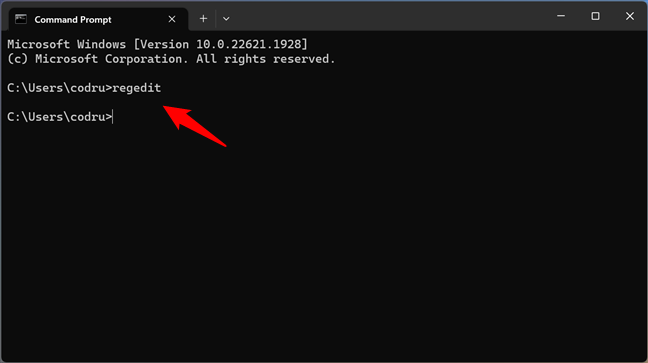
Using the regedit command to open Registry Editor
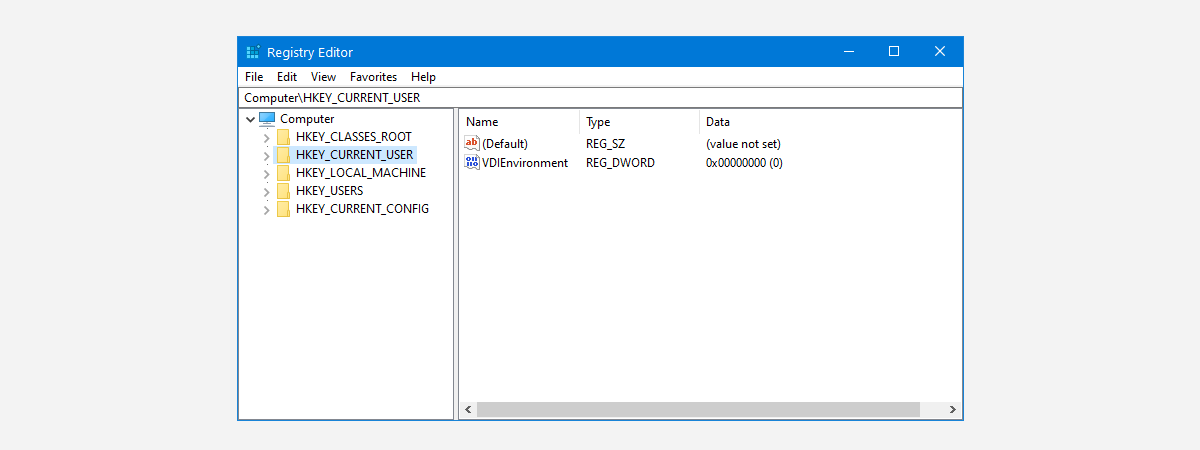
Regardless of the method you choose to follow, this is what you should see when the Registry Editor opens:
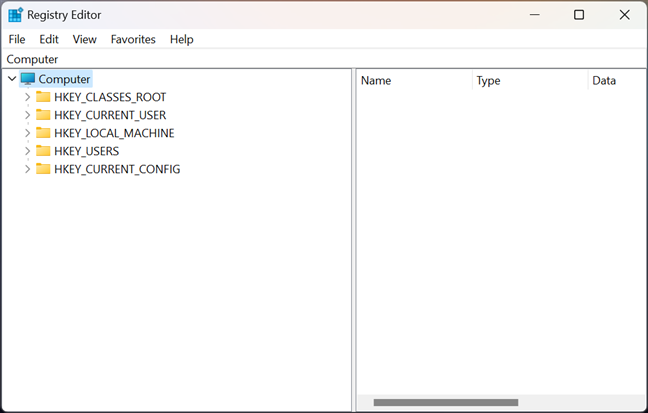
The Registry Editor in Windows 11
The screenshot is taken in Windows 11, and the only visible difference compared to the Registry Editor in Windows 10 is the fact that the window corners of the former are rounded. Otherwise, everything looks and works the same.
How to edit the Registry Editor
Once you’ve opened the Registry Editor, you can see that it’s split into panels. The one on the left side of the window shows a hierarchical tree view of the keys from the Windows Registry. On the right panel, you can see and work with the values of the keys selected on the left panel.
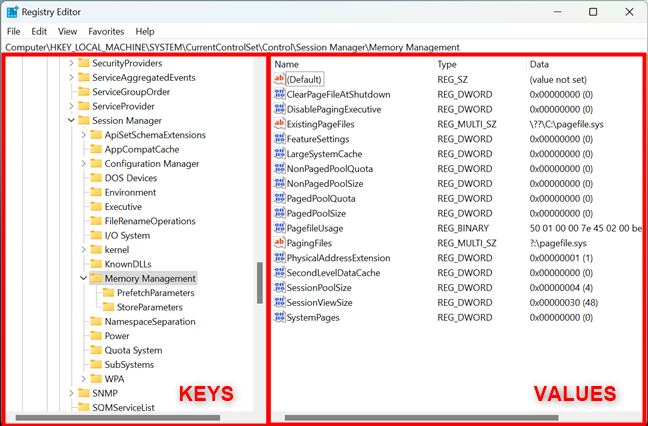
The Windows Registry contains keys and values
Although the Registry Editor lets you create new keys and values and even delete them, most people use it to edit the keys and values already found inside the Windows Registry. Unfortunately, almost all the keys and values from the Windows Registry bear cryptic names and are usually found buried in lots of other parent keys. That’s why I advise you to do a proper search online for exactly what you want to change in the Windows Registry before you do it.
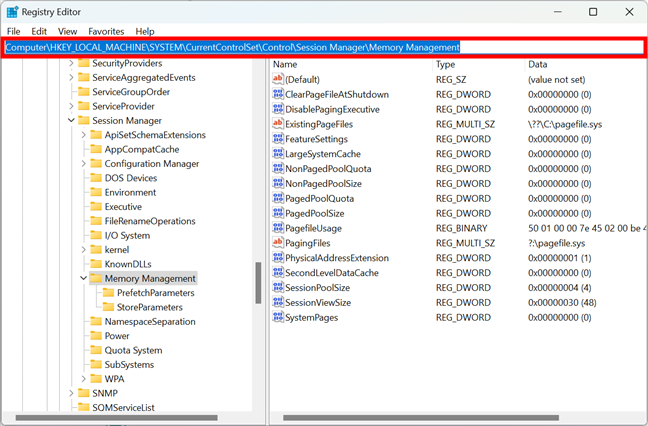
The address of a key in Windows Registry
TIP: If you’re new to working with the Windows Registry, before editing it, it is a good idea to create a restore point.
With all that in mind, it’s now time to see how to edit, create, and delete Windows Registry keys and values:
How to edit Windows Registry
In order to edit a key or value in Windows Registry, you need to navigate to its location and then double-click or double-tap its name to enter the editing process. To understand how all that is done, let’s take the following example: you want your Windows PC to delete the virtual memory file automatically, also known as the pagefile, each time you shut down your computer. For that, you must change a value called ClearPageFileAtShutDown from the Windows Registry. The value’s name is not that cryptic, but the path to it is: to get to it, you have to open the Registry Editor and go to:
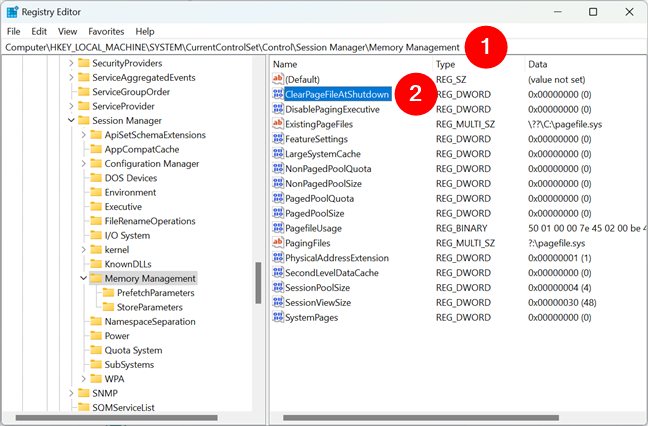
Locating a registry value in Registry Editor
TIP: If you’d like more details on browsing the Windows Registry, check this tutorial: How to navigate the Windows Registry.
To edit a value, you can double-click on it or right-click and click/tap on Modify.
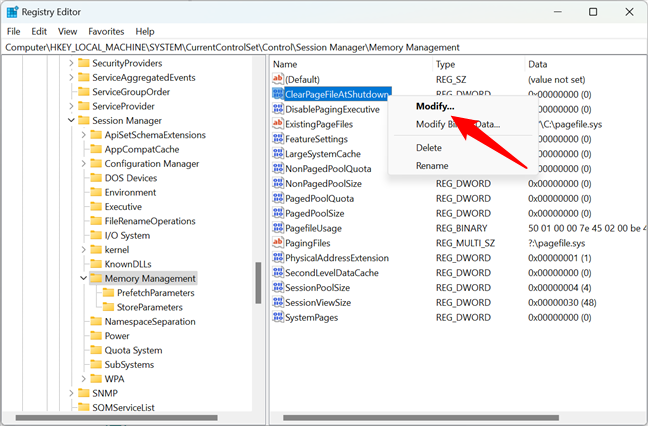
Modify a value in Windows Registry
Then, all you have to do is enter the new value you want to use. In this case, 0 means the pagefile is not deleted when you shut down Windows 11, and 1 means the virtual memory file is deleted each time you do that.
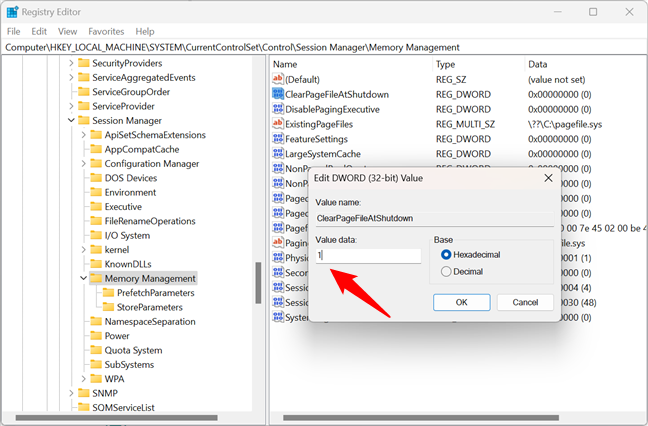
Entering the new registry value
Press Enter or click/tap the OK button, and the new value is set in the Windows Registry. For it to take effect, you need to restart your Windows computer.
How to add keys or values to Windows Registry
The Registry Editor lets you create new keys and values, and it also allows you to delete existing ones. However, these things are even more advanced than editing what’s already found in the Windows Registry. That’s why I feel I have to warn you again: don’t do any of these things unless you really know what you’re doing! Otherwise, your system may stop operating properly.
If you want to create a new key or value, navigate to the location in the Windows Registry where you need it. Then, right-click or press and hold on an empty space in the right-hand panel of the window. In the context menu, select New and choose Key or the Value type you want to create.
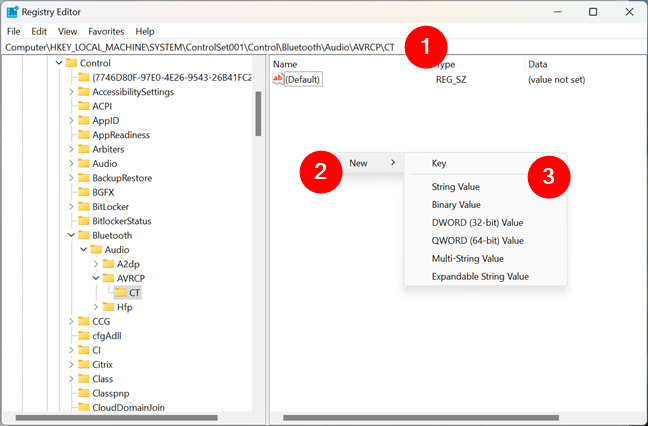
How to add a new key or value in Registry Editor
For example, I wanted to disable the Bluetooth absolute volume on my Windows 11 PC because my speakers don’t work with it. For that, I had to use the Windows Registry to navigate to this location first:
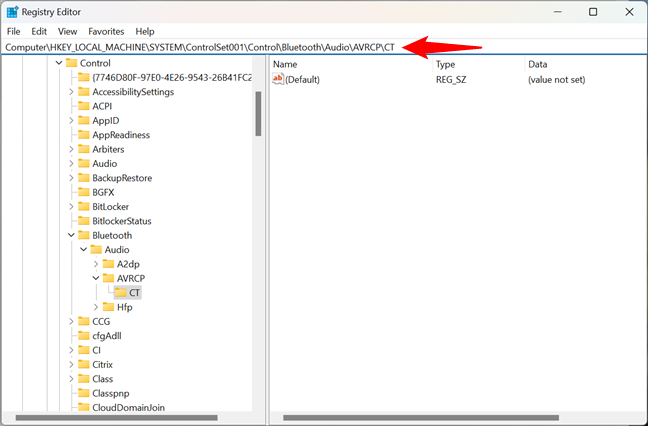
Navigating to a location in Windows Registry
Then, I had to create a new DWORD (32-bit) Value called DisableAbsoluteVolume.
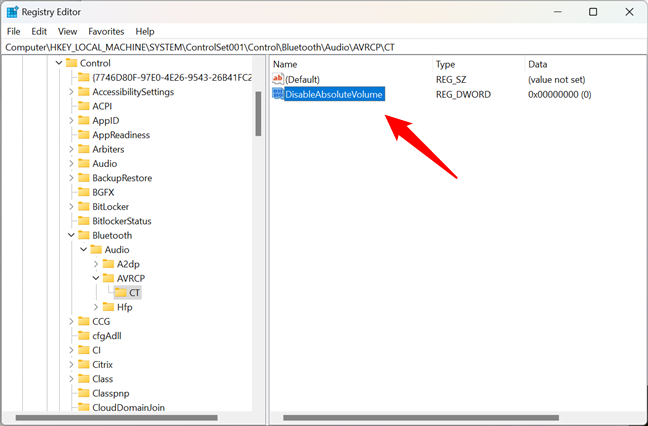
Creating a new key in Registry Editor
For the key to work as I wanted, I had to set its value to 1. As I mentioned earlier, changing a value is done by double-clicking it (or selecting Modify in the right-click menu). Then, you simply enter the new value and press OK.
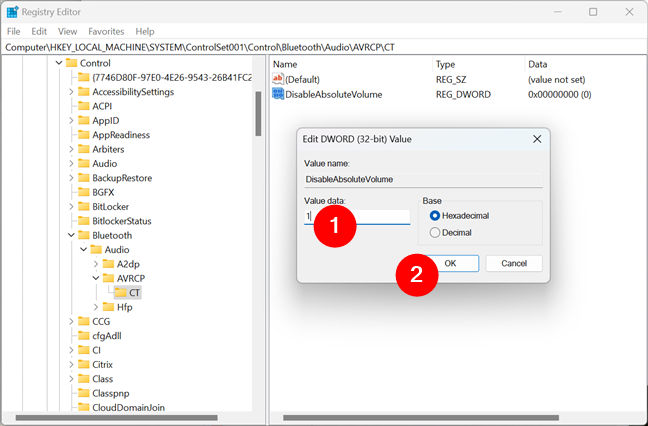
Entering the registry value
Restart your computer, and Windows will begin to use the new key/value that you created in its Registry.
How to delete a key or value from Windows Registry
Removing a key or value from the Windows Registry is even more simple than editing or creating one. All you have to do is navigate to the location of the key or value you want to delete, right-click or press and hold its name, and then select Delete in the context menu.
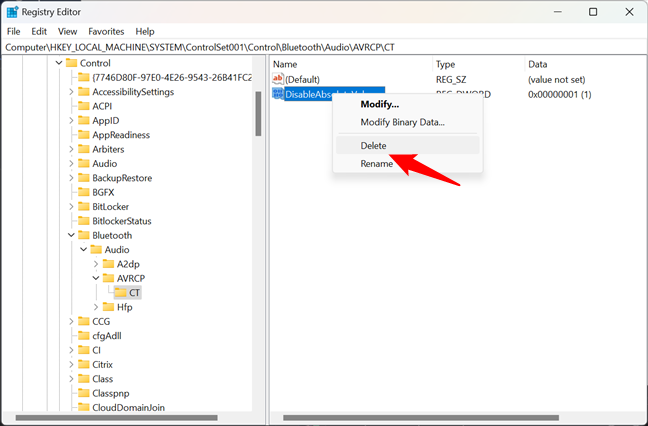
How to delete a registry key or value
The Registry Editor asks you to confirm that you want to delete the selected key or value. This confirmation is necessary because, as Windows puts it “deleting certain registry values could cause system instability.” If you’re sure of what you’re doing, press Yes to permanently erase the registry key or value you selected.
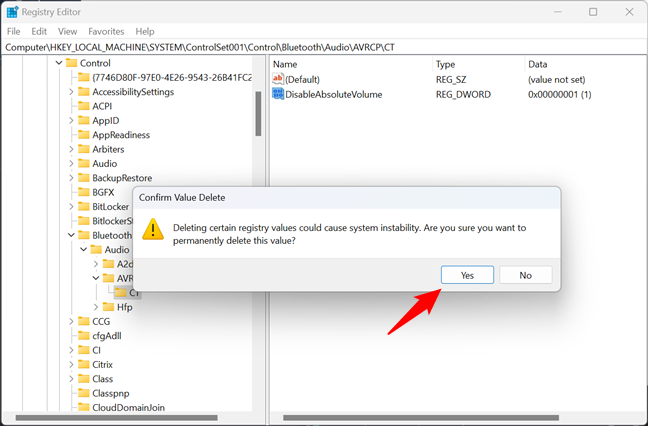
The key or value is permanently deleted from the Windows Registry
To apply the changes you’ve made to Windows Registry, reboot your computer. Hopefully, you didn’t delete a key or value that was essential to the system’s proper operation. 🙂
Do you have any questions about the Windows Registry?
Now you know what the Windows Registry is, and you should have a good idea of what it does and how to use the Registry Editor to make changes. Have you ever used it to alter how things work on your Windows computer or device? Or do you find it too advanced and dangerous? Don’t hesitate to share your comments or any questions you might have about it in the section below.


 11.07.2023