OneDrive is a cloud storage service that lets you store and access your files from any device. One of its best features is the Personal Vault, a secure folder that requires additional authentication to access your most sensitive and important files. In this tutorial post, I’m going to show you how to enable and use OneDrive’s Personal Vault to secure your data, no matter if you prefer working on your Windows computer, an Android smartphone, an iPhone, or on any device with a web browser. Without further ado, let’s start. There’s plenty of ground to cover:
What is Personal Vault in OneDrive?
The Personal Vault is a secure folder in your OneDrive that can only be accessed with a strong authentication method or a second factor of identity verification, such as your fingerprint, face, PIN, or a code that you receive via SMS or that you generate in the Microsoft Authenticator app.
What is Personal Vault in OneDrive?
Unless you can do that, you can’t unlock the Personal Vault. This ensures that even if someone else gains access to your device or your OneDrive account, they can’t open your Personal Vault without your authorization. The data inside this special folder is automatically encrypted, so OneDrive’s Personal Vault should be safe even for storing passwords, not only “regular” sensitive files. 🙂 Simply put, this feature is one of the best ways to password-protect folders in Windows, Android, and iOS.
Whether you’re using OneDrive for free or if you have a Microsoft 365 subscription linked to your Microsoft account, you can store files in the Personal Vault and access them from any device that supports OneDrive. This includes Windows 10 and Windows 11 PCs, Macs, Android devices, and also iPhones and iPads. With a free account, however, you can only store up to 3 files in the Personal Vault, while with a Microsoft 365 subscription, you can store as many as you want.
So, in order to use the Personal Vault, you need to have a Microsoft account and, preferably, a OneDrive subscription. If you don’t have an account, you can sign up for one by following the instructions in this guide: 3 ways to create a Microsoft account from your browser. Once you have everything ready, follow these steps:
How to enable and use OneDrive Personal Vault in Windows
Regardless of whether you’re using Windows 10 or Windows 11, open File Explorer and go to your OneDrive folder. In it, you’ll find a shortcut called Personal Vault. Double-click or double-tap it to access your Personal Vault.
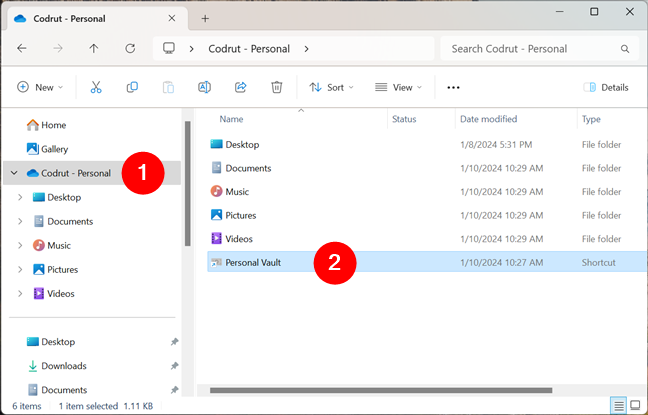
Double-click OneDrive's Personal Vault folder in File Explorer
If this is the first time you access your OneDrive Personal Vault, you’ll be greeted by a wizard that will briefly show you what it’s all about. It will also walk you through the initial configuration steps. For starters, press Next.
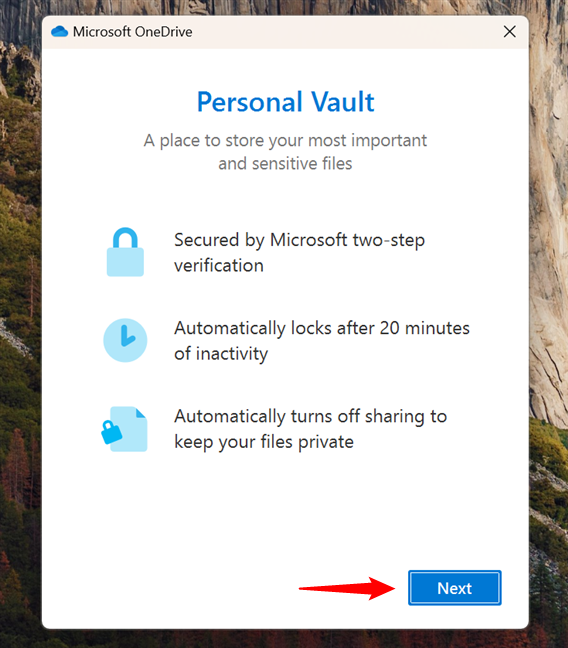
Click or tap Next
OneDrive will make the preparations for your Personal Vault, and when it’s almost ready, it will ask you to Allow it to finish setting up.
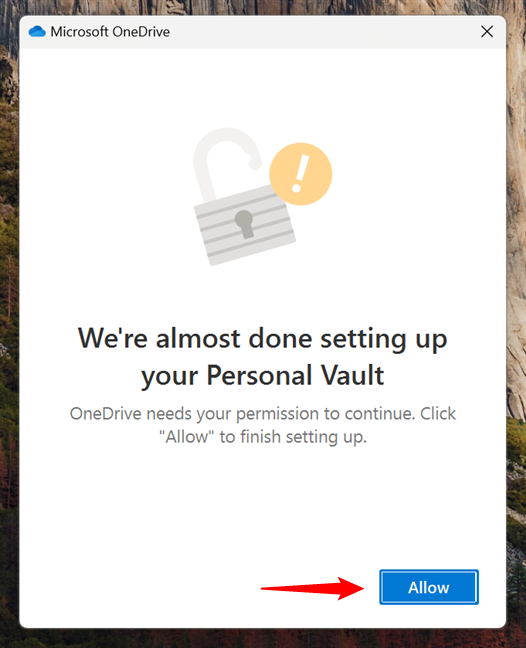
We're almost done setting up your Personal Vault
Then, you’ll need to set up a verification method. Depending on how you’ve configured your Microsoft account and your Windows computer, during this step, you may have to enter your PIN code, authenticate with a fingerprint, use face unlocking, type your password, or enter a code from your authenticator app or from your phone.
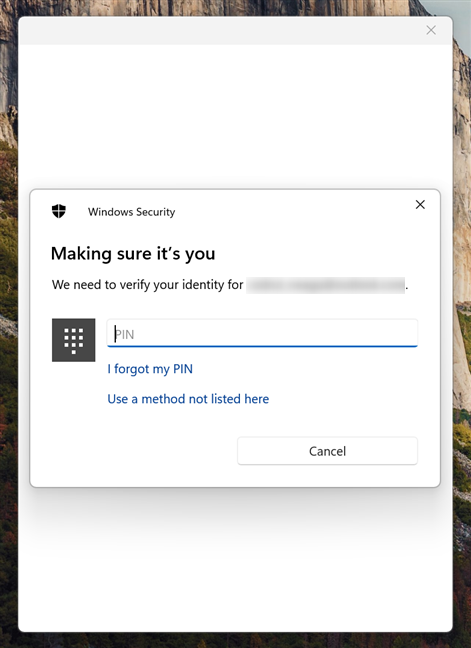
Verifying your identity
After you pass the identity verification step, Windows will open your OneDrive Personal Vault in File Explorer. You can then add, edit, and delete files and folders inside your Personal Vault just like you would normally do with any other files or folders. You can create new files, you can drag and drop files and folders from your Windows computer or from your other OneDrive folders, etc.
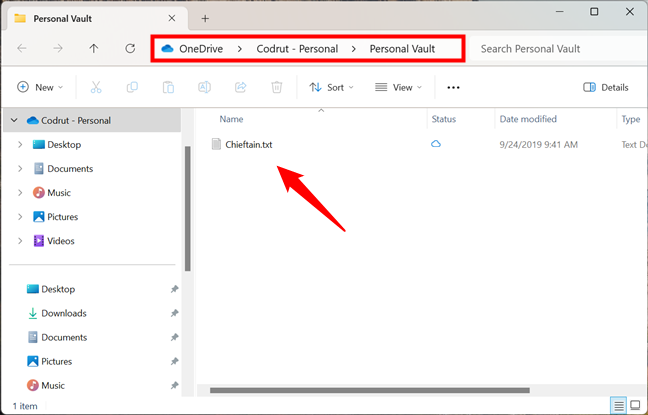
Getting access to your Personal Vault in OneDrive
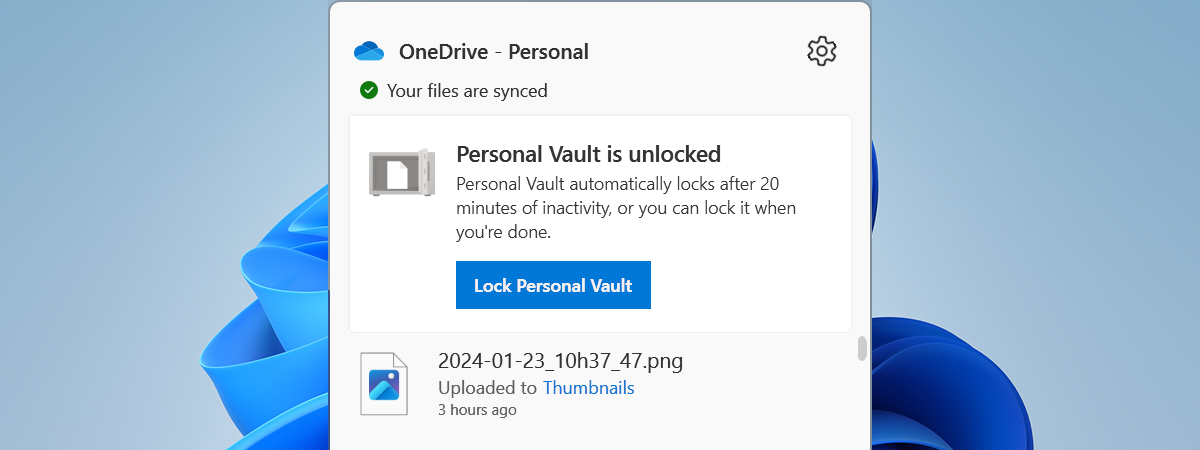
When you’re done, you can restrict access to your OneDrive Personal Vault by locking it. You can either wait for 20 minutes for Personal Vault to automatically lock, or you can click or tap the OneDrive icon in the system tray and then press the Lock Personal Vault button in the app’s fly-out.
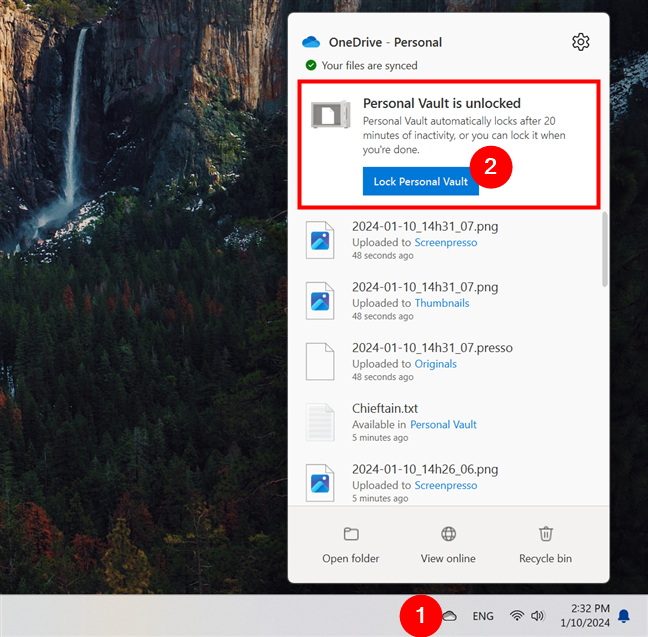
Lock Personal Vault in Windows
Each time you want to access the files and folders in your OneDrive Personal Vault, you’ll need to verify your identity again, just like I’ve shown you earlier.
How to change the automatic lock time for your Personal Vault in OneDrive for Windows
By default, on Windows computers, the Personal Vault in OneDrive locks automatically after 20 minutes of inactivity. However, you can change this setting to suit your preferences. To do so, right-click or press and hold the OneDrive icon in the system tray to open the Help & Settings menu in the OneDrive fly-out. Then, click or tap on Settings.
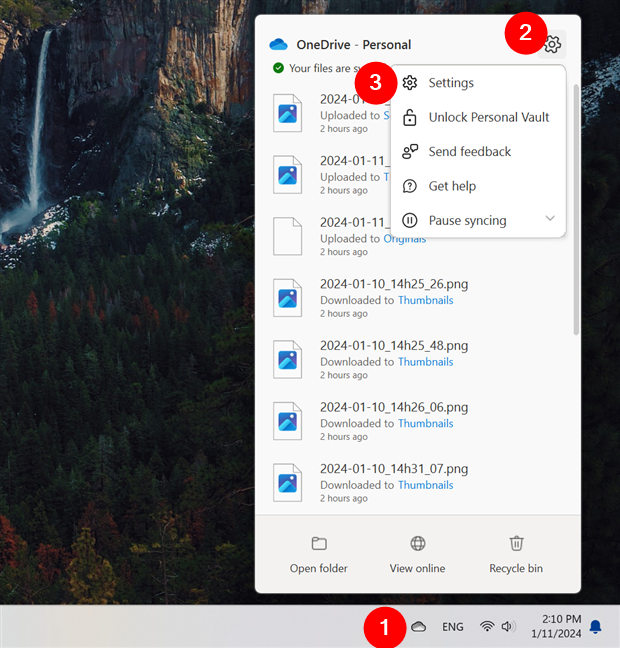
Open OneDrive Settings
This opens the OneDrive Settings window. In it, select Account in the left sidebar and, on the right, you’ll see a setting called “Lock Personal Vault after” with a drop-down menu next to it. The value shown there is the time set to keep your Personal Vault accessible after unlocking it. As mentioned earlier, 20 minutes is the default.
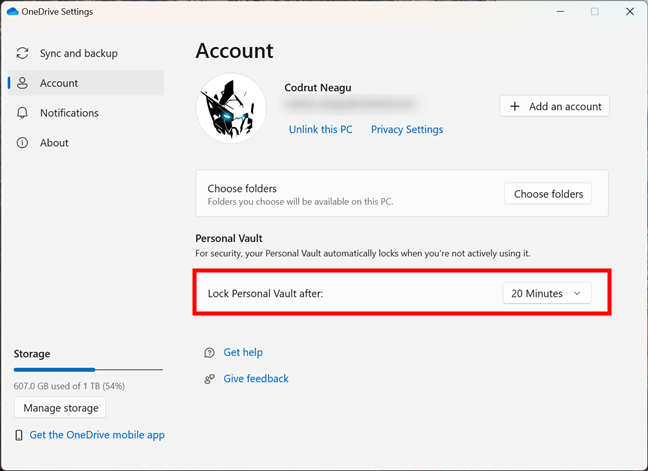
Lock Personal Vault after
If you want to change the time interval, click or tap the drop-down menu and choose one of the other options available: 1 Hour, 2 Hours, or 4 Hours.
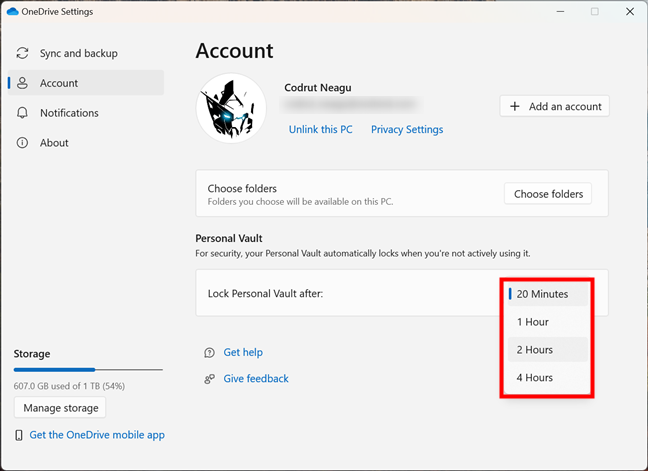
Choose the time interval before Personal Vault locks
You can now close the OneDrive Settings window, as your setting is instantly applied to the Personal Vault.
How to use OneDrive Personal Vault on Android smartphones
If you want to access and use Personal Vault on your Android smartphone, open the OneDrive app.
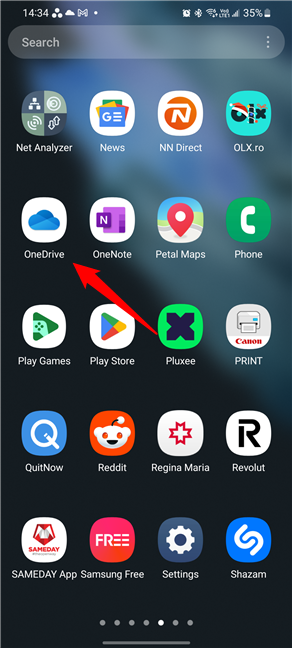
Open the OneDrive app in Android
TIP: If you don’t already have the OneDrive app on your Android phone, you can get it from Google’s Play Store. If you need help configuring the app on your phone, this guide may help you out: How to add, open, and configure OneDrive on Android.
Switch to the Files tab, find the Personal Vault folder, and tap on it.
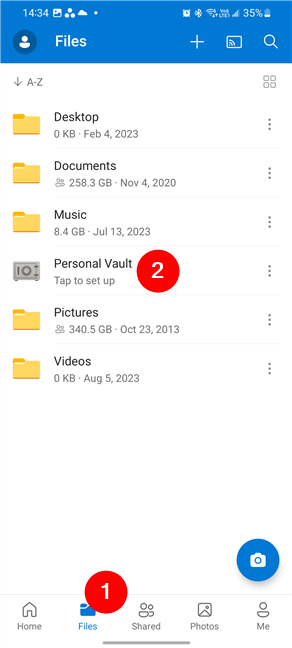
Go to Files and tap on Personal Vault
If this is your first time accessing your Personal Vault, you’ll be greeted by a welcome message, and then you’ll be asked to verify your identity. This means you’ll have to confirm it’s really you by re-entering the password of your Microsoft account, approving a request in your Microsoft Authenticator app, or using any of the other authentication methods you’ve configured for your Microsoft account.
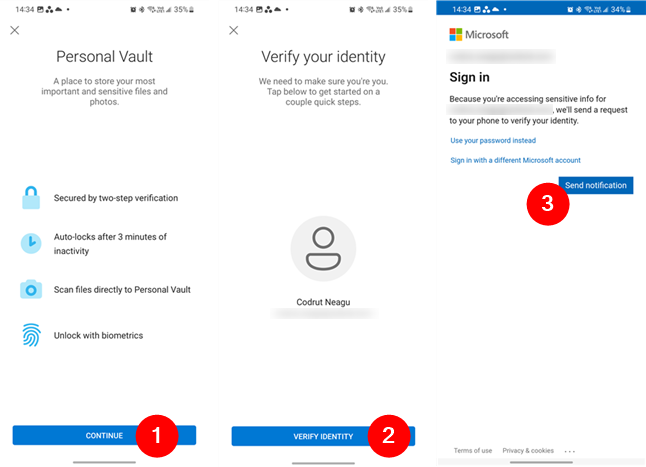
Verify your identity
Then, OneDrive will ask you to configure a PIN code made of six numbers. Enter the one you want and then confirm it by re-entering it.
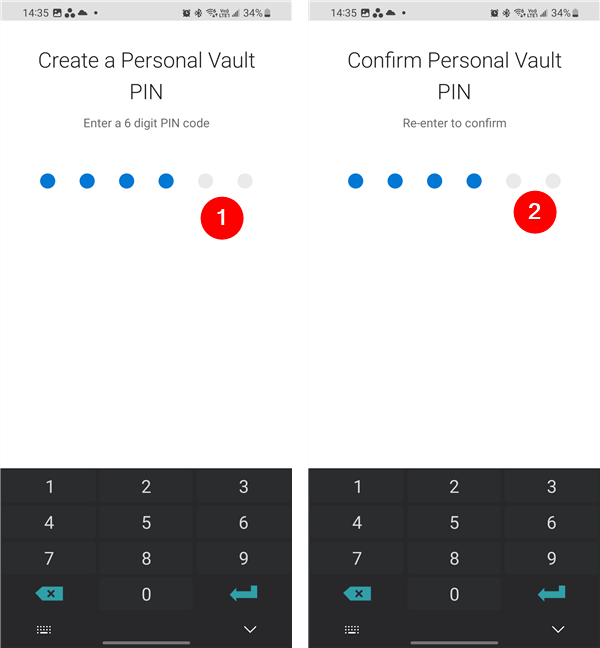
Create a Personal Vault PIN for Android
Once you’ve set a PIN code for your Personal Vault, OneDrive will give you access to this secured folder. Before starting to use it, though, you’ll also be asked whether you’d like to enable additional ways of authenticating that may be faster or just more comfortable to use. Like, for instance, fingerprint checks. Then, you get complete access to your Personal Vault, and you can start using it just like you’d normally do with any other folder in your OneDrive.
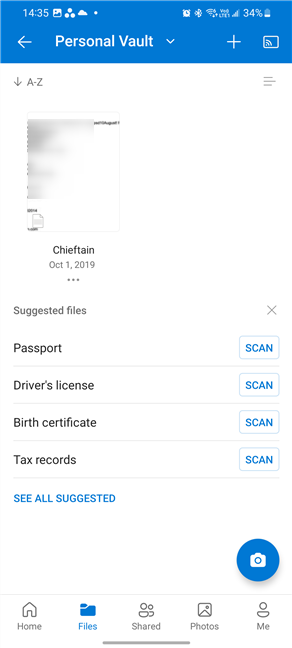
Personal Vault in OneDrive for Android
Upload, create, edit, move, and delete files and folders inside your Personal Vault as you like. Note that you can also use OneDrive to scan photos with your phone’s camera and add them directly to your Personal Vault in OneDrive.
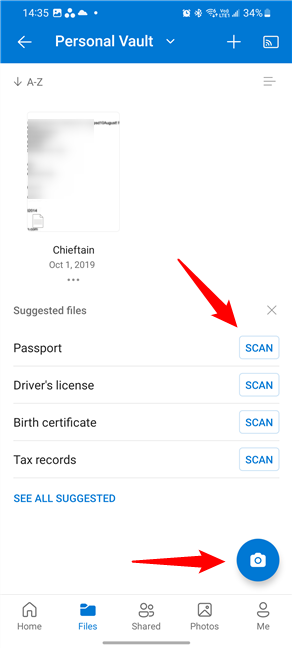
You can use Personal Vault as usual, and you can also scan documents with it
When you no longer need to work with the files or folders in your Personal Vault, you can lock it by tapping on the Personal Vault button at the top of the screen and selecting Lock in the menu displayed. However, even if you don’t do that, the OneDrive app on your Android phone will automatically lock your Personal Vault after a couple of minutes in order to prevent unauthorized access to your files.
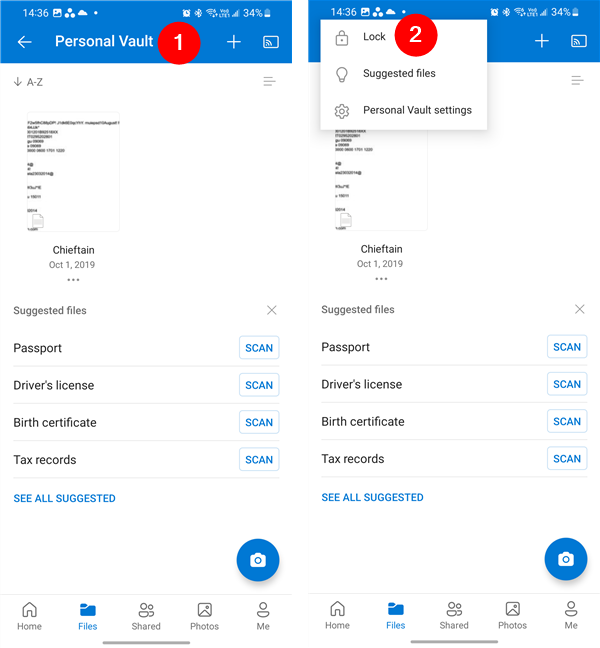
How to lock Personal Vault in OneDrive for Android
Later on, you’ll have to verify your identity again each time you want to access the files and folders stored securely in your Personal Vault from OneDrive.
How to configure your Personal Vault in OneDrive for Android
There are also a couple of settings you can adjust for how your Personal Vault works in OneDrive for Android. To get to them, tap the Personal Vault button at the top of the screen, and then tap Personal Vault settings in the menu displayed.
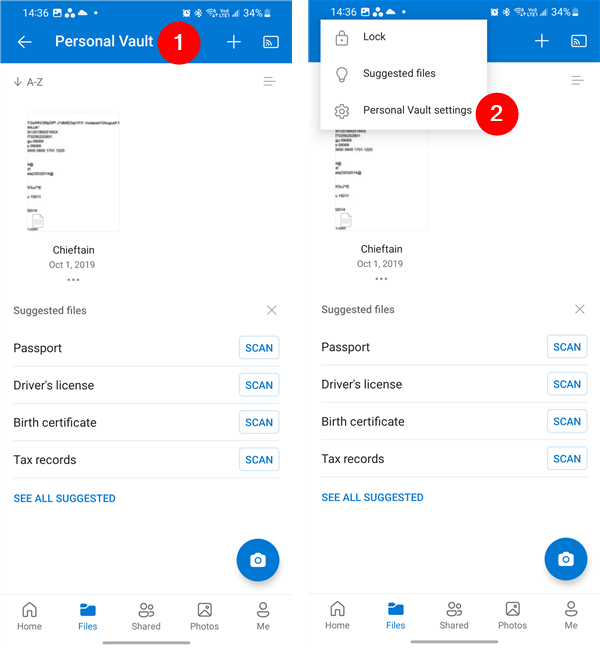
Get to the Personal Vault settings in Android
This will load a new screen with a couple of settings:
- Lock on exit: if you enable this switch, your Personal Vault will be automatically locked each time you exit the OneDrive app on your Android phone.
- Lock Vault automatically: tapping this setting allows you to choose a different time interval before the Personal Vault locks automatically. By default, OneDrive for Android uses 3 minutes, but you can decrease or increase this period to 1, 2, 3, 5, or 10 minutes.
- Change PIN lock: tapping this option allows you to change the PIN code you’ve set for your Personal Vault in OneDrive for Android.
- Use biometrics: when enabled, this switch allows you to unlock your Personal Vault using biometric authentication (fingerprint).
- Increase file size limit: if you’re using a free Microsoft account, tapping this link shows you the Microsoft 365 subscriptions you can buy in order to get full access to OneDrive’s Personal Vault.
- Turn off Personal Vault: tapping this link won’t offer you a way to disable Personal Vault in OneDrive. Instead, it will only direct you to the OneDrive website, which is the only place where you can turn off Personal Vault. If that’s something you want, read the last section of this guide.
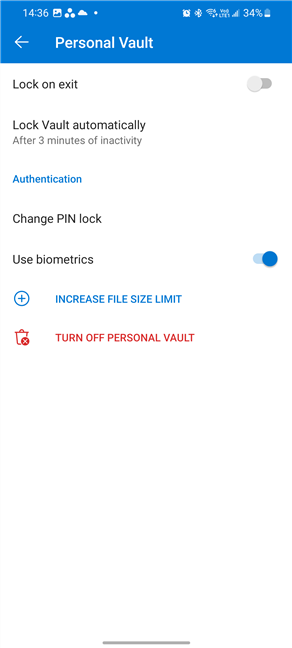
Personal Vault settings in Android
That’s all there is to OneDrive’s Personal Vault for Android. Next, let’s see…
How to use your Personal Vault in OneDrive for iPhones
Are you using an iPhone but love OneDrive when it comes to storing your files and folders in the cloud? Here’s some good news: the Personal Vault feature is also available on iPhones. To access it, open the OneDrive app on your phone and sign in with your Microsoft account. If you don’t already have it, you can download and install OneDrive from Apple’s App Store.
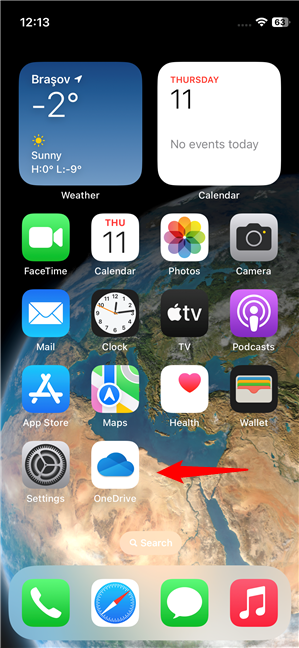
Open OneDrive on an iPhone
TIP: If you need help installing and setting OneDrive on your iPhone, this tutorial provides all the answers: How to add, open, and configure OneDrive on an iPhone or iPad.
Once you’ve logged in, go to the Files screen in the OneDrive app, and you’ll see your Personal Vault among the other folders you have in the cloud. Tap on it.
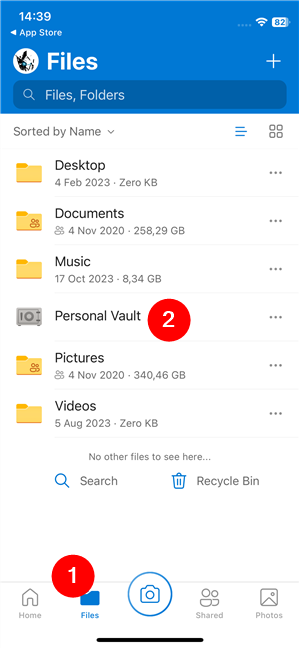
Go to Files and tap on Personal Vault
The first time you access your Personal Vault, OneDrive will greet you with a welcome message and ask you to verify your identity. For that, you’ll have to either enter the password of your Microsoft account, approve a request in the Microsoft Authenticator app, or use any other supported verification method that you’ve previously set for your Microsoft account.
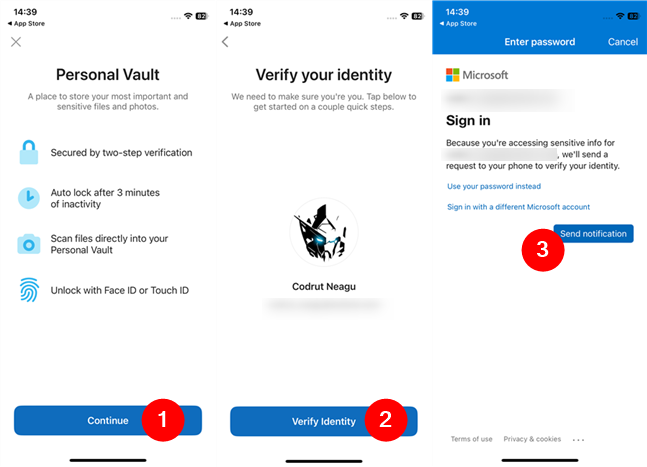
Verify your identity to enable Personal Vault
Next, you’ll have to create a PIN code for the Personal Vault in your OneDrive. Enter the one you want.
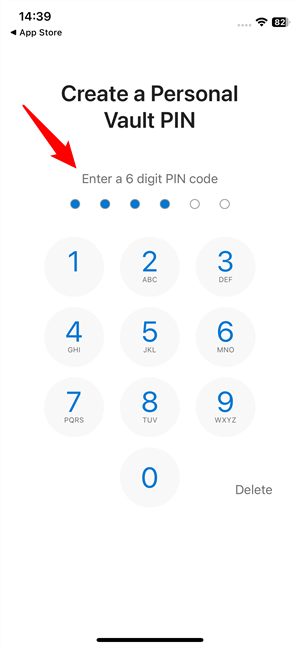
Create a Personal Vault PIN in iOS
Once you set the PIN code, depending on what authentication methods you’re using on your iPhone, you may also get options to enable face or fingerprint unlocking for Personal Vault. Then, you finally get access to your Personal Vault in OneDrive. You can now start using it normally, like any other folder or file in your OneDrive: upload, create, edit, and delete files as usual.
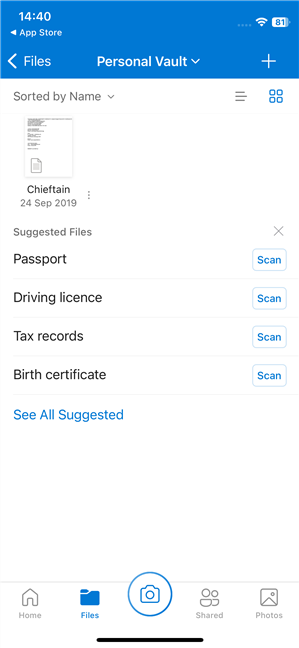
You can use Personal Vault as usual
Note that you can also scan and save photos and documents directly into your Personal Vault using OneDrive and your iPhone’s camera.
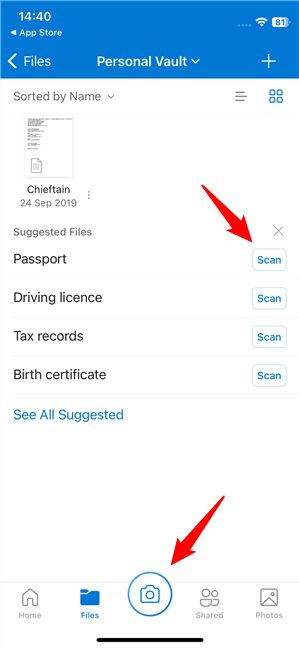
You can also scan documents to your Personal Vault
When you’re done using files and folders in your Personal Vault, you can manually lock it by tapping the Personal Vault button at the top of the screen and selecting the Lock option in the menu displayed. Alternatively, you can simply stop using your Personal Vault and OneDrive will automatically lock it after a while.
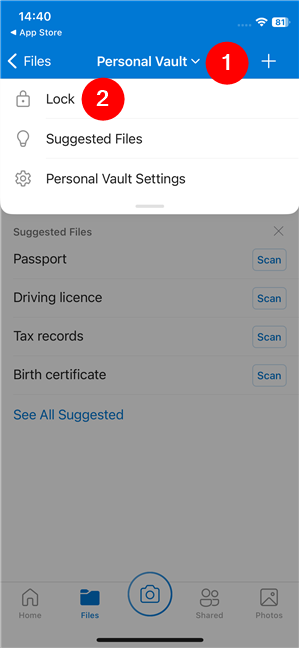
How to lock OneDrive's Personal Vault on an iPhone
Every time you want to access the files in your OneDrive’s Personal Vault, you need to verify your identity again by entering the PIN code you set earlier.
How to configure your Personal Vault in OneDrive for iPhones
You can also customize some options for your Personal Vault in OneDrive for iOS. To access them, tap on Personal Vault at the top of the screen, and then tap Personal Vault Settings in the menu that appears.
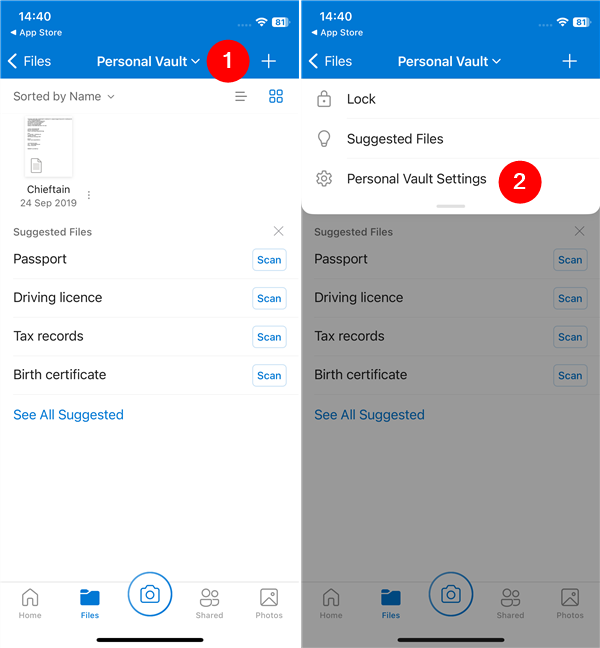
Access Personal Vault Settings in iOS
Then, you’ll see a few options on a new page:
- Personal Vault PIN: this allows you to change the PIN code you’ve previously configured for your Personal Vault in OneDrive for iOS.
- Manage Two-Factor Authentication: tapping this option will open your web browser and take you to this Microsoft web page about 2-step authentication.
- Download Authenticator App: this link will open the App Store on your iPhone and it will automatically take you to Microsoft’s Authenticator app, which the company obviously wants you to use. 🙂
- Lock on App Exit: this switch sets OneDrive to automatically lock your Personal Vault when leaving the app.
- Inactivity Lock: this specifies how much time the Personal Vault stays unlocked before locking automatically due to inactivity. If you want, you can change this time to 1, 2, 3, 5, 10, 20, 30 minutes, or 1 hour.
- Personal Vault Notifications: brings up a new page with two switches that allow OneDrive’s Personal Vault to send you In App Notifications and Device Notifications.
- Delete Personal Vault: this doesn’t actually let you disable Personal Vault in OneDrive. It only tells you to go to the OneDrive website, where you can find the option to turn off Personal Vault. To learn how to do that, check the last section of this guide.
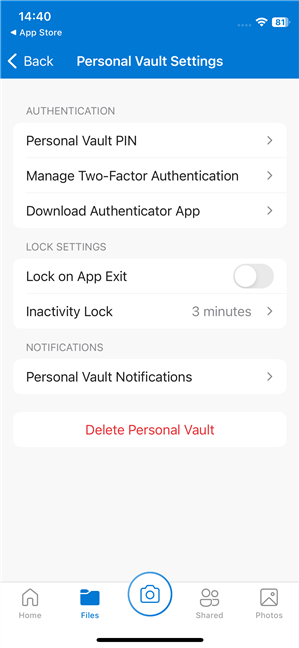
Personal Vault Settings in iOS
Having that covered, let’s now also see…
How to use your OneDrive Personal Vault in a web browser
Last but not least, you can also access and use your Personal Vault in OneDrive from the web. To do so, launch your favorite web browser, go to onedrive.live.com, and sign in with your Microsoft account. Once you’ve logged in, select My files and you’ll find your Personal Vault folder among your other folders. It’s easy to recognize as its icon resembles a safe. Click or tap on it.
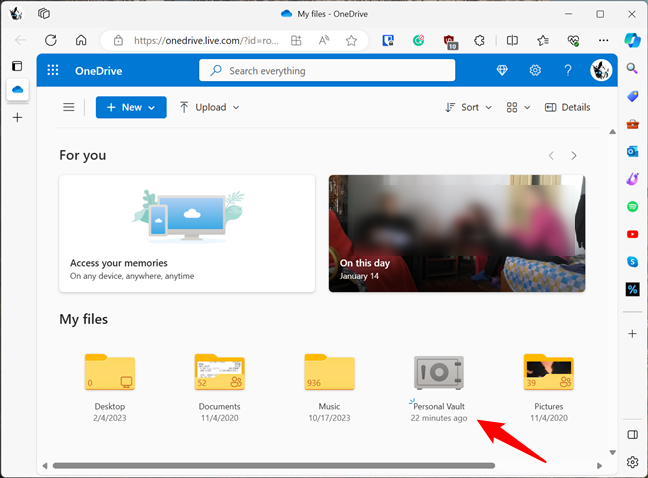
Go to the OneDrive website in a web browser
OneDrive will then ask you to verify your identity. Depending on how you’ve set your Microsoft account to handle security, you will have to enter your account’s password or PIN code, authenticate with your fingerprint, approve a request in the Microsoft Authenticator app on your phone, etc.
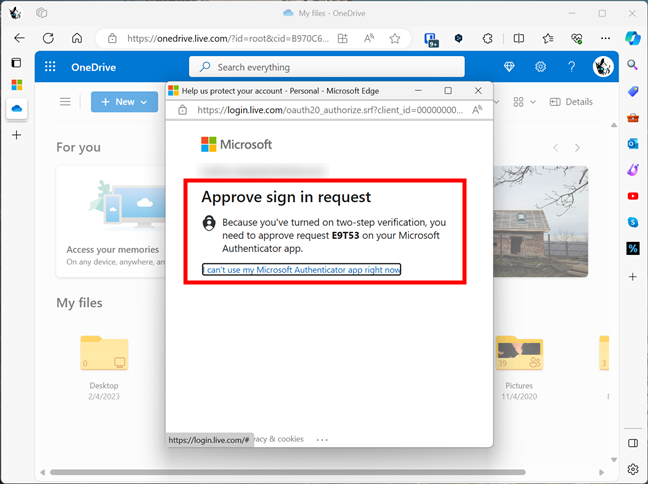
Sign in with your Microsoft account
After Microsoft verifies your identity, you get access to your Personal Vault in OneDrive. Then, you can create, edit, upload, or delete files and folders in it. In other words, you can do everything you’d expect to, just like in any other folder in your cloud storage.
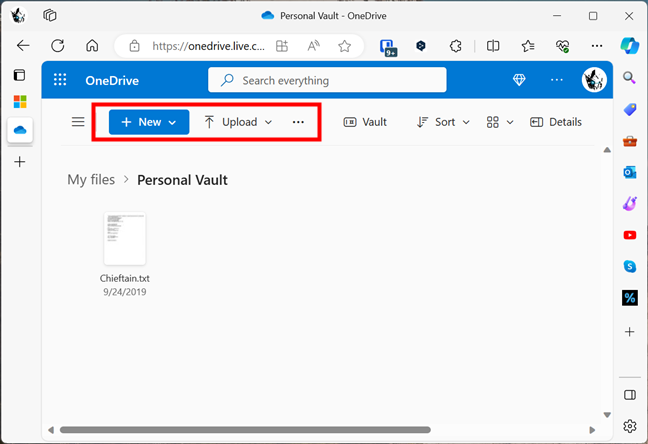
Use Personal Vault normally, like any other OneDrive folder
When you’re done working with the files and folders in your Personal Vault, you can manually Lock it if you want to secure your data in it immediately. For that, click or tap the Vault button at the top of the webpage and select Lock in the menu displayed.
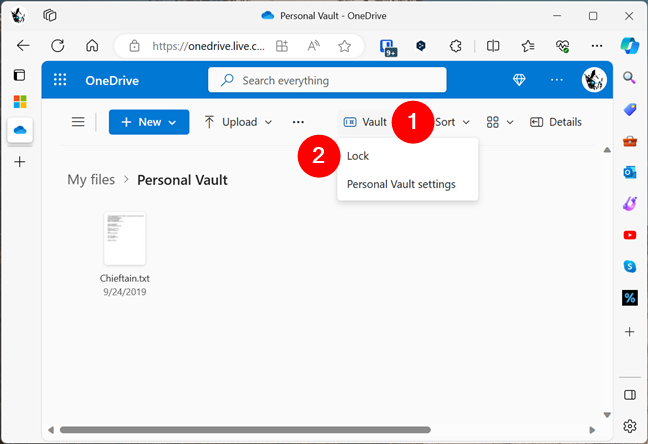
How to lock Personal Vault in a browser
Note that even if you don’t lock Personal Vault yourself, OneDrive will still automatically do that after a period of inactivity.
How to disable Personal Vault in OneDrive
What if you neither like nor need Personal Vault in your OneDrive and want to disable it? In that case, here’s what you’ll have to do:
Use any web browser to go to the OneDrive website and sign in with your Microsoft account. Once you’re in, click or tap on the Personal Vault folder.
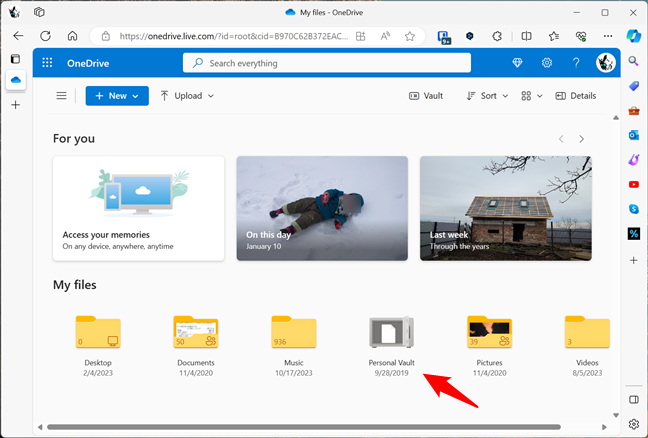
Open the Personal Vault folder
Once Personal Vault is unlocked, click or tap the gear icon in the top-right corner of the page.
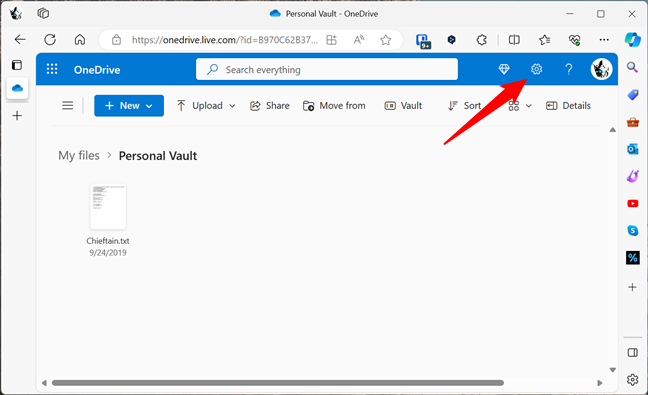
Click or tap the gear icon
This will show a sidebar with a couple of entries on the right. Click or tap on Options.
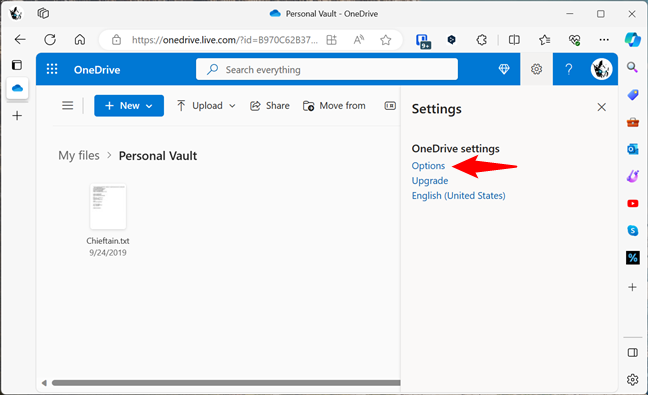
Click or tap Options under OneDrive settings
On the OneDrive Options web page, select Personal Vault in the left sidebar, and then click or tap Disable next to Disable Personal Vault on the right.
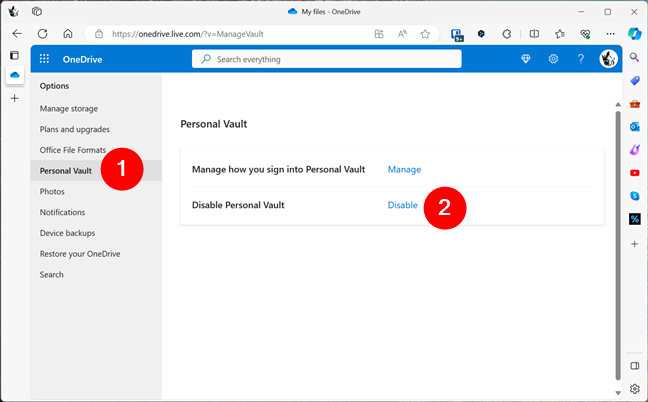
How to disable Personal Vault in OneDrive
OneDrive will ask you if you’re sure you want to disable Personal Vault. It will also tell you what happens if you do: the Personal Vault folder in your OneDrive will disappear, and everything in it, both files and folders, will be lost forever. Even if you decide to re-enable Personal Vault later on. If you’re certain you want to remove Personal Vault from OneDrive, click or tap Disable.
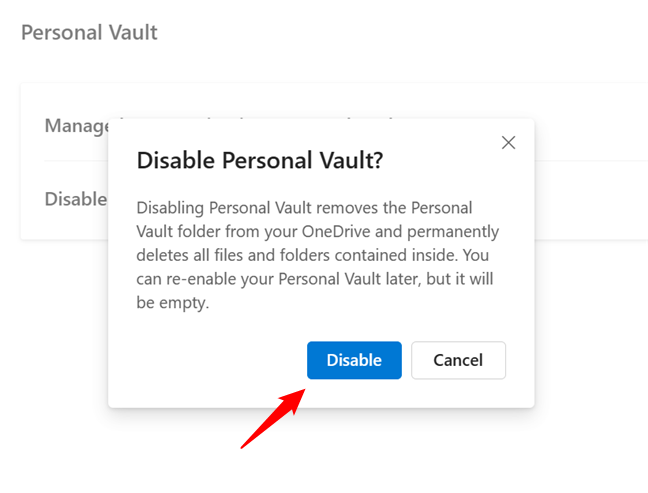
Click Disable to remove Personal Vault from OneDrive
Then, confirm your choice once more by clicking Disable again.
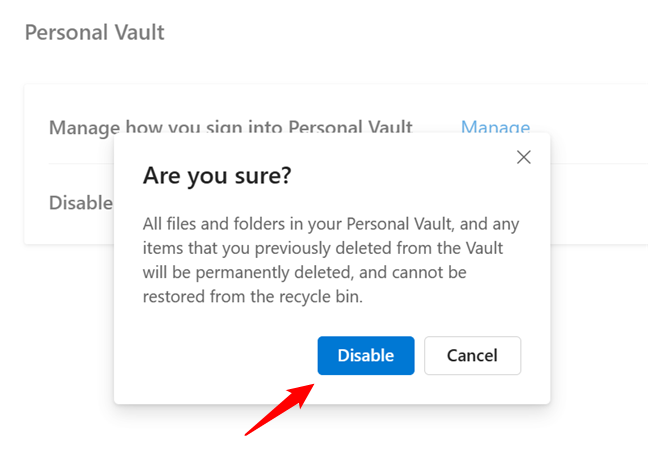
Confirm that you want to remove Personal Vault from OneDrive
Wait for a moment and your Personal Vault will be disabled in your OneDrive.
NOTE: If you change your mind and want to use Personal Vault again, you can Enable it back from OneDrive’s Options page.
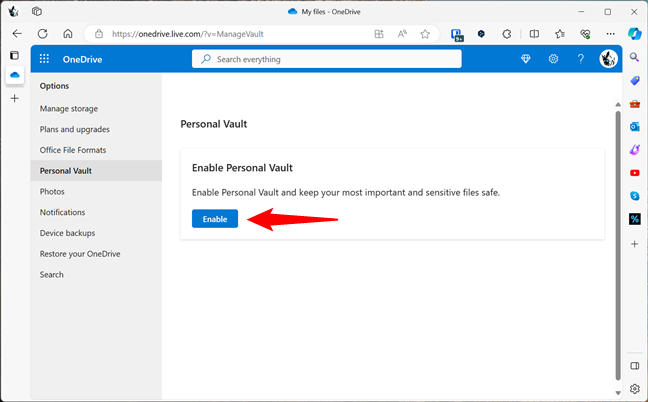
How to re-enable Personal Vault in OneDrive
Are you using OneDrive’s Personal Vault?
As you’ve seen, Personal Vault is a OneDrive feature that allows you to store your sensitive files in a secure folder that requires additional authentication to access. The Personal Vault is an excellent way to protect your confidential and personal data from unauthorized access. Moreover, it’s easy to set it up and use, regardless of whether you need access to it on a Windows computer, an Android smartphone or an iPhone, or directly from a web browser. Did you try it out? What’s your take on Personal Vault? Let me know what you think in the comments section below.


 23.01.2024

