The Local Group Policy Editor enables a power user to control a large number of settings in Windows. You can control the sign-in and shutdown processes, the features and the apps that users are allowed to access, and you can do so using a simple interface that offers lots of information. The tool itself is rather hidden from view and before using it, you obviously need to know how to get to Local Group Policy Editor in Windows 10 and Windows 11. We have put together a comprehensive list of methods for accessing it, so that you can choose the one that is most convenient:
Where is the Local Group Policy Editor in Windows? I can’t find it!
The Local Group Policy Editor is a tool aimed at power users of Windows. You can find lots of information about using the tool in this article: What is the Local Group Policy Editor, and how do I use it?
If you try the methods below and the Local Group Policy Editor doesn’t show up, you may have a version of Windows that doesn’t come with the tool. By default, you can find the editor only in:
- Windows 11 Pro and Windows 11 Enterprise
- Windows 10 Pro and Windows 10 Enterprise
- Windows 7 Professional, Windows 7 Ultimate, and Windows 7 Enterprise
- Windows 8.1 Professional and Windows 8.1 Enterprise
Although the process isn’t covered in this article, there are ways to install the Local Group Policy Editor on Windows Home editions as well. If you do not know your Windows version, read this tutorial: How to tell what Windows I have (11 ways).
NOTE: This article covers Windows 11 and Windows 10. Still, many of the methods described below are valid for older versions of Windows as well.
Editing policies globally versus editing policies for specific users or groups
If you have other users on your Windows computer (for example other family members), you can control what kinds of changes they can make and what applications they can run. Before you open the Local Group Policy Editor, you first need to decide whether you want the changes to apply to all users (including yourself) or only to specific users or groups of users (for example non-administrators) on your computer. The process of opening the Local Group Policy Editor is going to be very different, depending on your objective.
First, let’s see how you can open the editor if you want to apply the changes to all users.
NOTE: You need to have administrative privileges in order to be able to access the Local Group Policy Editor. If you try opening it as a regular user, you get this error:
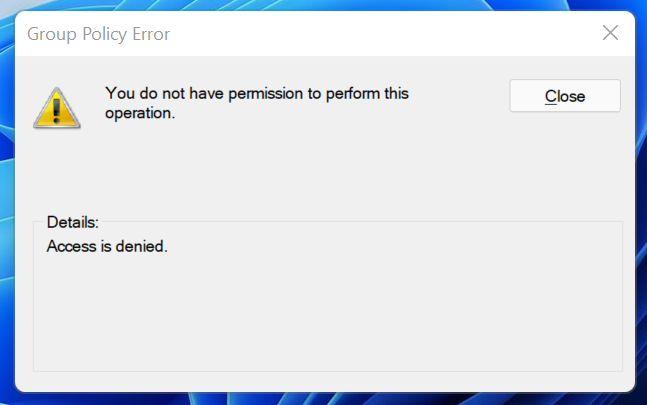
Only users with administrative rights can use the Local Group Policy Editor
Opening the Local Group Policy Editor to change settings for all users
If you want the settings that you modify to affect all users of the computer (or if you want to modify settings related to the computer itself), here are all the ways you can open the Local Group Policy Editor:
1. Open Local Group Policy Editor using Windows Search
The first method of opening the Local Group Policy Editor is pretty simple: you have to search for it by name or by the name of its executable file: gpedit.msc. For Windows 11, press Windows + S on your keyboard or click/tap on the magnifier icon on your taskbar to open the Search window. Then, type either gpedit or group policy, and the result should show up as you type. Click or tap on the “Edit group policy” result.
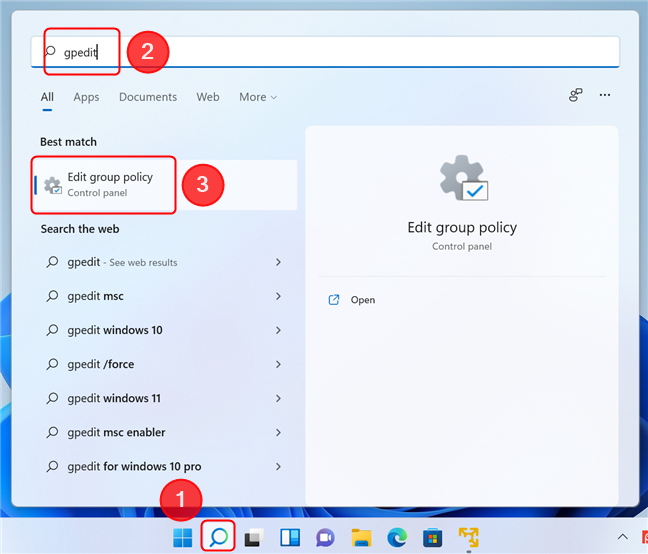
Open the Local Group Policy Editor using Search in Windows 11
Are you wondering how to find Local Group Policy Editor In Windows 10? Well, the process is even simpler in this case, since this popular operating system has a search field in its taskbar. Just click or tap on the input field (or press Windows + S) and then type gpedit or group policy. In the results list, click or tap on “Edit group policy.”
TIP: You can use the Start Menu to initiate a search, as well. Simply open it by pressing the Windows key or clicking the Start Menu icon on the taskbar, then start typing the keyword.
2. Open the Local Group Policy Editor from Settings

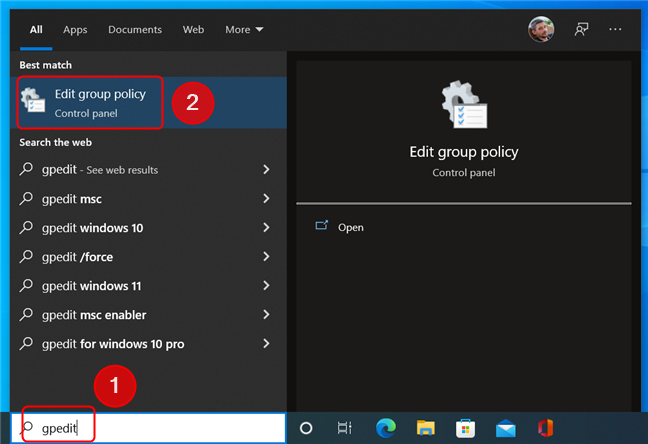
Open the Local Group Policy Editor using Search in Windows 10
You can also access the Local Group Policy Editor from the Settings app in Windows 11 or Windows 10. First, open Settings (one way to do it is by pressing Windows + I on your keyboard), then type gpedit in the search box and select the “Edit group policy” result. Here’s how it looks on Windows 11:
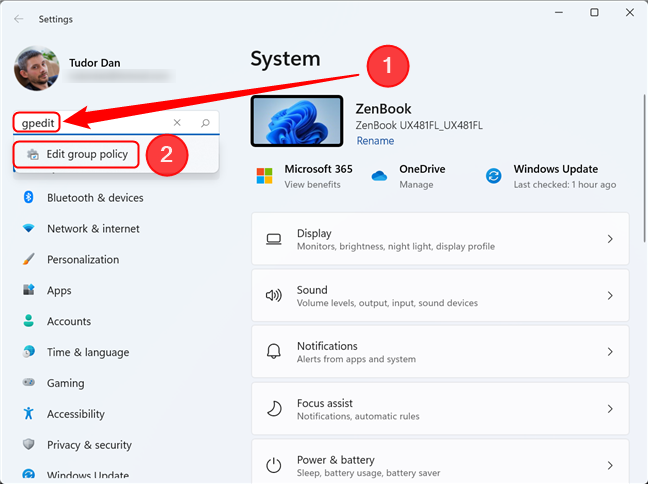
Open the Local Group Policy Editor from Settings in Windows 11
…and here’s how it looks on Windows 10. Very similar.
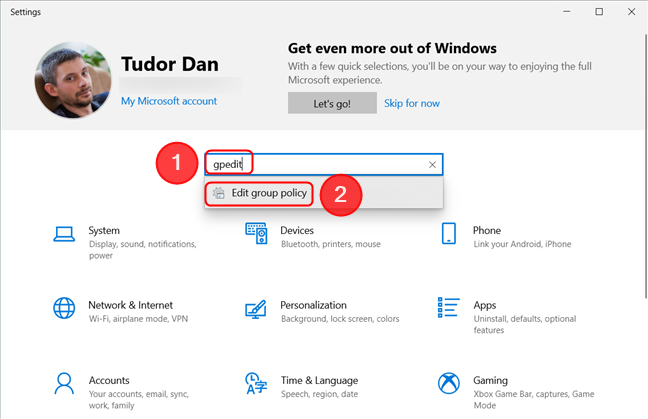
Open the Local Group Policy Editor from Settings in Windows 10
3. Create a shortcut for Local Group Policy Editor
If you want to access the editor very frequently but prefer to use desktop shortcuts, then you can create one for Local Group Policy Editor. In the Create Shortcut wizard, type gpedit.msc in the Location field. If you don’t know how to create shortcuts, read this article: How to create shortcuts for files, folders, apps, and web pages in Windows.
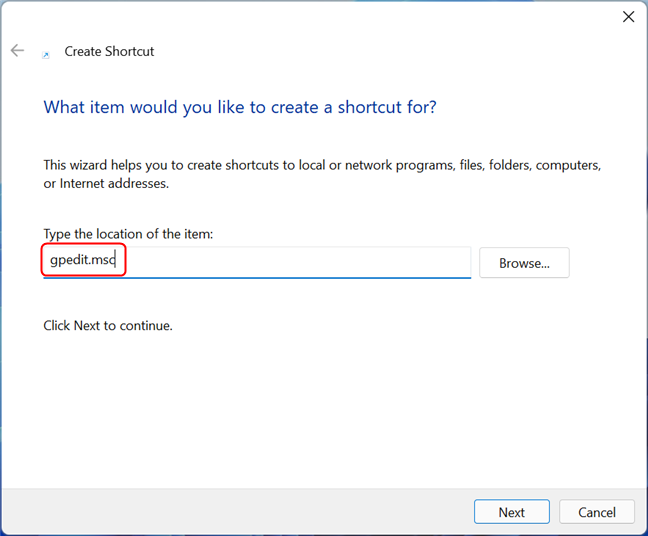
Create a shortcut to the Local Group Policy Editor in Windows
After creating it, you can open Local Group Policy Editor by double-clicking or double-tapping on the shortcut.
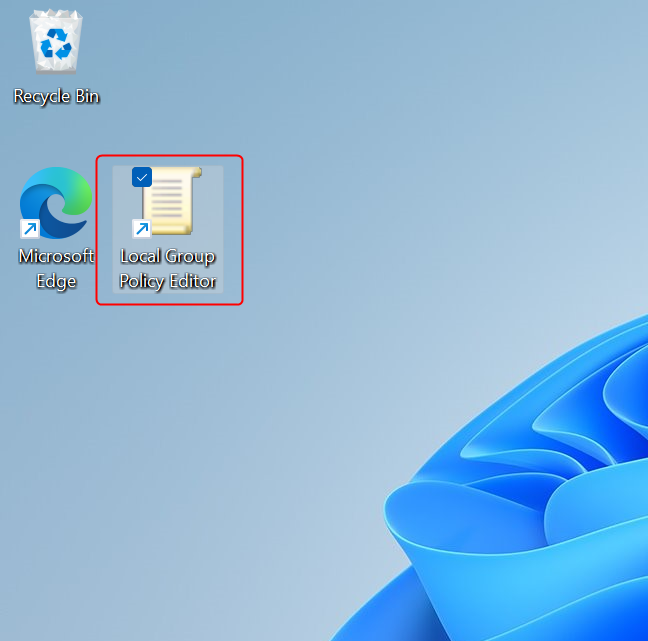
The Local Group Policy Editor shortcut
4. Pin the Local Group Policy Editor to the taskbar or the Start Menu
If you use the Local Group Policy Editor frequently, you can pin it to the taskbar or the Start Menu, but first, you need to create a shortcut for the editor. After creating it, in Windows 11, right-click or tap and hold the icon. Next, access the old right-click menu by selecting “Show more options”. Then, click or tap on one of the two actions, depending on what you want to do.
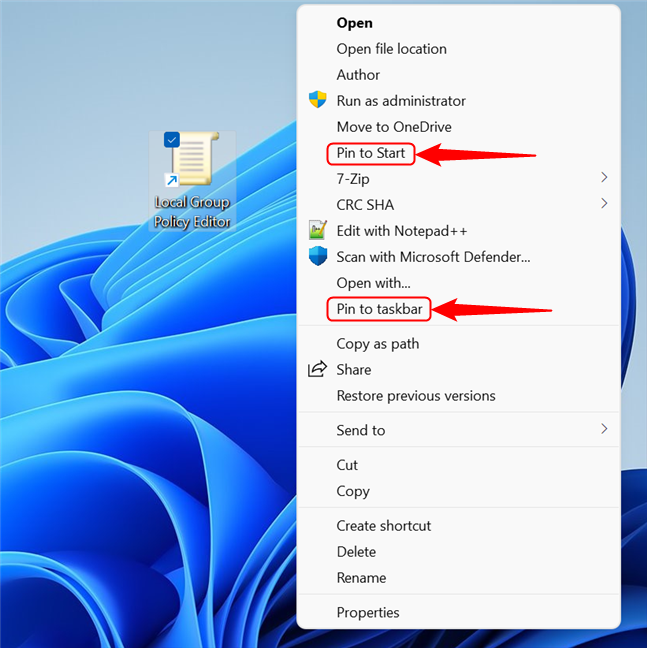
Select one of the two options if you want to pin the shortcut in Windows 11
In Windows 10, since the classic right-click menu is the default, simply right-click (or tap and hold) on the shortcut and select Pin to Start or Pin to taskbar.
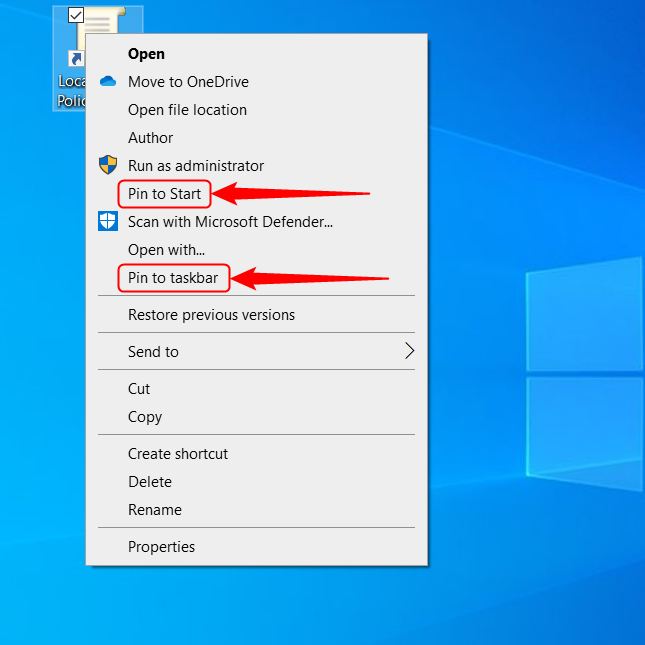
Pinning the Local Group Policy editor is easier in Windows 10
From now on, you can open Local Group Policy Editor from the Start Menu or the taskbar.
5. Opening the Local Group Policy Editor from Control Panel
Local Group Policy Editor is also available through the Control Panel. First, open the Control Panel. Then, click on the search box, type “group policy” and click or tap on Edit group policy in the results list.
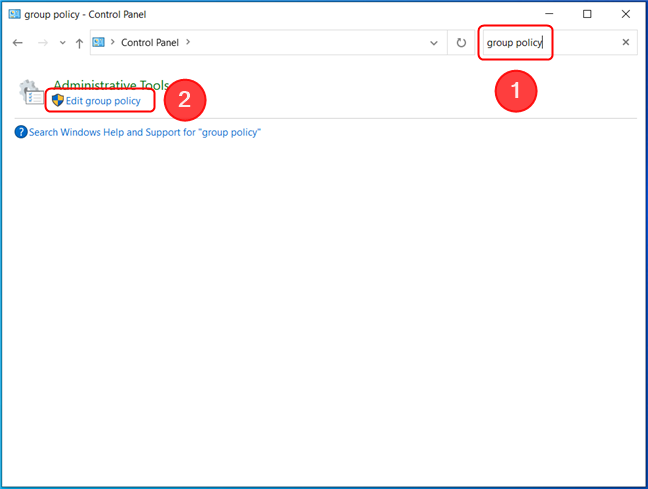
Open Local Group Policy Editor from the Control Panel
NOTE: Although Windows lists the search result under Administrative tools (in Windows 10) or Windows tools (in Windows 11), if you open the location, the Edit group policy shortcut is not there. Thus, the only way to reach it in the Control Panel is to use the search feature.
6. Open Local Group Policy Editor by using the Run window
Here’s another way to open Local Group Policy Editor: Press Windows + R on the keyboard to open the Run window. Then, type gpedit.msc and press Enter on the keyboard or click OK.
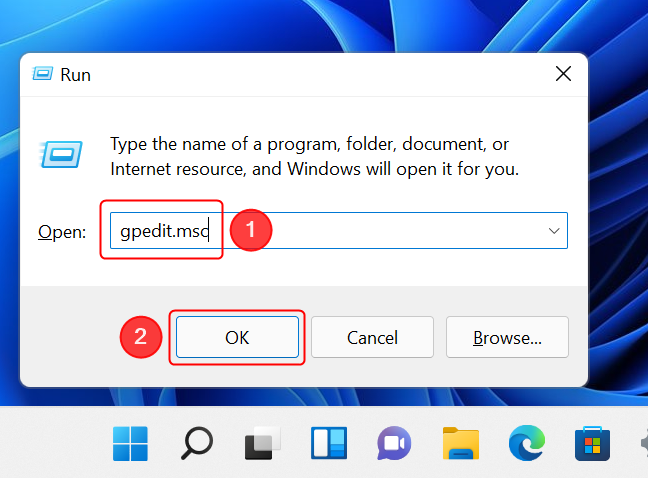
Open the Local Group Policy Editor using Run
7. Open Local Group Policy Editor by using Command Prompt, PowerShell or Windows Terminal
You can also use Command Prompt, PowerShell, or Windows Terminal to open the editor. In any of these apps, type gpedit.msc in the command line and press Enter.
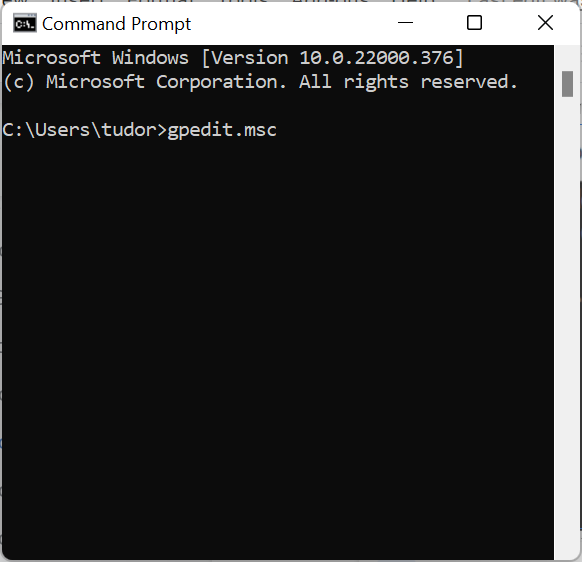
The command is identical for Command Prompt and PowerShell
8. Open Local Group Policy Editor by using Task Manager
You can open Local Group Policy Editor using the Task Manager. Launch Task Manager (a quick way to do it is by pressing Ctrl + Shift + Esc on your keyboard). If you are presented with the compact view of the Task Manager, press More details in the bottom-left corner. Next, open the File menu and click or tap “Run new task”.
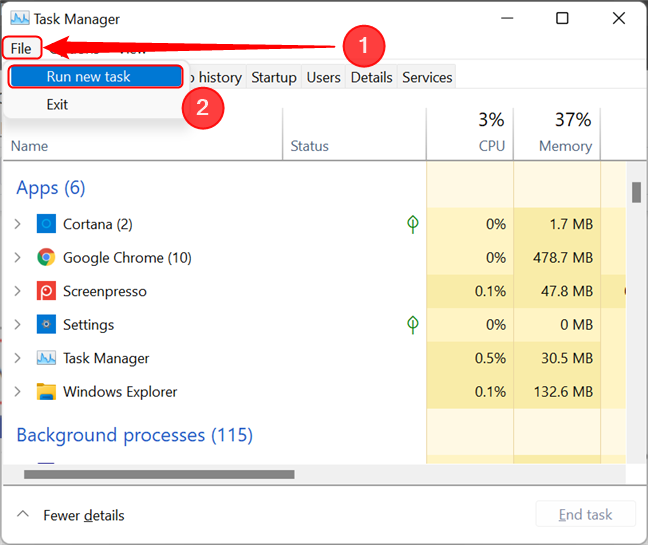
Run a new task in Task Manager
Now, type gpedit.msc in the Open field of the “Create new task” window. Press Enter or OK to run the command.
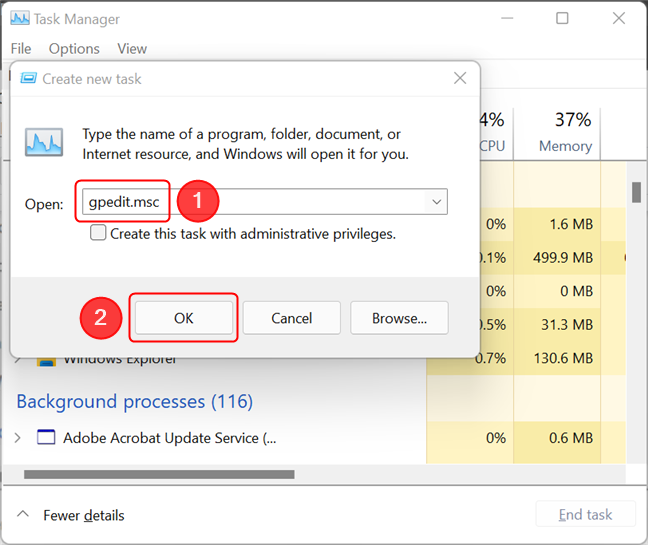
Opening the Local Group Policy Editor from the Task Manager
9. Open Local Group Policy Editor by using File Explorer
The File Explorer from Windows 11 and Windows 10 is another convenient way to start the Local Group Policy Editor. Simply open File Explorer, then type gpedit.msc in the address bar and press Enter on the keyboard.
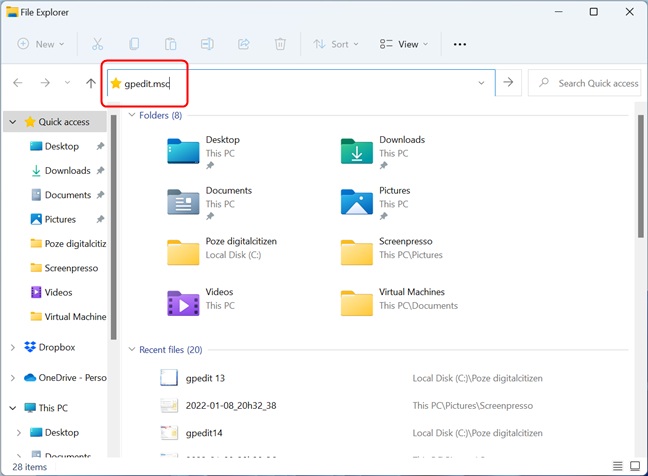
Run the Local Group Policy Editor from File Explorer in Windows 11 and Windows 10
10. Open Local Group Policy Editor by running its executable file
On both Windows 11 and Windows 10, the Local Group Policy Editor executable file is found in the System32 subfolder of the Windows folder. Navigate to “C:\Windows\System32” and look for a file named gpedit. If you hover your mouse cursor over the file, its description should be “Microsoft Common Console Document”. Once you identified the correct file, double-click or double-tap on it.
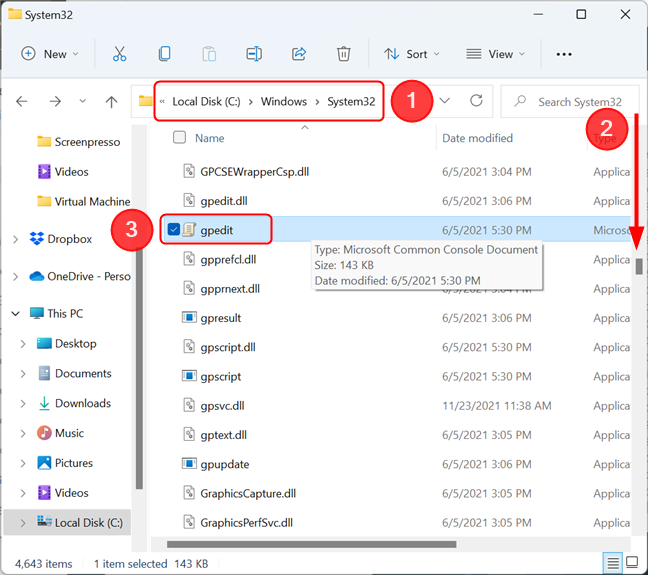
The file is located in the System32 folder
Opening the Local Group Policy Editor to change settings for specific users or groups
If you want to adjust settings only for a specific user account or user group on your Windows PC, launching the Local Group Policy Editor is more complicated and begins with launching the Microsoft Management Console. The quickest way to do this is by pressing Windows + R to open the Run window, typing mmc and pressing Enter. If you get a UAC warning, press Yes to continue. In the MMC window that appears, open the File menu, then click or tap on Add/Remove Snap-in.
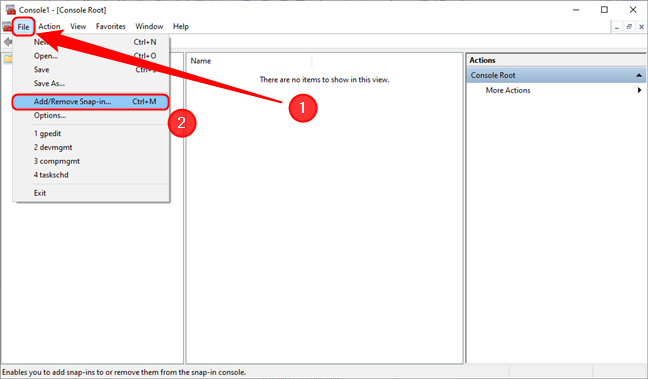
Add a snap-in in the Microsoft Management Console
The Add or Remove Snap-ins window appears. Here, click or tap on Group Policy Object Editor, then press Add. Alternatively, you can double-click the Group Policy Object Editor snap-in.
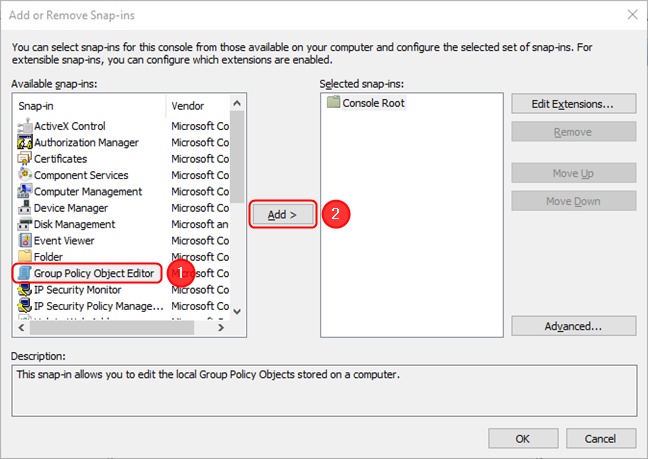
Select the Group Policy Object Editor, then press Add
This opens the Select Group Policy Object wizard. Click or tap on Browse to continue.
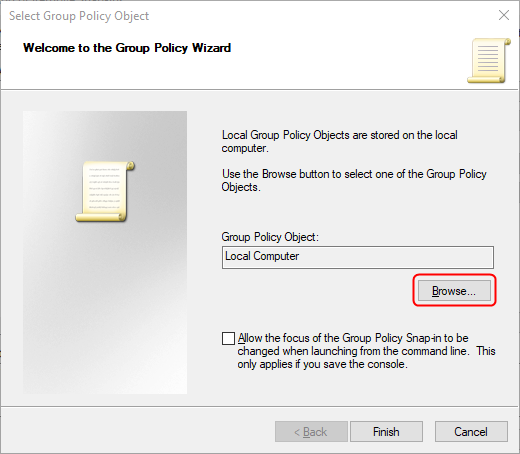
Hit Browse in the wizard
In the next window, go to the Users tab, select the user or the group of users for which you want to make changes (we selected the Non-Administrators group), then click or tap on OK afterward. Finally, press Finish.
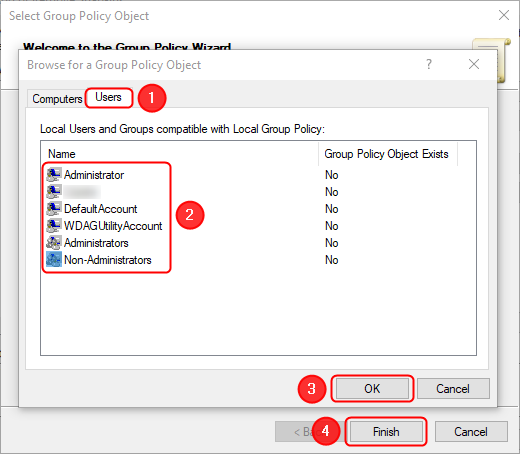
Selecting the user or the group for which you want to change settings
The Add or Remove Snap-ins window comes into focus. Press the OK button in the lower-right. This opens the settings tree applicable to the selected user/group.
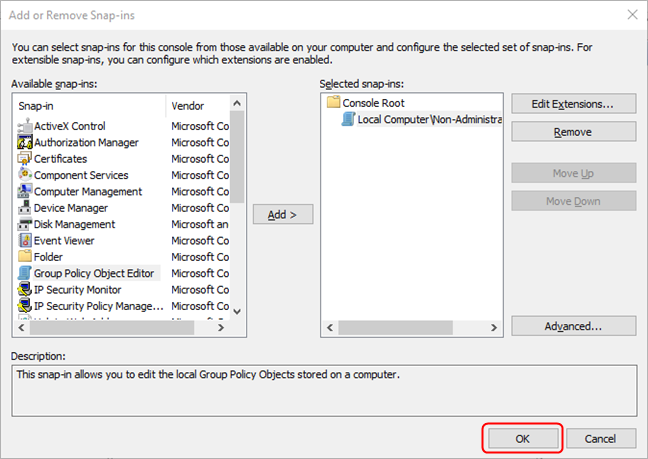
Press OK and the Editor will appear
If you plan on changing the settings frequently, in order to bypass this lengthy process, you can save the console settings. Open the File menu, then click or tap on Save as.
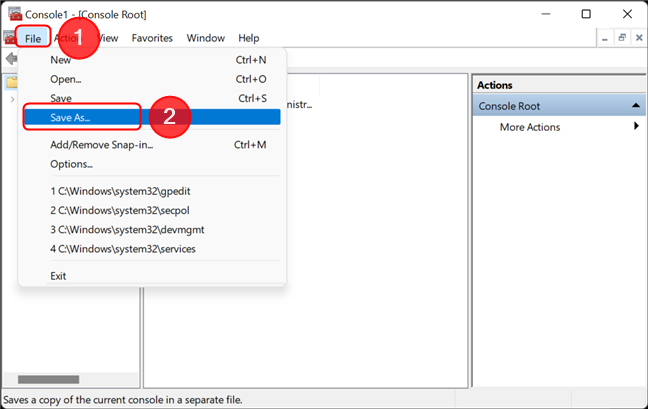
Save the console configuration for the Local Group Policy Editor
Next, navigate to the location where you want a shortcut to the console to be created, rename the shortcut, and click or tap on Save.
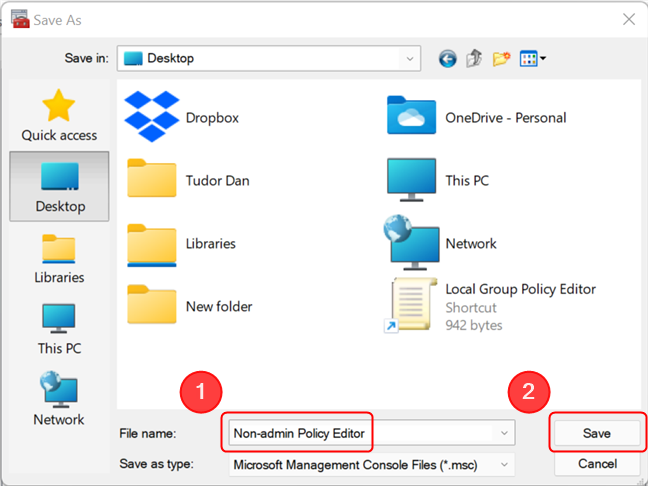
Rename the shortcut and place it in a folder of your choosing
The next time you want to modify the settings for the same user or group, simply double-click or double-tap the newly-created icon.
NOTE: The settings you alter in the Local Group Policy Editor will be enforced and will override the user’s preferences. For example, you can enforce a certain wallpaper, in which case the user will have no way of changing it (unless it has access to Local Group Policy Editor).
What do you plan to change in the Local Group Policy Editor?
Local Group Policy Editor is a powerful tool designed for power users and IT administrators. You get to control many aspects of how the other users access and use your Windows PC. What do you plan to change in the Local Group Policy Editor? Let us know your preferences in a comment below. Also, if you know any other ways of opening the editor, share them with us and we will update the article.


 13.01.2022