
Although we tend to like the OneDrive service, and we use it on our Windows computers, there are a few quirks that we have trouble with. One of them is that, sometimes, we’re facing issues with OneDrive not syncing. Another one is knowing when it performed the last synchronization to get an idea of whether it has synchronized the latest files we have added. Here is how to sync OneDrive by force and how to check when your files were last synced by it in Windows 11 and Windows 10:
NOTE: Because things are mostly the same in Windows 11 and Windows 10, we are primarily using screenshots from Windows 11 to illustrate the instructions for these two operating systems.
How to see when OneDrive files were last synced
If it looks like OneDrive’s not syncing on your Windows 11 or Windows 10 computer, and you want to check when your files were last synchronized, click or tap once on the OneDrive icon from the taskbar notification area.

OneDrive icon from Windows 11's taskbar
This action opens a window where OneDrive shows the last actions it performed. For each synced file, you can see how far back in time that happened.
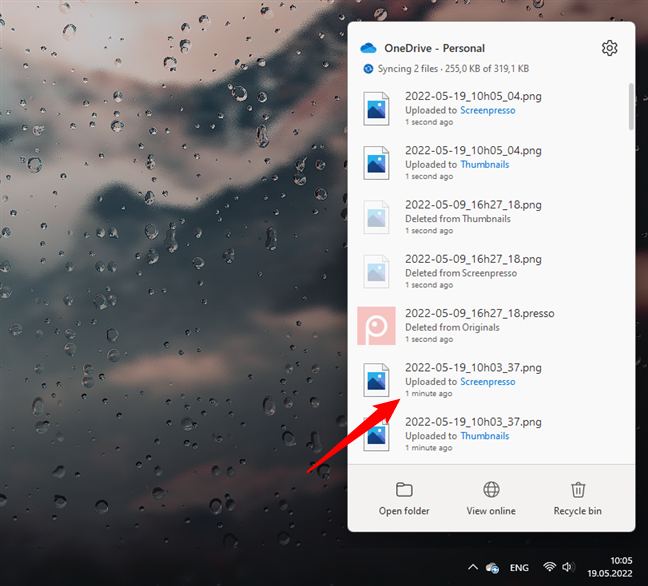
Last sync times shown by OneDrive in Windows 11
The OneDrive app for Windows 10 is identical to the one in Windows 11, as you can see in the screenshot below.
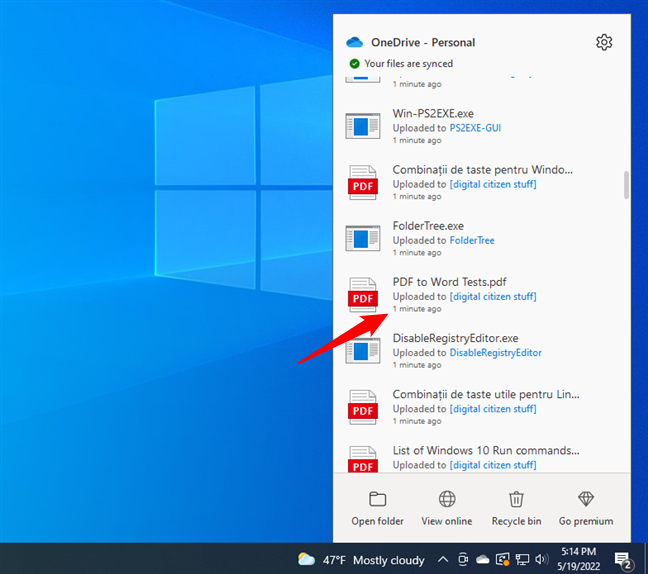
Last sync times shown by OneDrive in Windows 10
Note that, as far as we know, this is the only way to find out when OneDrive last synchronized your files in either Windows 11 or Windows 10.
There’s also a OneDrive app in the Microsoft Store, which is different from the desktop application. However, the app from the Microsoft Store doesn’t offer any information regarding the last sync time.
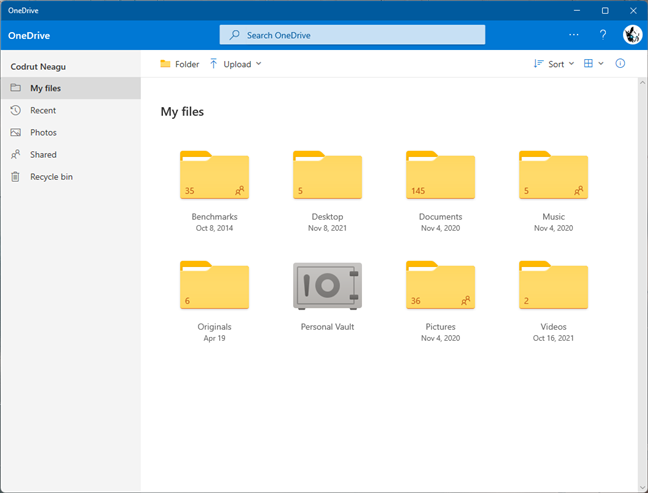
Microsoft Store OneDrive app for Windows 11
How often does OneDrive sync?
In normal circumstances, the OneDrive application syncs your files continuously as soon as it detects a change, which it should do automatically. You don’t get any controls to force OneDrive to sync, and you don’t get any options related to the syncing process’s frequency.
As we said, it’s all automatic, so there’s not much you can actually do if your OneDrive is not syncing in Windows 11 or Windows 10. However, you can do a OneDrive force sync by pausing and resuming the synchronization process or by restarting the app. Here are a few ways to do that:
1. How to force OneDrive to sync using its “Pause syncing” feature
In either Windows 11 or Windows 10, forcing OneDrive to sync your files can be rather easy, although not exactly intuitive. All you have to do is “Pause syncing” and then “Resume syncing.” Here’s how to do it:
Click or tap on OneDrive’s icon from the right side of the taskbar. Then, press the cogwheel button called “Help & Settings” from the top-right corner of OneDrive’s popup window.
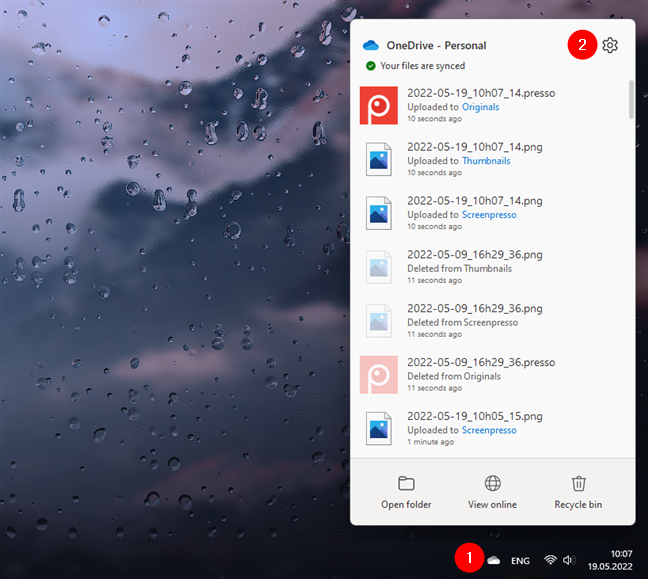
Opening Help & Settings in OneDrive's app
The previous action opens OneDrive’s menu. On it, click or tap on “Pause syncing” and select “2 hours” or any of the other options available.
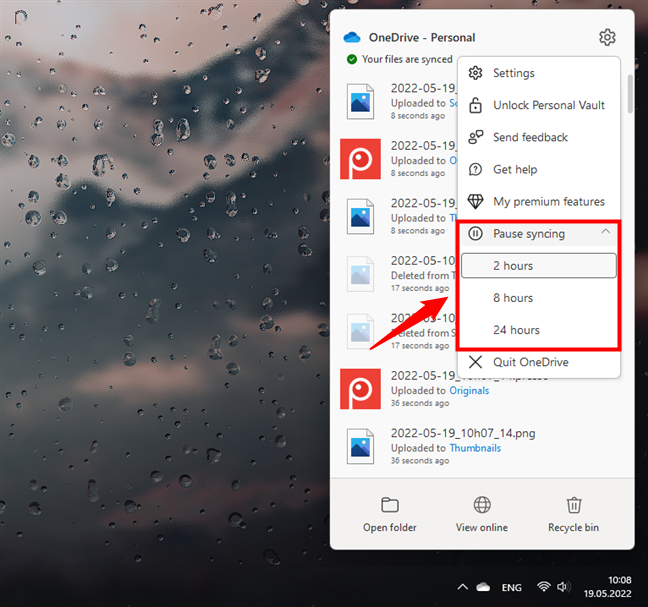
Pause syncing for OneDrive
OneDrive immediately stops syncing your files for the time you selected. In its popup window, it tells you about the syncing pause, just like in the screenshot below.
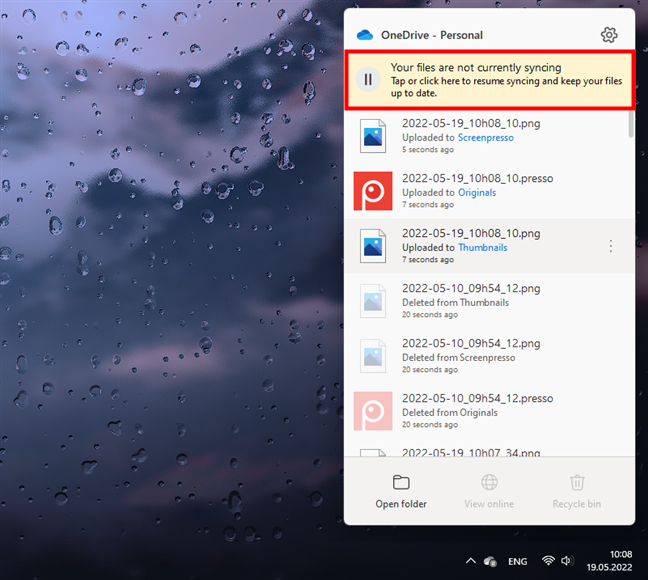
OneDrive: Your files are not currently syncing
To force OneDrive to sync, there’s only one thing left to do. Open OneDrive’s window again, and click or tap on the Pause button from the top.
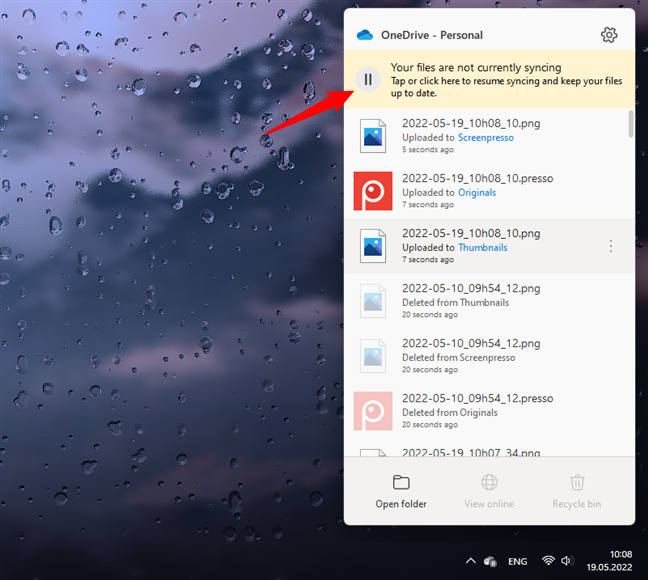
Resume syncing in OneDrive
Alternatively, you can also press the “Resume syncing” option from its menu.
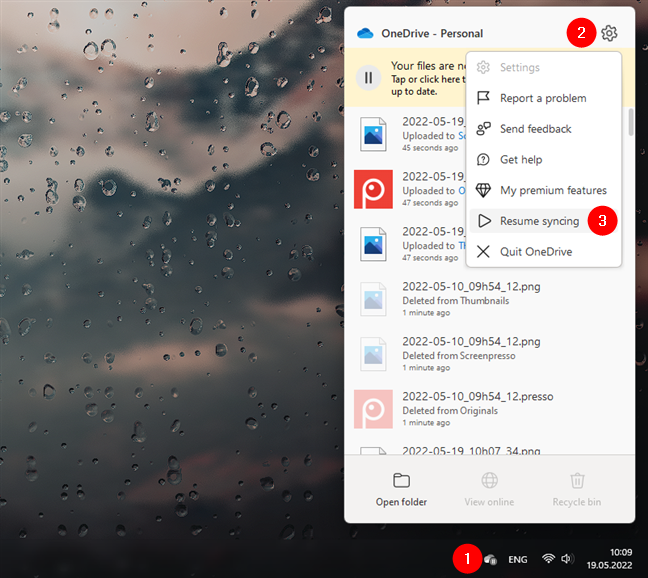
Resume syncing for OneDrive from its menu
This action makes OneDrive sync the latest data right now.
TIP: If you also use OneDrive on your Android devices or your iPhone, read How to force OneDrive to sync on Android and iPhone.
2. How to do a OneDrive force sync using its menu
An alternative way to do a OneDrive force sync is to stop the OneDrive app and then start it again. To stop it, right-click (or tap and hold) on its icon from the taskbar notification area, and press Quit OneDrive.
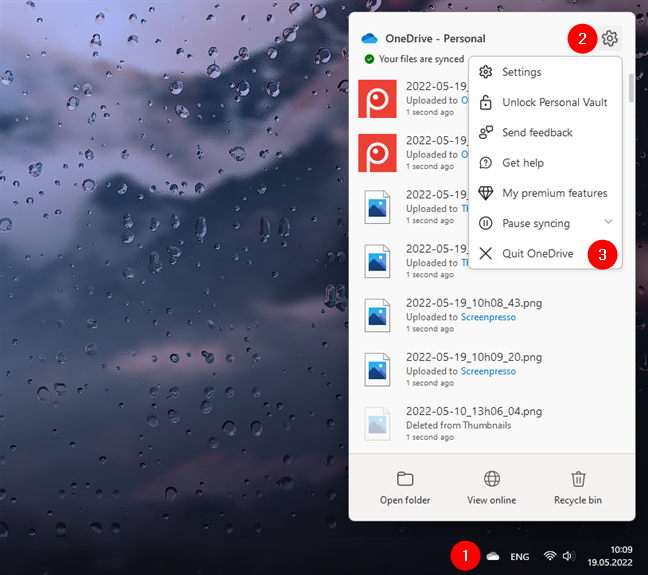
OneDrive force sync: Close OneDrive
Then, start OneDrive again. Both in Windows 11 and Windows 10, a quick way to do it is to look for the OneDrive shortcut in the Start Menu and click or tap on it.
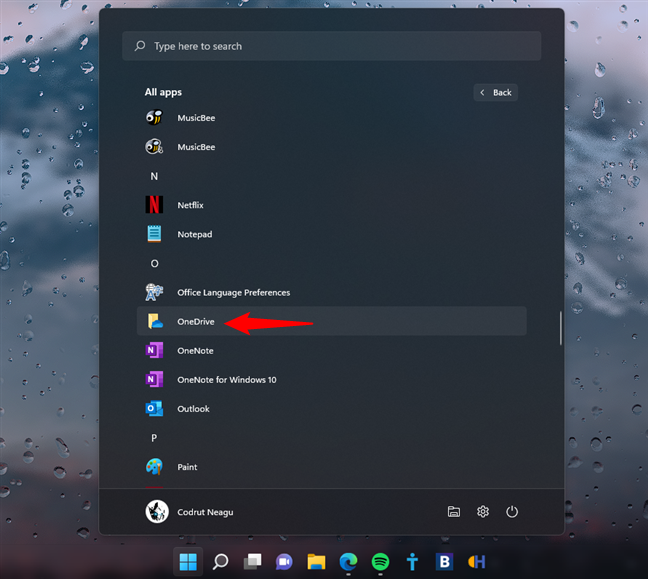
Force OneDrive to sync: Restart the OneDrive app
3. How to force OneDrive to sync using Task Manager
Another way to force OneDrive to sync, both in Windows 11 and Windows 10, is to restart the OneDrive application using Task Manager.
Open the Task Manager and select the Processes tab. Then, find the Microsoft OneDrive process, right-click (press-and-hold) on it and select End Task to stop its process.
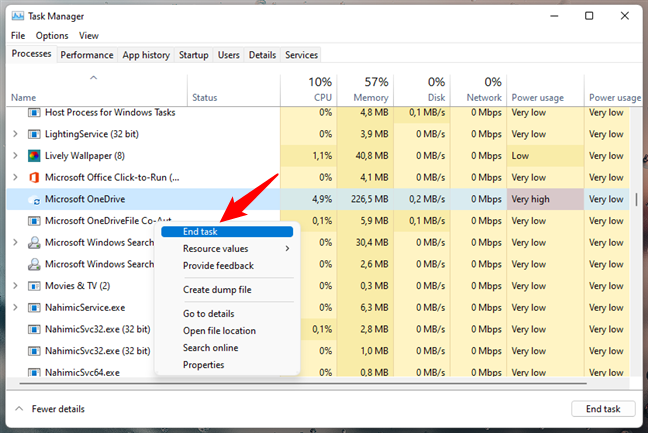
Ending the OneDrive task
In the same Task Manager window, open the File menu and click or tap on Run new task.
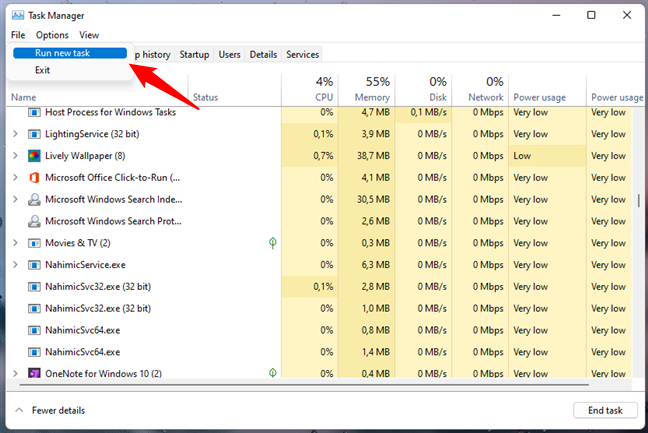
Using Task Manager to Run new task
Task Manager now launches a new window called “Create new task.” In the Open field, if you use Windows 11, type this path:
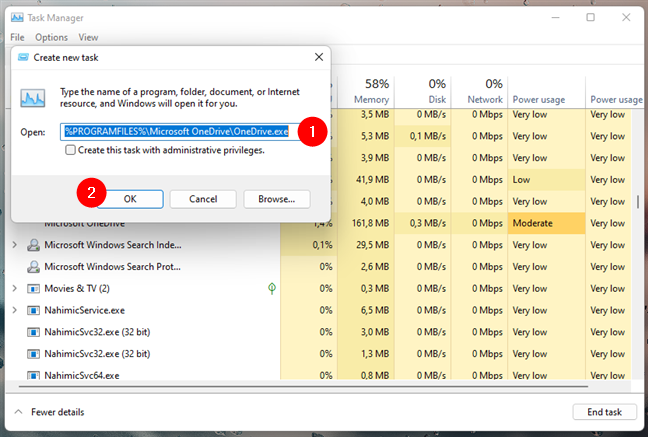
Start OneDrive from Windows 11's Task Manager
If you use Windows 10, use this path instead:
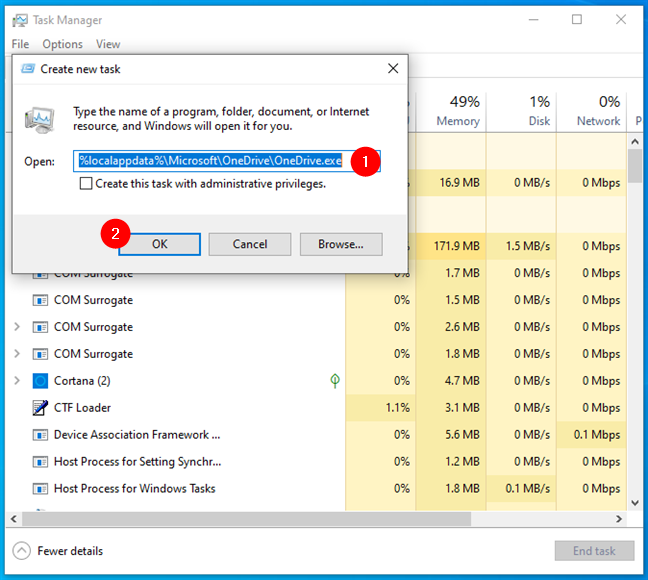
Start OneDrive from Windows 10's Task Manager
In either case, after you’ve entered the proper path, click or tap on OK or press Enter on your keyboard. OneDrive's process should now start again. Once it’s launched, it automatically triggers a file check, and if any change is detected, it also starts syncing your files.
4. How to do a OneDrive force sync using Command Prompt
Command Prompt also offers an alternative solution to the OneDrive not syncing problem. If you’re using Windows 11, open CMD and run the following commands, one after the other:
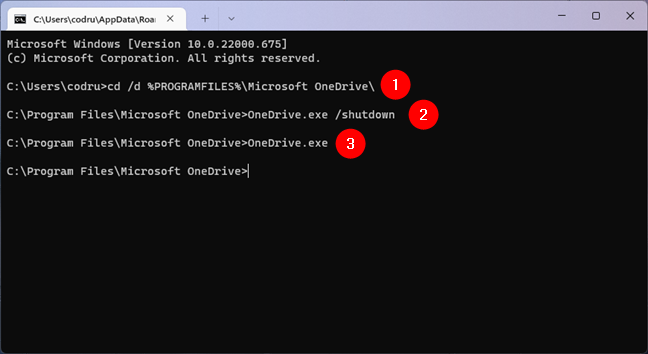
OneDrive force sync using commands in Command Prompt
If you’re using Windows 10, run these commands:
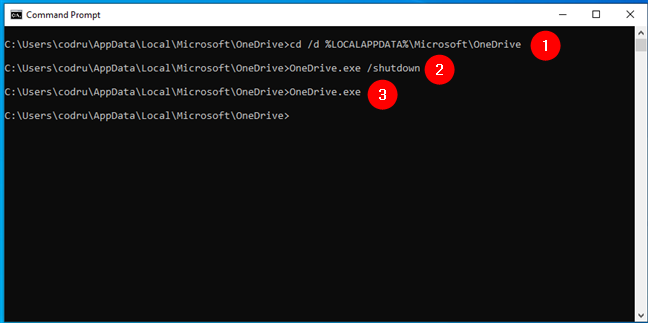
OneDrive force sync commands in Windows 10
In both cases, the first command sets the working directory to the one where OneDrive is installed. The second command shuts down OneDrive, and the last one relaunches the app. The result is that the OneDrive app is restarted, which should force OneDrive to sync.
5. How to do a OneDrive force sync using PowerShell
Finally, our final solution to the OneDrive not syncing issues is to restart OneDrive using PowerShell. Open PowerShell and run the following command to close the OneDrive app:
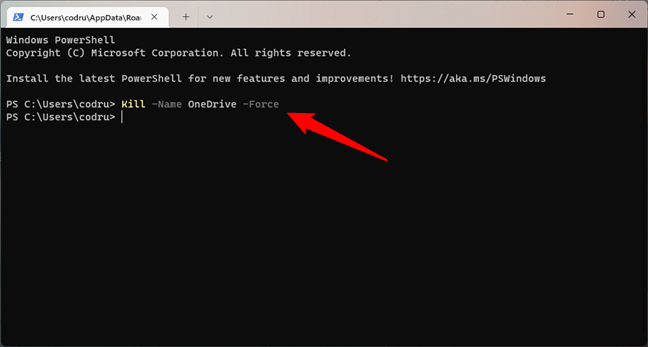
Kill the OneDrive process from PowerShell
Then, if you use Windows 11, run the next command to relaunch OneDrive:
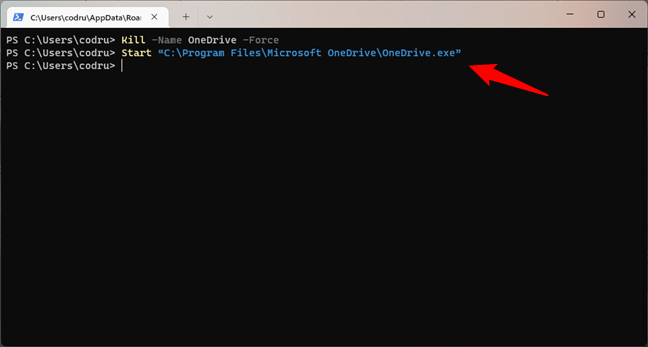
OneDrive force sync by launching OneDrive from PowerShell
If you use Windows 10, run this command instead:
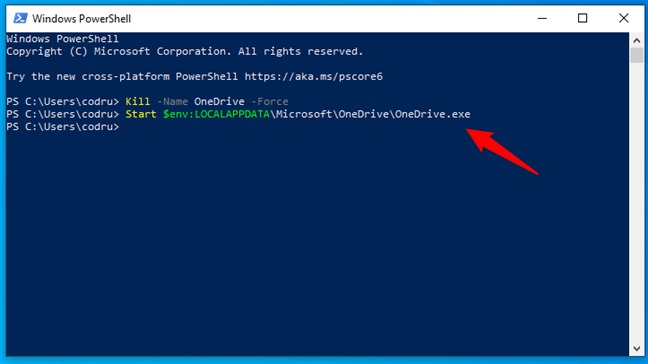
OneDrive force sync in Windows 10 from PowerShell
Regardless of whether you use Windows 11 or Windows 10, now the app is restarted, which should force OneDrive to sync.
Did you manage to do a OneDrive force sync?
We hope this guide was helpful and that you managed to repair the “OneDrive not syncing” problems you’ve met. Let us know in the comments section below if you know other ways to force OneDrive to sync or check when OneDrive last synced your files. We will update this guide as soon as possible.


 23.05.2022
