IP addresses are vital for the internet and all the networks in the world. IPv6 addresses even more so, because the world has run out of IPv4 addresses. Without them, we couldn’t send data between our devices and use an ever-expanding internet. Most internet service providers (ISP) worldwide offer IPv6 internet addresses for all their clients, and enabling them is a great idea. If you have an ASUS router or mesh Wi-Fi system, here’s how to enable IPv6 on it and how to configure IPv6 internet connectivity:
IMPORTANT: This guide must be followed only after your ASUS router is connected to the internet and the Wi-Fi works well in your home, using IPv4 addresses. If your WAN connection is not set up correctly, you shouldn’t be activating IPv6 on your router.
Also, for more information about IP addresses, read this guide: What is an IP address and a subnet mask, in simple terms? If you’re curious about the benefits of using IPv6 addresses for all the devices on the internet, Facebook has published an interesting study they’ve done on the topic: IPv6: It’s time to get on board.
Step 1. Log in to your ASUS router or mesh Wi-Fi
On your PC or device, open your favorite browser and navigate to router.asus.com or your router's IP address. On newer models, the default IP address is 192.168.50.1. On older ASUS routers, the IP address is 192.168.1.1. Next, type the username and password and click or tap Sign In.
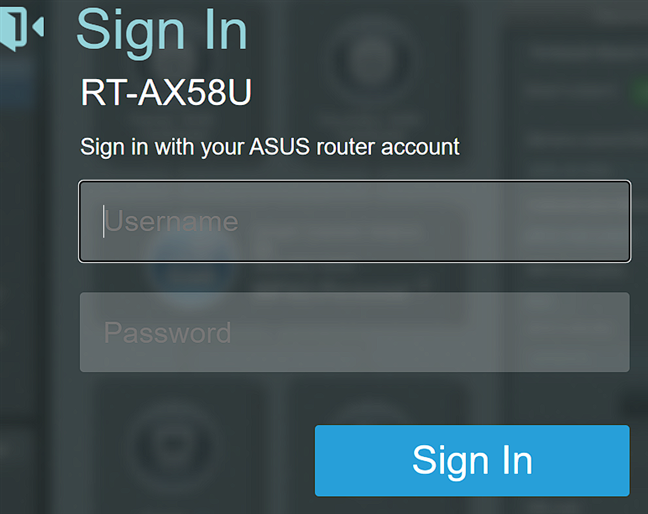
Log into your ASUS router or mesh Wi-Fi
NOTE: If you need help with other ways to log in to your ASUS router, read: How to login to your ASUS router.
Step 2. Go to the IPv6 settings on your ASUS router
When you see the admin interface of your ASUS router, look for the Advanced Settings section in the left sidebar. Find the entry named IPv6 and click or tap on it.
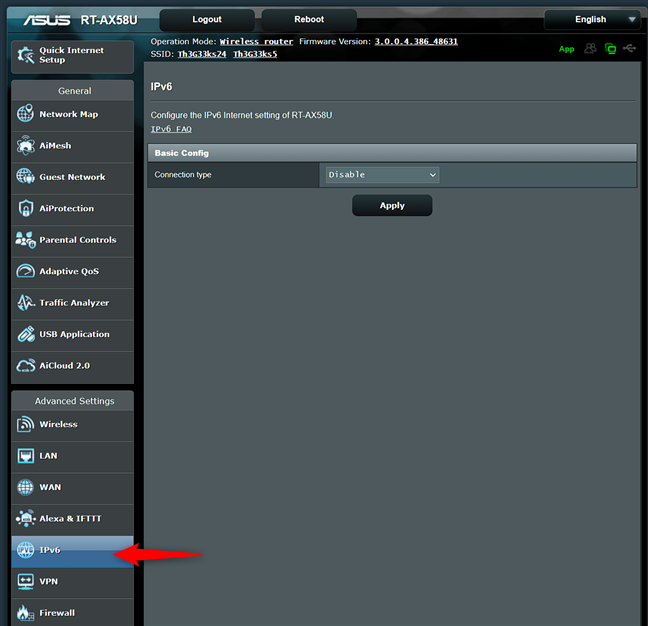
On the left, choose IPv6
IMPORTANT: If you don’t see the IPv6 section, your ASUS router may not be able to work with IPv6 addresses or may need the latest version of firmware to add this feature. If you’ve checked for new firmware and your ASUS router doesn’t feature IPv6 settings, it is an old model that doesn’t work with this type of IP address.
Step 3. Configure the IPv6 settings on your ASUS router or mesh Wi-Fi
After selecting IPv6 on the left, go to the IPv6 tab on the right. Click or tap the Connection type drop-down list and choose the type of connection you want.
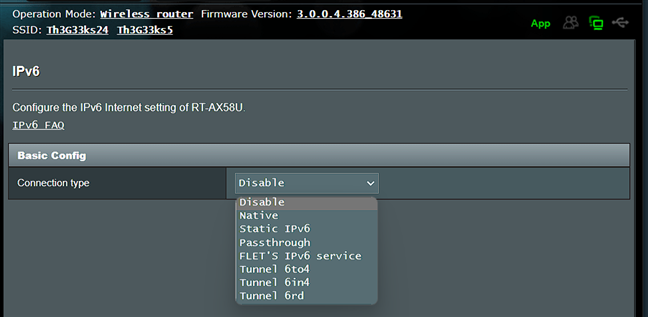
Choose the appropriate Connection type
Depending on your specific router, you will see a longer or shorter list of connection types. However, for most people, the following options should be used:
- If you have a PPPoE internet connection, like I do, you should select Native.
- If you have a static IP internet connection, you should choose Static IPv6.
- If you have an automatic IP internet connection, you should select Passthrough.
Depending on this choice, you get different configuration options. But before going into details about each of them in the next subchapters, let’s briefly describe the other connection types available in the dropdown list, which tend to be used only in business networks:
- FLET’S IPv6 service - a special type of IPv6 PPPoE internet connection that uses the same PPPoE connection method as IPv4 FLET'S services. Users configure their ASUS router using the IPv4 PPPoE account and password. Both IPv4 and IPv6 PPPoE settings are required to set up an IPv4/IPv6 dual-stack environment.
- Tunnel 6in4 - a tunneling protocol that encapsulates IPv6 packets on specially configured IPv4 links. A 6in4 packet format consists of the IPv6 packet preceded by an IPv4 packet header. When using this option, you need to provide static IP addresses for the server and client communicating over this tunnel.
- Tunnel 6to4 - a system that allows IPv6 packets to be transmitted over an IPv4 network without the need to configure explicit tunnels, like is the case with Tunnel 6in4.
- Tunnel 6rd - an extension of the Tunnel 6to4 feature that allows the internet service provider (ISP) to provide a unicast IPv6 service to customers over its IPv4 network by using encapsulation of IPv6 in IPv4.
Step 3.1 Set Native IPv6 connections on your ASUS router or mesh Wi-Fi
When you have a PPPoE internet connection, all you have to do is to select Native in the Connection type drop-down list and click or tap Apply.
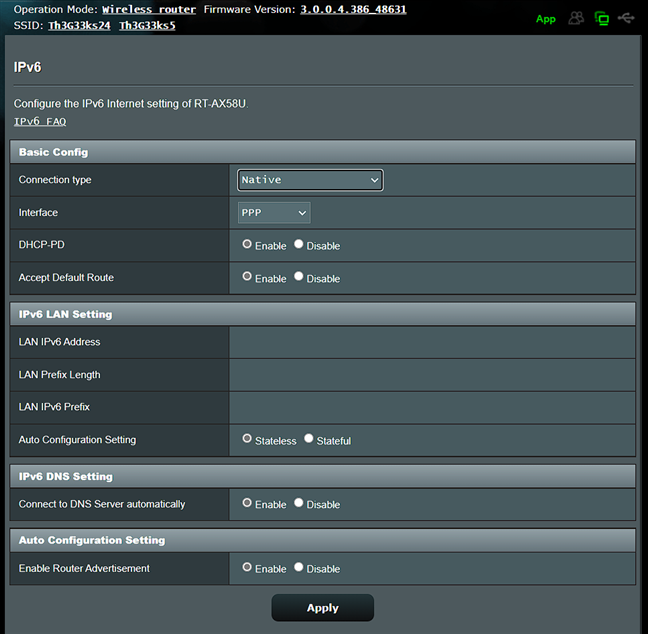
Setting Native IPv6 connections
Your ASUS router or mesh Wi-Fi system will reboot, apply your settings, and receive an IPv6 address for your internet service provider.
Step 3.2 Set Static IPv6 connections on your ASUS router or mesh Wi-Fi
When you have a static IP internet connection, choose Static IPv6 in the Connection type drop-down list. Then, you have to enter lots of information like the IPv6 address for your WAN connection, the IPv6 Gateway, IPv6 DNS servers, and so on. You need to talk to the tech support service to get all that information so that you can complete it correctly.
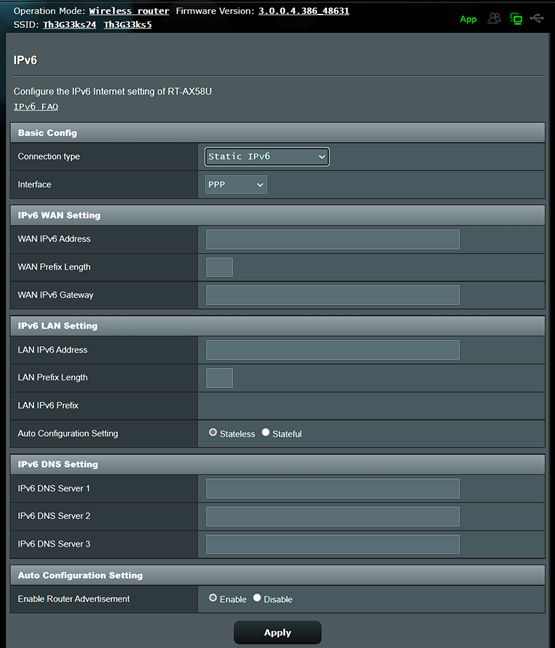
Setting Static IPv6 connections
When you are done entering everything, verify that all the IP addresses were typed correctly, and then hit the Apply button. After the router restarts, your IPv6 settings are applied.
Step 3.3 Set Passthrough IPv6 connections on your ASUS router or mesh Wi-Fi
If your internet connection uses an automatically assigned IP address from your provider, in the IPv6 tab, choose Passthrough for the Connection type.
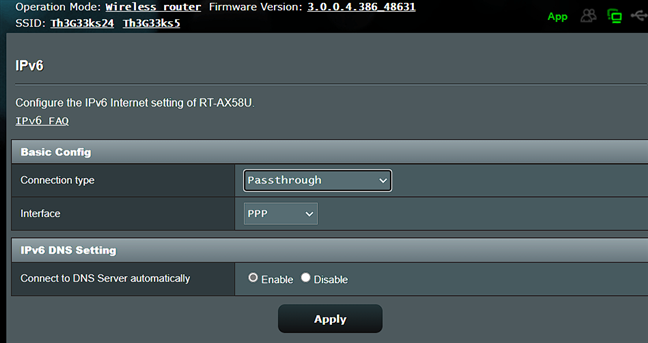
Setting Passthrough IPv6 connections
There’s no other setting to be made. Only hit Apply, wait for the router or mesh Wi-Fi to reboot, and it will be receiving an IPv6 address in no time.
How to verify that your ASUS router or mesh Wi-Fi is using an IPv6 address
After you’ve made your settings, you may want to verify if everything works well and if your ASUS router has an IPv6 address. To do that, fire up your favorite web browser on a computer connected to the network managed by your router and visit Test your IPv6. This site automatically tests if everything works well, and it gives you a readiness score. If it’s 10 out of 10, all is great. 🙂
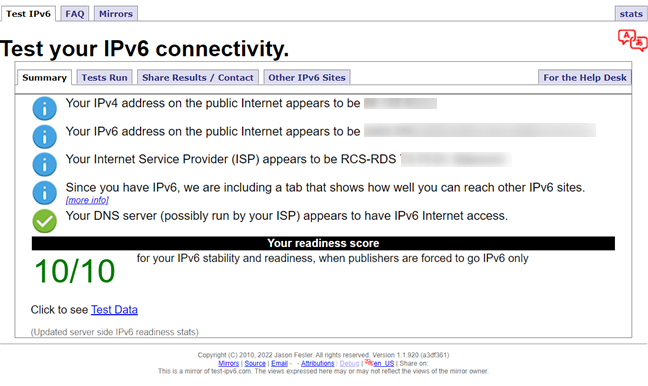
Test your IPv6 settings
If it’s not, the site shares what it finds missing in your IPv6 connectivity. This information might help you figure out what’s wrong and improve your IPv6 settings on your ASUS router or mesh Wi-Fi.
Did you successfully enable IPv6 on your ASUS router or mesh Wi-Fi?
By the end of this guide, you should have an IPv6 internet connection enabled on your ASUS router. Hopefully, everything worked well from the very first try, and the website shared earlier confirms that IPv6 is configured correctly. Before closing, tell me if the IPv6 settings on your ASUS router work as intended and whether you have any issues. Use the commenting options below, and let’s chat.


 26.05.2022
