Apple is aware that your iPhone wallpaper is important, so it offers plenty of options when deciding on an iPhone background. With just a few taps, you can set images from the Photos app or default iPhone wallpapers on the Lock Screen and Home Screen. Did you know that iOS 17 also includes preset wallpapers or that you can even use live photos as wallpapers for your iPhone? Read this guide to learn more about iPhone backgrounds and to find out how to change the iPhone wallpaper to whatever makes you smile:
NOTE: To create this tutorial, I used iOS 17.1. If you have an older version of iOS, some of the features and options might not be available on your device. Also, before starting, you should know that setting a new wallpaper is not the only way you can customize your iPhone; follow this link for tips on how to personalize your iPhone’s home screen.
How to change your iPhone’s wallpaper
If you want to give your iPhone a fresh look, changing its wallpaper is a simple and highly efficient way to do so. Here’s how it all works:
Step 1. Access your iPhone’s wallpaper settings
Settings is the go-to app for most changes on your device, whether it’s setting a new ringtone or using your iPhone as a Wi-Fi hotspot. To access all the options available for your iPhone background, open the Settings app, scroll down a bit, and then tap Wallpaper.
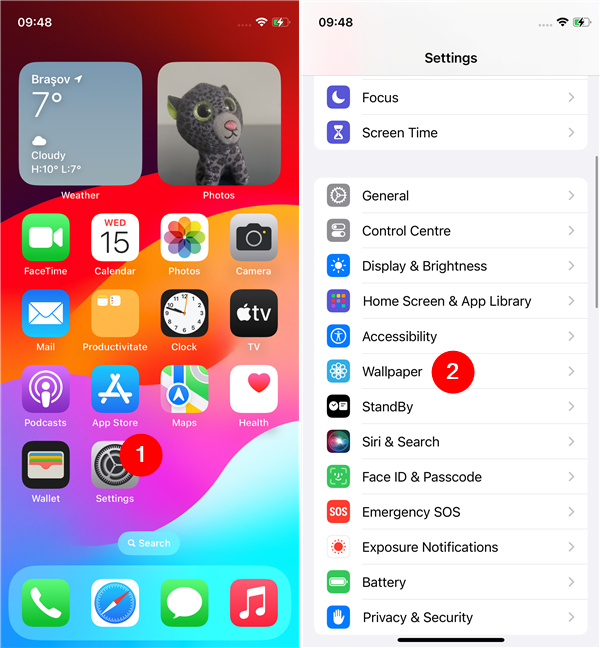
Open Settings and tap Wallpaper
On the Wallpaper screen, you can see your Current wallpaper. The iPhone Lock Screen background is shown on the left, and the iPhone Home Screen wallpaper is displayed on the right.
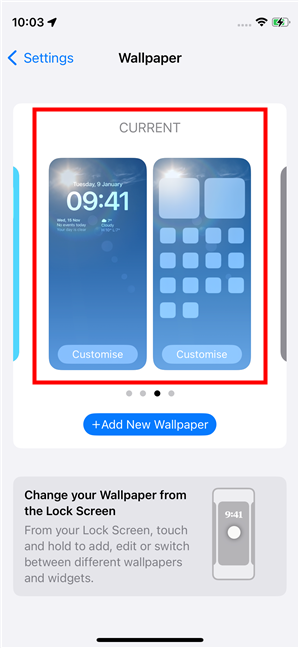
The Current Wallpaper on your iPhone
Step 2. Change or add a new wallpaper on your iPhone
If you want to change your iPhone’s wallpaper, there are two paths you can follow. You can either slide on the screen to select one of the wallpapers you’ve previously set on your iPhone, or you can choose a new wallpaper. Assuming you didn’t change your iPhone’s wallpaper previously, you’ll want to use the latter option. Tap the “+Add new wallpaper” button to begin the process of changing the wallpaper on your iPhone.
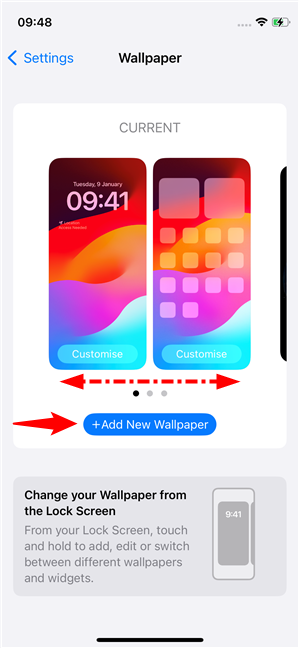
Swipe to select a different wallpaper or Add New Wallpaper
This loads a page full of options for your new iPhone wallpaper. As you can see in the next screenshot, the area at the top lets you choose an iPhone wallpaper from different sources. You can choose to set a wallpaper from your Photos, use a Photo Shuffle, change to a Live Photo (if you want to make your iPhone wallpaper live), create an Emoji wallpaper, and so on.
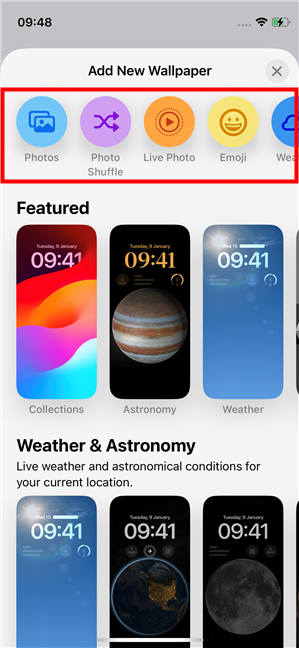
Image sources for the iPhone's wallpaper
Beneath the wallpaper sources row, iOS 17 also gives you other preset wallpaper options you can use, split into categories such as Featured, Weather & Astronomy, Emoji, Collections, or Colour.
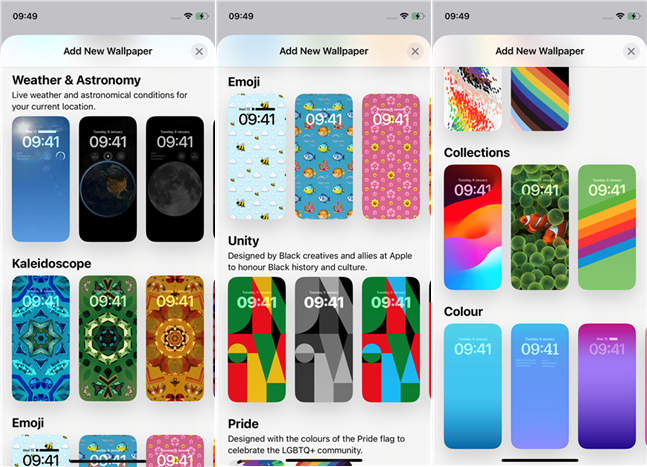
Wallpapers bundled with iOS 17
Depending on your preferences, choose a source or one of the predefined wallpapers and tap on it.
For example, if you’d like to set one of your photos as your iPhone’s wallpaper, tap the Photos source on the top row of the “Add New Wallpaper” page. Then, select the photo you want to use and tap on it.
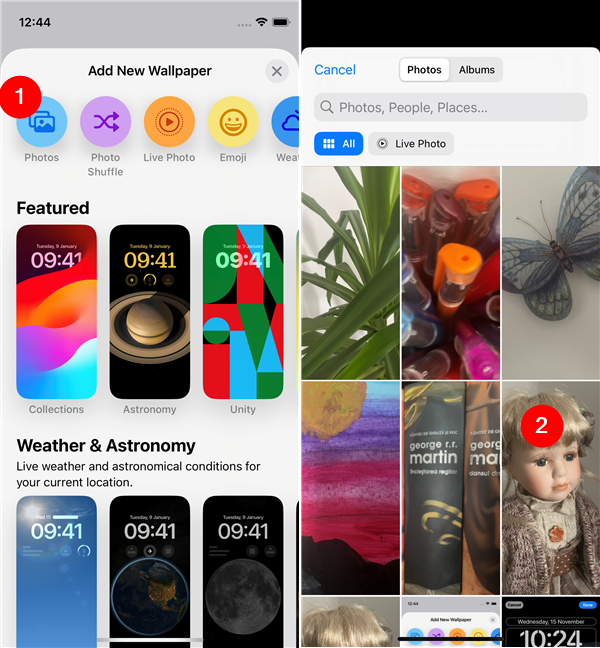
How to set a photo as your iPhone's wallpaper
Or, if you’d like to set your iPhone’s wallpaper to show the Earth, Moon, other planets, or our entire Solar System, choose the astronomy wallpaper you prefer in the Weather & Astronomy section.
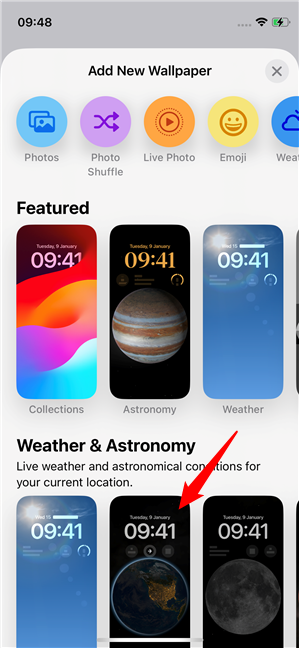
How to set a default iPhone wallpaper
Regardless of the source or the preset iPhone wallpaper you decide to use, once you select it, you’ll get a preview of how it’s going to look on your lock screen.
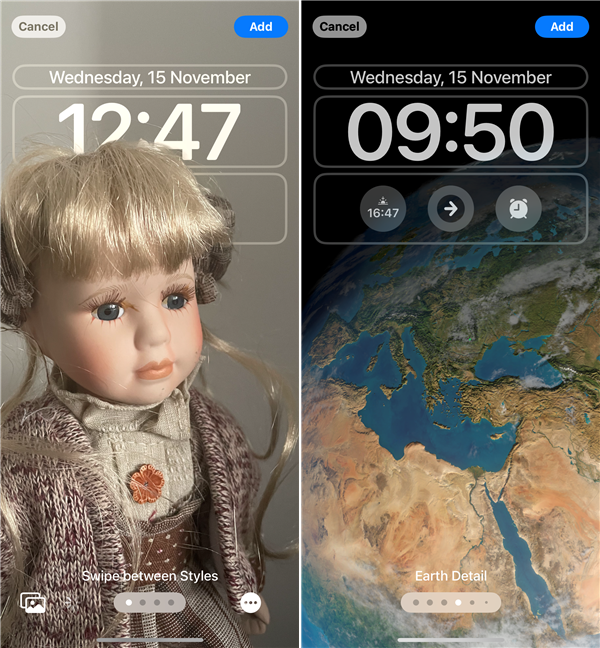
iPhone's wallpaper preview screen
If everything is already to your liking, you can tap the Add button in the top-right corner of the screen to go straight to applying the wallpaper on your iPhone. However, before you do that, you might want to first customize the wallpaper a bit. In this case, don’t tap on Add yet; instead, follow the steps in the next section of this guide.
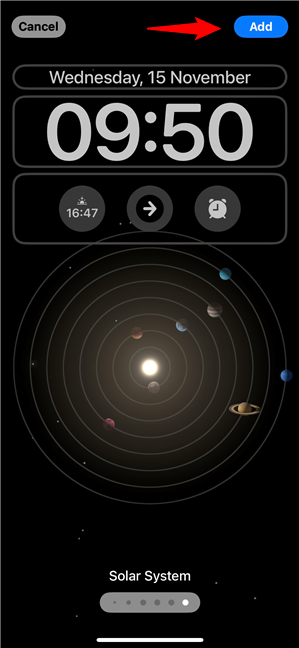
Tap Add to apply the wallpaper
Step 3. Customize your iPhone’s wallpaper
In the following paragraphs, I’m going to show you some of the options available when setting the Astronomy Earth wallpaper on an iPhone. The steps are similar for all types of wallpapers:
Once you’ve chosen a wallpaper, and you can see its preview, I recommend first choosing a Style for it. You can do this by swiping your finger on your iPhone’s screen left or right. Depending on the wallpaper you’ve selected, you’ll get different styles.
For example, if you decide to use a photo from your iPhone, the Styles you can choose from are actually filters that change the wallpaper’s colors from the original ones to others, such as Black & White, Duotone, or Colour Wash.
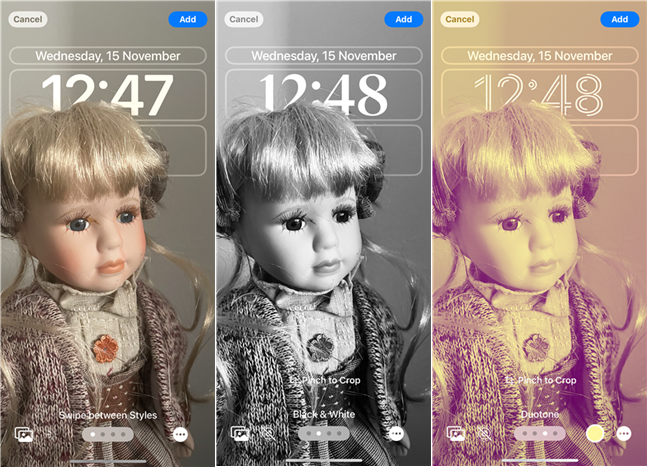
Select a different style for a photo wallpaper on your iPhone
Other types of iPhone wallpapers come with different kinds of Styles. If you swipe over the Astronomy wallpaper preview screen, you can change your iPhone’s wallpaper to show the Earth, Earth [in] Detail, Moon, Mars, Jupiter, and so on.
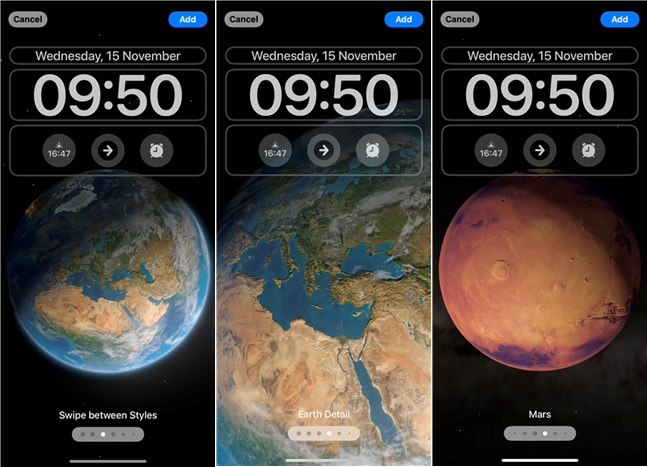
Select a different style for a default wallpaper on your iPhone
Once you’ve made up your mind on the Style you prefer for your iPhone’s wallpaper, the next step is to decide what widgets you’d like to have on it. These widgets are the ones shown on your Lock Screen. By default, there are three widget locations available toward the top of the screen. You can tap on any of the existing widgets to customize or remove them, and you can also add new widgets if that’s what you want. However, you can only do the latter if there’s space for them; if there’s not, you’ll first have to remove one or more widgets to make room for the one you want.
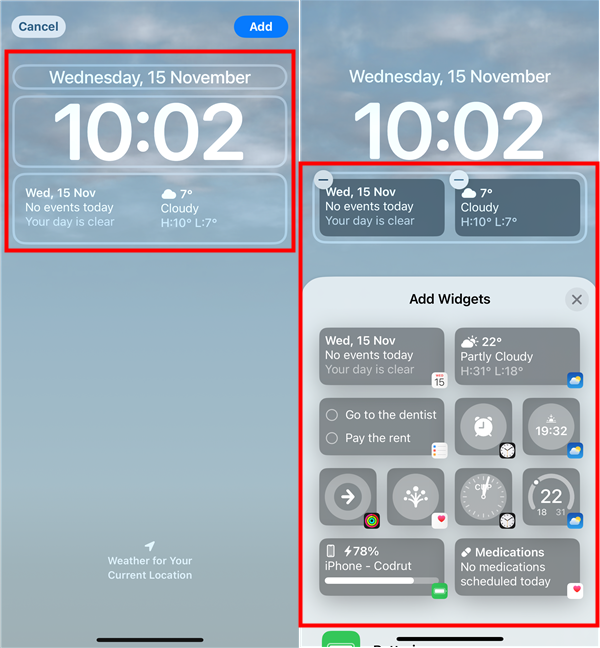
Customize an iPhone's wallpaper with widgets
Step 4. Set the wallpaper on your iPhone
Once you’re done customizing the widgets on your Lock Screen, it’s time to set your new iPhone wallpaper. To do so, tap the Add button in the top-right corner of the screen. As soon as you do that, you’re prompted to decide if you want this wallpaper Set as Wallpaper Pair or if you’d rather Customise Home Screen.
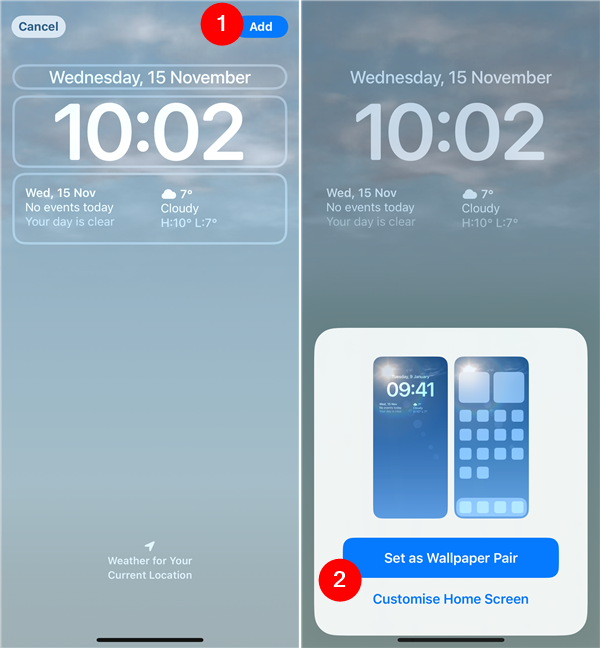
Set as Wallpaper Pair or Customise Home Screen
The first one is the default option, and choosing it means that the wallpaper will be used on both your iPhone’s lock screen and its Home Screen. If that’s what you want, tap Set as Wallpaper Pair, close the Settings app, and enjoy your new wallpaper! 🙂

How to set a wallpaper on both the Lock Screen and Home Screen
If you want to further adjust the wallpaper used on the home screen of your iPhone, choose the second option: Customise Home Screen. A new screen will load, where you can change and adjust the wallpaper on your iPhone’s home screen independently from the one on its lock screen. Here, you can use the buttons found on the row at the bottom of the screen to choose a Colour, Gradient, or Photo instead of the main wallpaper used on your iPhone’s Lock Screen (signaled by the Pair button). Furthermore, you can also tap the Blur button in the bottom-right corner of the screen to adjust the blur level on your iPhone’s Home Screen wallpaper. Once you’ve made the changes you want, tap Done in the top-right corner of the screen.
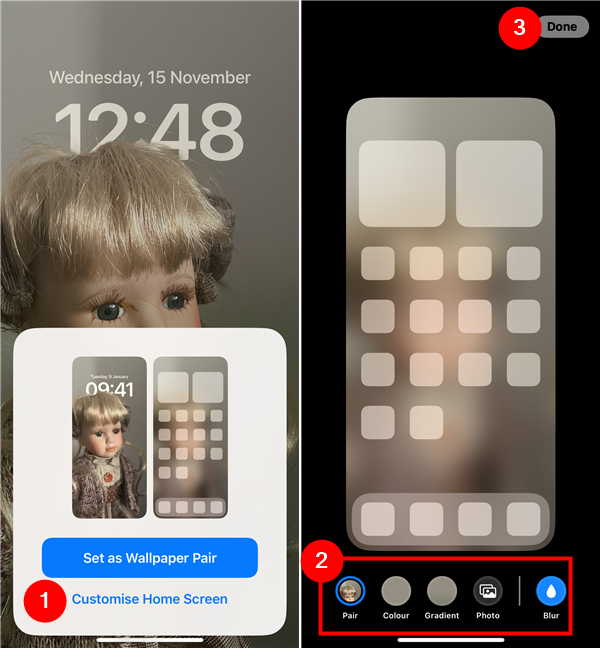
How to customize an iPhone's Home Screen wallpaper
Your new wallpaper is now applied, so you can close the Settings app and start enjoying the fresh look of your iPhone.
How to change your iPhone’s wallpaper from the Lock Screen, Photos, or the Camera app
While the previous is the only method to set iPhone wallpapers, there are other ways you can start the whole process that I’ve shown you without accessing your iPhone’s Settings. Here they are:
How to customize your iPhone’s wallpaper from the Lock Screen
A slightly faster way to access your iPhone’s wallpaper customization options is available from the lock screen. Instead of going to the Settings app, you can tap and hold on an empty space on your iPhone’s Lock Screen until it enters editing mode, like in the next screenshot.
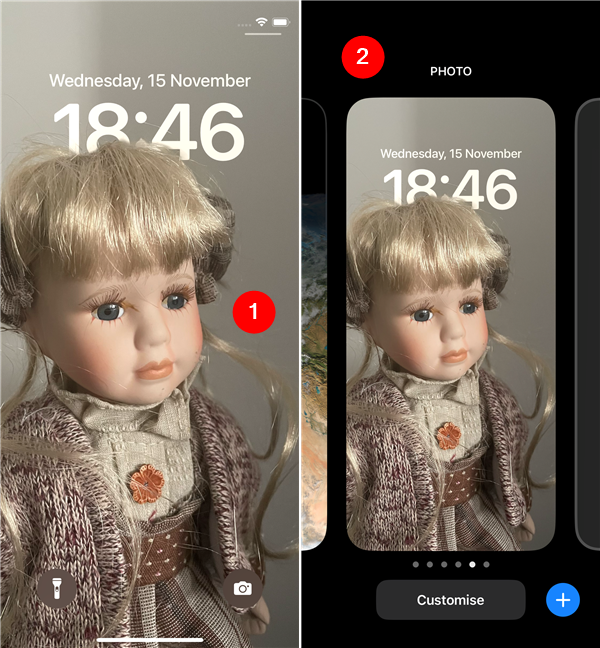
How to change an iPhone's wallpaper from the lock screen
While in editing mode, you can swipe left or right to choose any of the wallpapers you’ve previously configured on your iPhone.
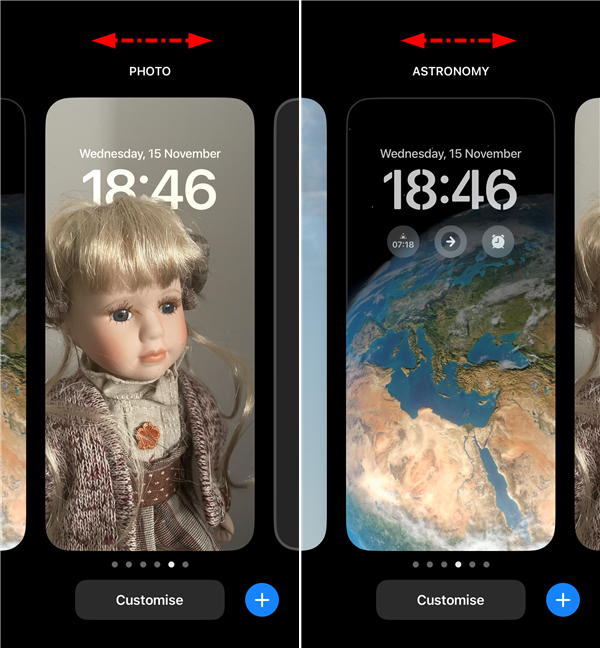
How to switch to a different iPhone wallpaper from the Lock Screen
Moreover, you can also tap the Customize button to change a wallpaper’s settings, as well as tap the + (plus) button to add a new wallpaper to your iPhone.
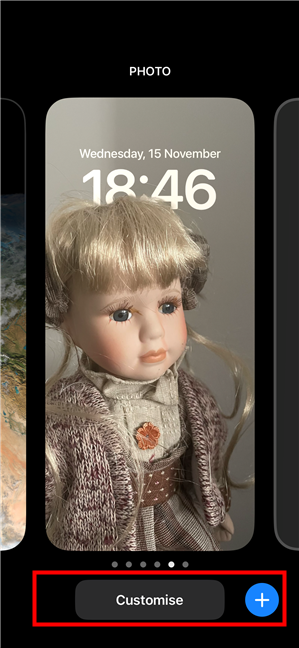
How to customize an iPhone's wallpaper from the Lock Screen
Regardless of what you intend to do, once you’ve decided to customize or add a new wallpaper, you’ll get the same options as the ones I’ve already described in the previous chapter of this guide. You’ll be able to configure your wallpaper, customize it, add or remove widgets, and so on.
How to set your iPhone’s wallpaper from the Photos app
If all you want is to use a picture as your iPhone wallpaper, you can do it directly from the Photos app. Launch Photos, browse your iPhone’s gallery to find the image you want, and tap on it to open it. Then, tap the Share button from the bottom-left corner.
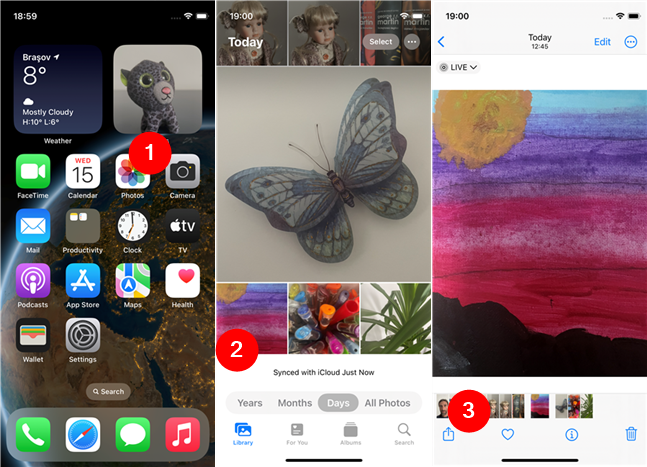
How to change an iPhone's wallpaper from the Photos app
Scroll down and tap on the “Use as Wallpaper” option. This opens the wallpaper preview screen. From here on, you get the same options as the ones I’ve shown you in the first section of this guide. Use them to change how the selected image appears and behaves as your iPhone wallpaper.
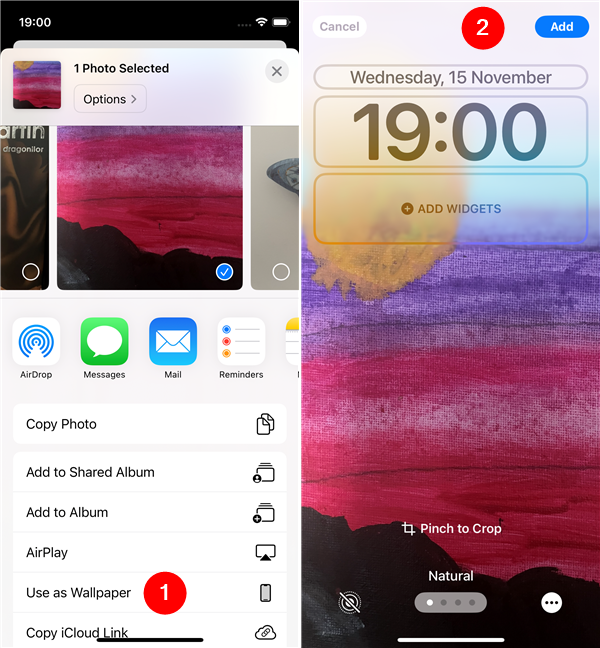
How to set a photo as an iPhone's background from the Photos app
How to set an iPhone wallpaper from the Camera app
If you just took a fantastic picture and can’t wait to use it as your iPhone wallpaper, you don’t have to postpone: iOS gives you the option to change your background directly from the Camera app. To begin, tap on the thumbnail shown in the bottom-left corner of your screen. This opens the most recent photo saved on your iPhone. Tap the Share button displayed in the lower-left corner.
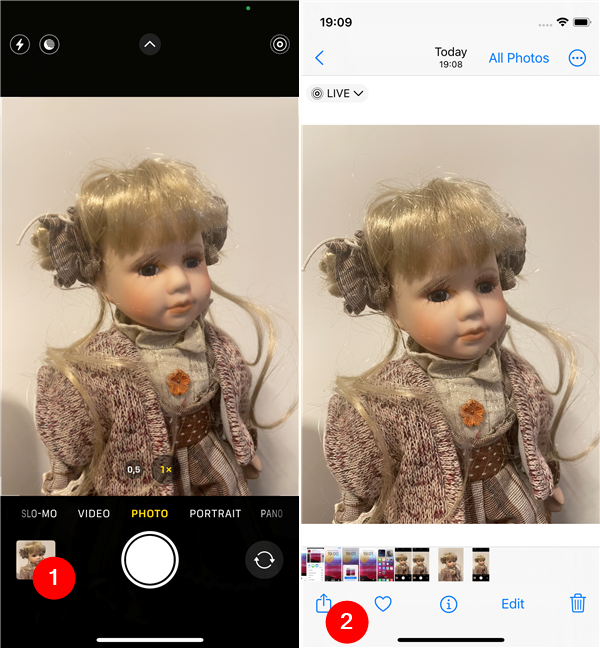
How to change an iPhone's wallpaper from the Camera app
Press “Use as Wallpaper” in the list of options and you’ll be brought to the wallpaper editing screen. From this point on, the instructions are identical to the ones in the first chapter of this guide.
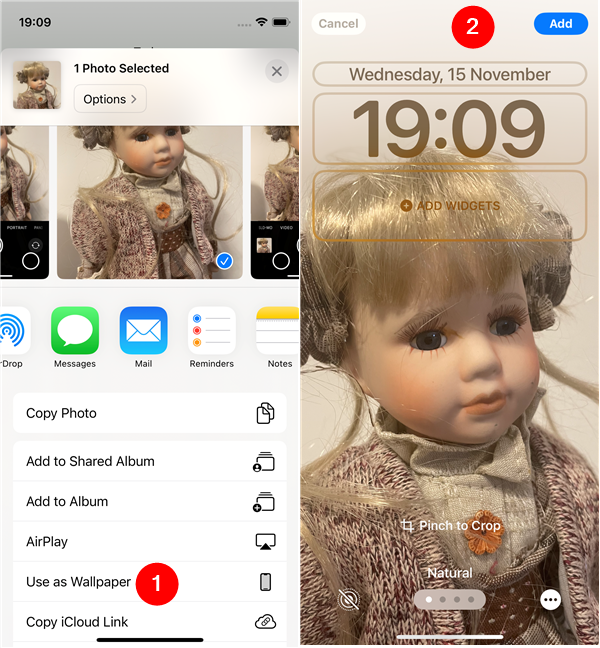
How to set an iPhone's background from the Camera app
TIP: If you like experimenting with color filters, here’s how to make an iPhone black and white.
What are your favorite iPhone backgrounds?
I find it fun to customize my iPhone with backgrounds that make me laugh or reflect my passions. What about you? Before you close this tutorial, I’d like to know what type of wallpaper you chose for your iPhone. Did you set a default wallpaper, or did you end up using one of your photos? Let me know in the comments section.


 22.11.2023