
Unfortunately, not many people spend time delving into the more advanced settings of their wireless routers. For simplicity, they prefer to use the default settings provided by their manufacturer. However, this doesn’t always lead to great results, and you may end up not using all the potential of your router or mesh Wi-Fi system. If you use an extendable ASUS router or ZenWiFi mesh system, I want to help you optimize wireless network performance by strategically tweaking a few channels and bandwidth settings. Using simple tools and a few smart gimmicks, I was able to boost my download speed by 29%, in just a few minutes. If this sounds appealing to you, read this step-by-step tutorial on analyzing the wireless networks in your area and fine-tuning your router's settings to maximize Wi-Fi speed and minimize interference:
Step 1. Open an app for analyzing the wireless spectrum
To optimize the channel settings on your ASUS router, you first need to analyze the wireless network in your area and see how congested the channels are. There are many apps you can use for this purpose, and one of the popular options is WiFiman. It’s made by Ubiquiti and available both on Android, iOS, and Windows. I installed it on my smartphone and opened it, and then gave it all the permissions it required.
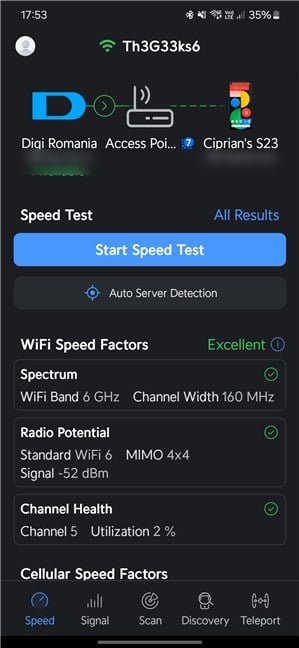
WiFiman provides tones of useful information
To view details on the surrounding Wi-Fi networks, tap Scan at the bottom. The app starts to populate a list with all the wireless networks in your area. By default, you see a list with All networks. However, you can tap to separate them between bands: 2.4 GHz, 5 GHz and 6 GHz.
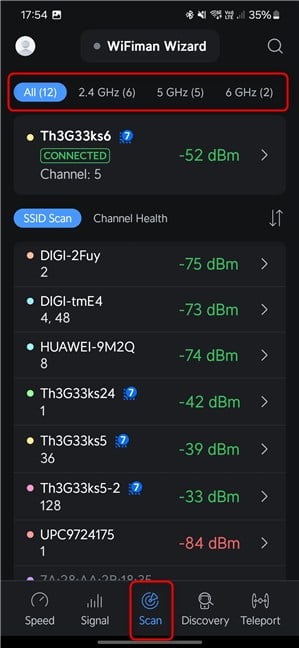
Tap Scan and select the wireless band that interests you
IMPORTANT: The WiFiman app shows you graphs only for the wireless bands your smartphone can use. If you have an older smartphone that works only with the 2.4 GHz and 5 GHz bands, it won’t detect the wireless networks on the 6 GHz band and it won’t show this as a category that can be scanned.
With the app still open on your smartphone, go to a PC or laptop and follow the next steps.
Step 2. Login to your ASUS router or ZenWiFi system
If you want to customize the channel and channel bandwidth on your extendable ASUS router or ZenWiFi system, you must log in to its web-based admin dashboard. To do that, use a laptop or PC connected to the network managed by your ASUS router or ZenWiFi system. Open a web browser and navigate to asusrouter.com or to the IP address of your router. Type your admin username and password, and then click or tap Sign In.
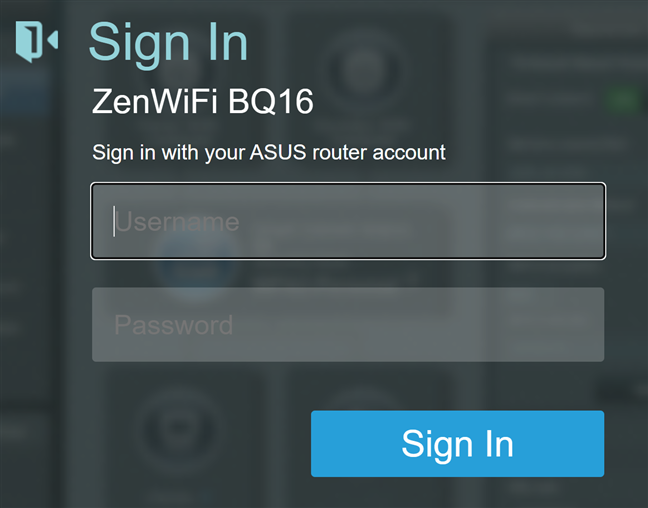
Login to your ASUS router or ZenWiFi
TIP: If you need help logging in to your ASUS router, I recommend this step-by-step guide: How to login to your ASUS router.
Step 3. Access wireless settings on your ASUS router or ZenWiFi
After you log in and see the Network Map, choose Wireless in the column on the left. It’s just under Advanced Settings. Then, on the right, ensure the General tab is selected.
In this tab, you see all the wireless bands emitted by your ASUS router or ZenWiFi mesh system.
Users with more affordable ASUS routers are likely to see only two bands: 2.4 GHz and 5 GHz. However, users with more powerful routers or mesh systems should see a second 5 GHz band and a 6 GHz band. The 6 GHz band is available only on newer ASUS routers or ZenWiFi mesh systems with Wi-Fi 6E or Wi-Fi 7, like the ZenWiFi BQ16 that I’m using for this article.
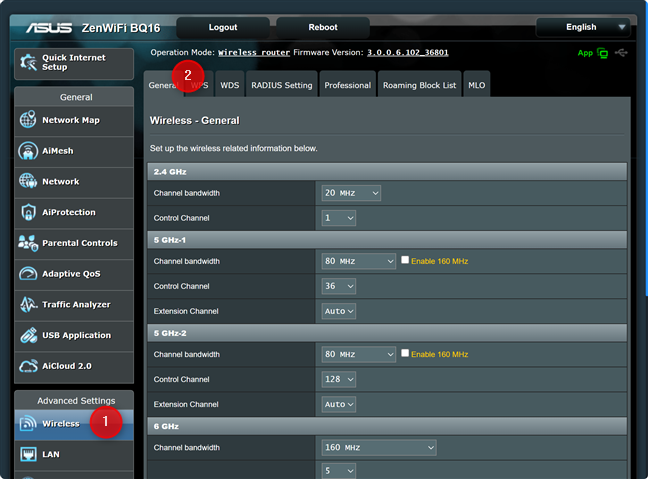
Go to Wireless > General
Step 4. Set the channel bandwidth and the control channel for the 2.4 GHz band
First in the list of bands shown in the Wireless - General section is 2.4 GHz. This band is important for IoT devices, and it tends to be the most crowded, at least in urban areas.
Open the WiFiman app on your smartphone and study the 2.4 GHz wireless spectrum. See how many networks there are in your area and which channels are more crowded. As you can see, channels 10 to 13 are free in my area.
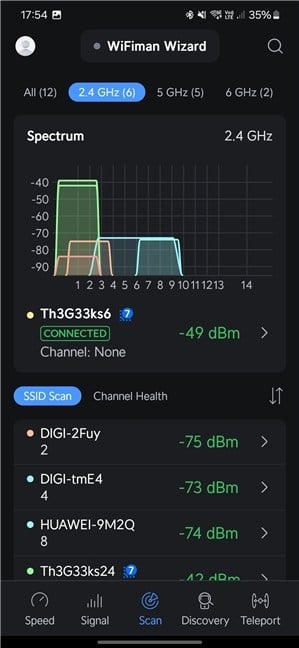
Check the 2.4 GHz channels used in your area
Back on your PC, one first improvement you should make is click or tap the Channel bandwidth drop-down list and select the appropriate value. If your area is very crowded, you should opt for a 20 MHz channel bandwidth to minimize interference. However, if you have some free channels or networks with lower signal strength, choosing 40 MHz instead of 20 MHz or 20/40 MHz is the better option. This choice increases the channel bandwidth and ensures maximum bandwidth on the 2.4 GHz wireless band. Applications for video streaming or file transfers will benefit from wider channel bandwidth.
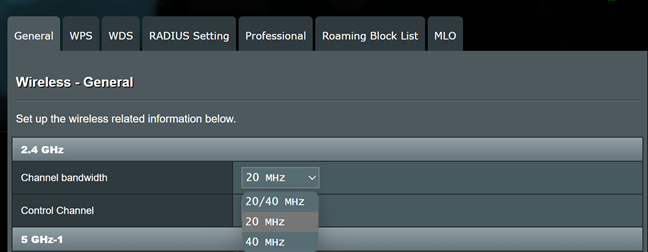
Set up the Channel bandwidth for 2.4 GHz
Next, click or tap the drop-down list next to Control Channel and select a free channel from the list, based on the data you got from WiFiman.
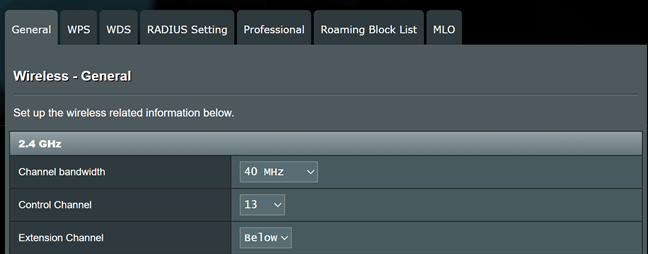
Set up the Control Channel for 2.4 GHz
Step 5. Set the channel bandwidth and the control channel for the 5 GHz band
In the Wireless - General section, go to 5 GHz. If your router is dual-band, you’ll see only one 5 GHz section. If your ASUS router is tri-band or quad-band, you’ll see two sections: 5 GHz-1 and 5 GHz-2.
But before changing any settings on your router, open the WiFiman app on your smartphone. Study the 5 GHz channel statistics to see the networks in your area and which channels are more crowded. As you can see, in my area, all 5 GHz networks use the same channels, and I have plenty of spare channels left, which aren’t used by anyone, from 52 to 68.
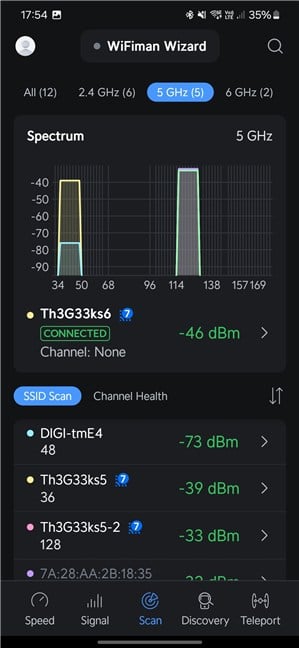
Check the 5 GHz channels used in your area
Going back to your PC, if it’s a Wi-Fi 6 or Wi-Fi 7 router, ensure you check the box next to Enable 160 MHz (if available) to ensure maximum bandwidth on the 5 GHz band. Then, in the Channel bandwidth, select 160 MHz.
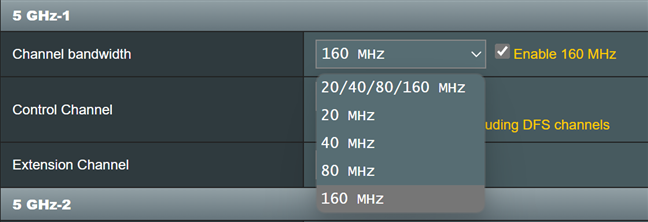
Set up the Channel bandwidth for 5 GHz
For the next step, click or tap the drop-down list next to Control Channel and select one of the free channels in your area or at least one of the least congested channels.

Set up the Control Channel for 5 GHz
If you have a 5 GHz-2 section available on your ASUS router or ZenWiFi system, configure it in a similar way.
Step 6. Set the channel bandwidth and the control channel for the 6 GHz band
If you are one of the few users with a Wi-Fi 6E or Wi-Fi 7 router from ASUS, you’ll also see a 6 GHz wireless band in the Wireless - General list of settings. Again, check the WiFiman app and see if it reports any data for the 6 GHz channels. As you can see, there are no networks competing with mine in my surroundings. In this situation, I can use any wireless channel I want, and it will work perfectly well.
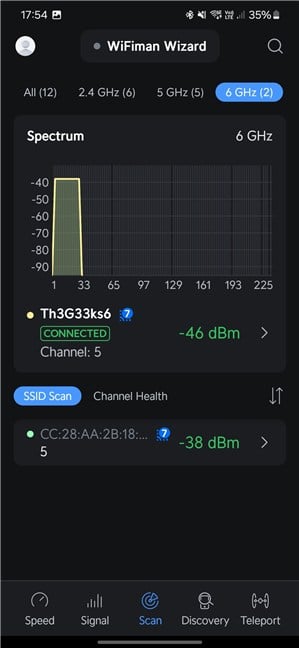
Check the 6 GHz channels used in your area
Back to the ASUS router, ensure you choose 320 MHz or 160 MHz (the higher of the two available for your specific model). This setting increases the maximum throughput you can get on the 6 GHz band. Then, choose the Control Channel you want to use.
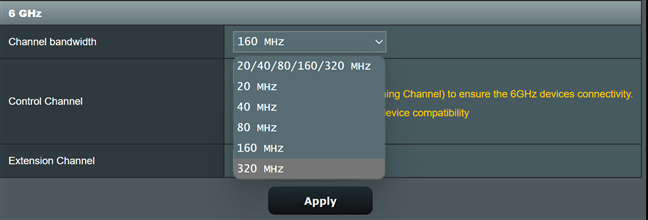
Set up the Channel bandwidth for 6 GHz
To save and apply all your settings, don’t forget to click or tap the Apply button at the bottom of the Wireless - General tab.
But does this all work? Does it deliver meaningful improvements?
I’m sure that many readers willing to follow my recommendations also want to know if they deliver actual improvements and are not wasting their time. So I decided to make a quick measurement on the ASUS ZenWiFi BQ16 I’m using for this article. Initially, the 2.4 GHz band was set to use a 20 MHz Channel bandwidth and a channel that was crowded and also used by other networks in my area. I changed the Channel bandwidth to 40 MHz, and Windows 11 immediately reported that my network’s aggregate link speed had increased from 344 Mbps to 688 Mbps.
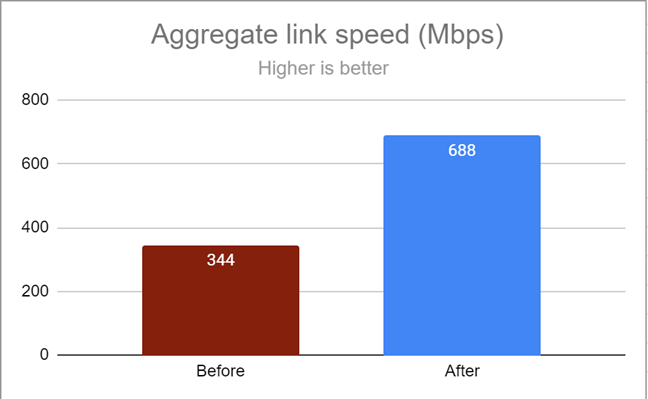
The aggregate link speed after setting up the channel bandwidth
I also ran SpeedTest before and after making my optimizations. Initially, the average download speed on the 2.4 GHz band was 154.87 Mbps. After making my changes, it reached 220.35 Mbps, an increase of 29%.
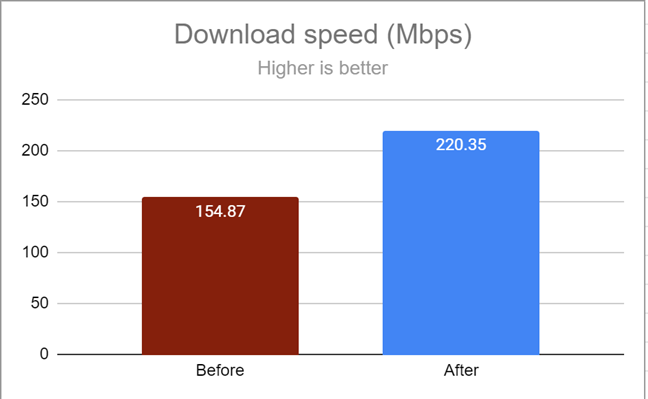
The average download speed after tweaking the channel settings
With just two settings, I managed to double the link speed reported by Windows 11 on my laptop and increase the download speed over the internet by 29%. You’ll agree that this is a meaningful improvement.
Did you improve the speed of your Wi-Fi?
Now that you know how to optimize the channels on your extendable ASUS router or ZenWiFi system, follow my example. In just a few minutes, you should enjoy faster Wi-Fi connectivity. However, before making your changes, I recommend you run some measurements: before and after the fact. Don’t hesitate to share them with me and other readers, using the commenting options available below. I’m curious if you'll get even higher speed improvements than I did.


 27.12.2024


