

The Windows Snipping Tool is a utility app included in modern versions of the operating system, like Windows 10 and Windows 7. Due to its familiarity, many users find Microsoft’s Snipping Tool an easy and efficient instrument for taking screenshots in Windows. This guide shows how to use the Snipping Tool for Windows 10 and Windows 7 from the moment you click the Snipping Tool shortcut to when you’re saving your image. Let’s get started:
NOTE: The Snipping Tool is also mentioned in our tutorial showing 9 ways to screenshot on Windows.

 How to open the Snipping Tool on Windows 10 using Search
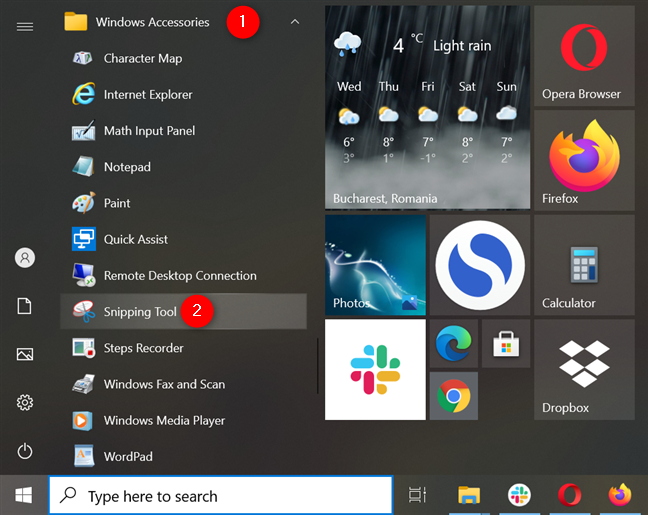
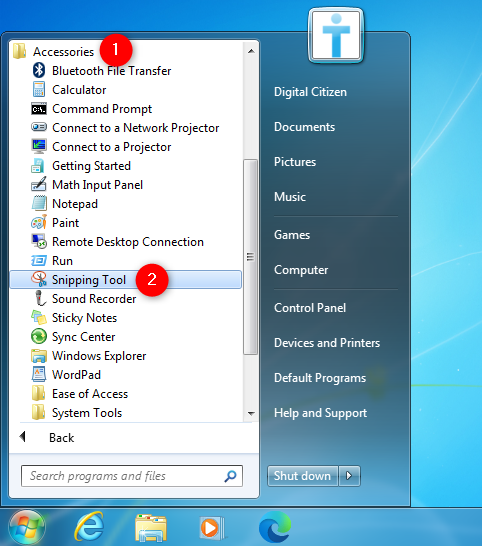
If you prefer a more classic approach, open the Start Menu and access the Windows Accessories folder. Click or tap on the Windows 10 Snipping Tool shortcut inside to launch the app.
How to open the Snipping Tool on Windows 10 using Search
If you prefer a more classic approach, open the Start Menu and access the Windows Accessories folder. Click or tap on the Windows 10 Snipping Tool shortcut inside to launch the app.
 Press the Snipping Tool shortcut in Windows 10 to open the app
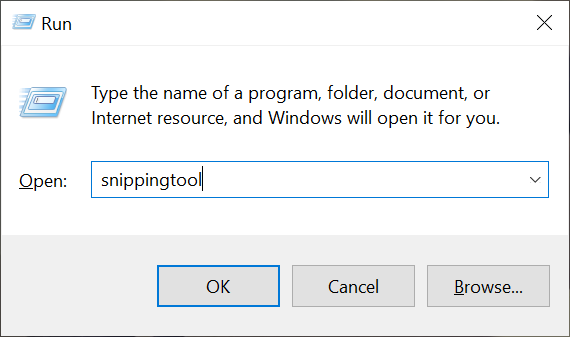
An alternative way to launch the Snipping Tool in Windows 10 is to use the Run command window. Use the Windows + R keyboard shortcut to quickly open Run, write snippingtool in the Open field, and then click/tap the OK button or press the Enter key.
Press the Snipping Tool shortcut in Windows 10 to open the app
An alternative way to launch the Snipping Tool in Windows 10 is to use the Run command window. Use the Windows + R keyboard shortcut to quickly open Run, write snippingtool in the Open field, and then click/tap the OK button or press the Enter key.
 Launch the Windows 10 Snipping Tool using Run
Alternatively, a shortcut for Snipping Tool can also be pinned to Start or the Windows 10 taskbar, and you can use it for quickly accessing the tool.
TIP: Here are all the ways to open Snipping Tool in Windows 10.
Launch the Windows 10 Snipping Tool using Run
Alternatively, a shortcut for Snipping Tool can also be pinned to Start or the Windows 10 taskbar, and you can use it for quickly accessing the tool.
TIP: Here are all the ways to open Snipping Tool in Windows 10.
 Open the Snipping Tool for Windows 7 from the Start Menu
Another way is to open the Accessories folder from the Windows 7 Start Menu and then click on the shortcut for Snipping Tool.
Open the Snipping Tool for Windows 7 from the Start Menu
Another way is to open the Accessories folder from the Windows 7 Start Menu and then click on the shortcut for Snipping Tool.
 Use the Windows Snipping Tool shortcut from the Start Menu
Alternatively, you can also use the Run window to launch the app using the same steps shown in the previous chapter.
TIP: You can also create a Snipping Tool keyboard shortcut in both Windows 10 and Windows 7 by following the instructions in this guide. You can then launch the app by pressing the Snipping Tool hotkey.
Use the Windows Snipping Tool shortcut from the Start Menu
Alternatively, you can also use the Run window to launch the app using the same steps shown in the previous chapter.
TIP: You can also create a Snipping Tool keyboard shortcut in both Windows 10 and Windows 7 by following the instructions in this guide. You can then launch the app by pressing the Snipping Tool hotkey.
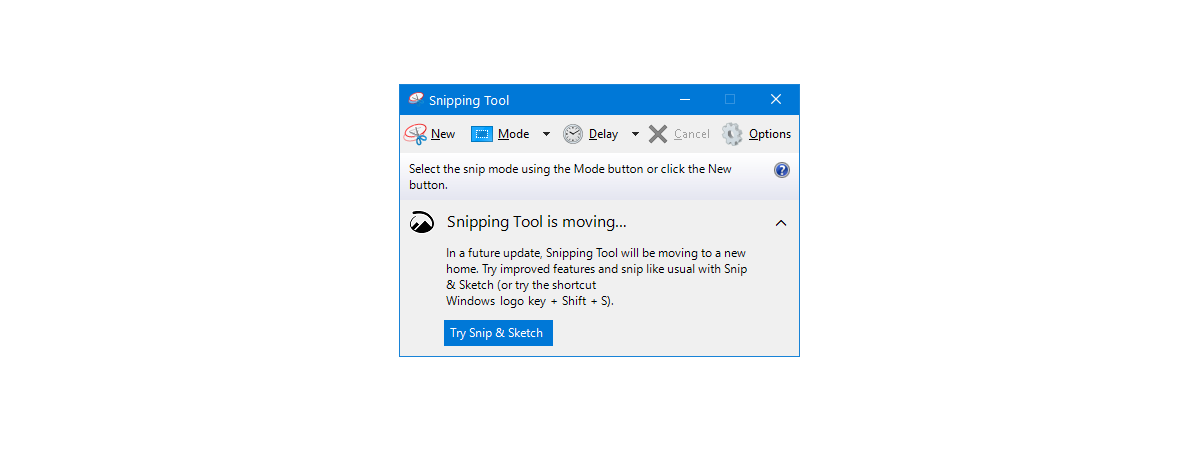
 The Windows 7 Snipping Tool
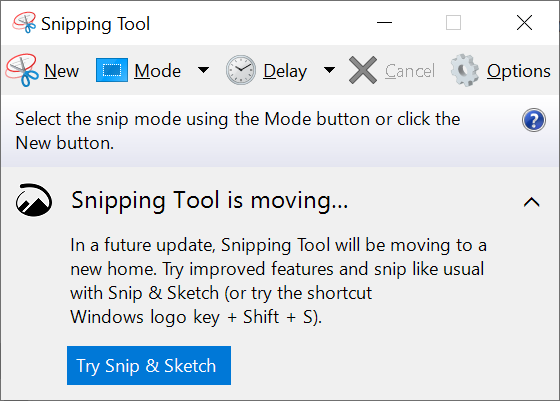
The Snipping Tool for Windows 10 has a slightly different user interface than the one found in Windows 7. The Windows 10 Snipping Tool includes the Mode and Delay buttons, that aren’t found in the Snipping Tool for Windows 7.
NOTE: Another difference is the notification shown at the bottom, urging you to try the Windows 10 app that might replace the Snipping Tool in the near future: Snip & Sketch.
The Windows 7 Snipping Tool
The Snipping Tool for Windows 10 has a slightly different user interface than the one found in Windows 7. The Windows 10 Snipping Tool includes the Mode and Delay buttons, that aren’t found in the Snipping Tool for Windows 7.
NOTE: Another difference is the notification shown at the bottom, urging you to try the Windows 10 app that might replace the Snipping Tool in the near future: Snip & Sketch.
 The Windows 10 Snipping Tool
Here’s what each of the main buttons does:
The Windows 10 Snipping Tool
Here’s what each of the main buttons does:
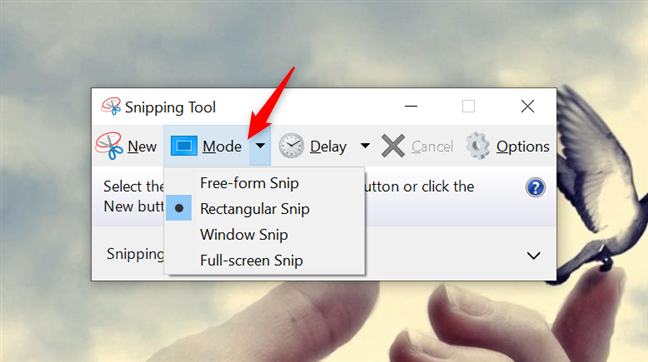
 The Mode button from the Snipping Tool in Windows 10
In Windows 7, click on the arrow next to New to display a dropdown menu with the same options.
The Mode button from the Snipping Tool in Windows 10
In Windows 7, click on the arrow next to New to display a dropdown menu with the same options.
 Select the type of screenshot in the Snipping Tool for Windows 7
Each option lets you take another type of screenshot:
Select the type of screenshot in the Snipping Tool for Windows 7
Each option lets you take another type of screenshot:
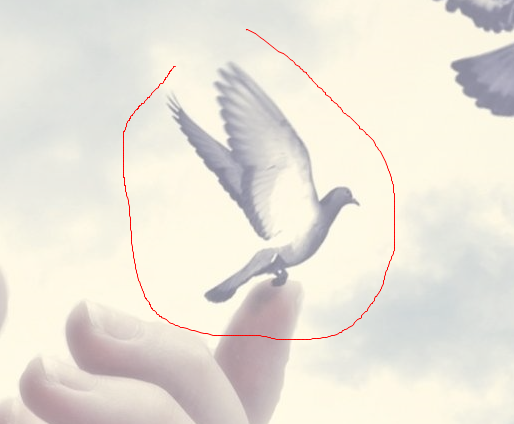
 How to use the Snipping Tool on Windows to get a Free-form snip
When you are finished with your selection, release the mouse button or lift your finger, and the captured area is automatically opened in an editing window, where you can annotate, save or share the screenshot.
How to use the Snipping Tool on Windows to get a Free-form snip
When you are finished with your selection, release the mouse button or lift your finger, and the captured area is automatically opened in an editing window, where you can annotate, save or share the screenshot.
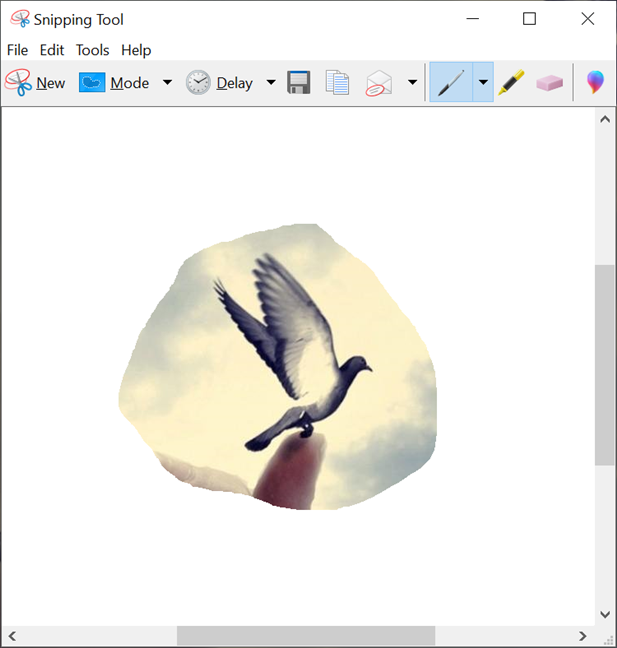
 Captured screenshots are opened in the Snipping Tool editing mode
 How to use the Snipping Tool editing mode
To save the screenshot, press the Save button. In the pop-up, select the image location, type in a File name, and choose the file type: PNG, GIF, JPEG, or HTML. Then, press Save.
How to use the Snipping Tool editing mode
To save the screenshot, press the Save button. In the pop-up, select the image location, type in a File name, and choose the file type: PNG, GIF, JPEG, or HTML. Then, press Save.
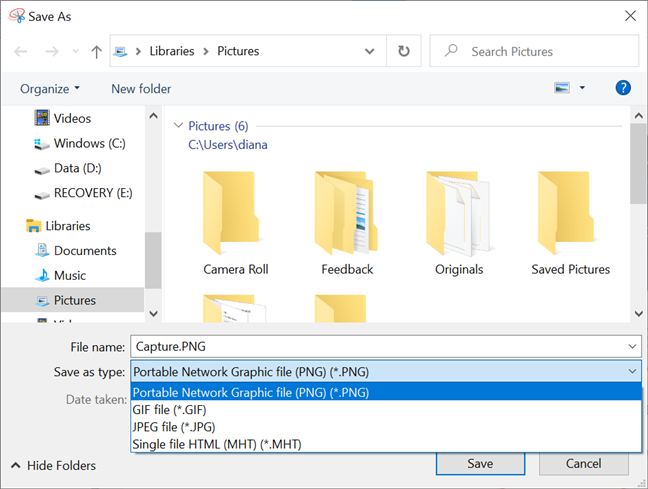
 Save your screenshots
TIP: By default, the Snipping Tool app saves screenshots in the Pictures folder. For more details, we created a guide to help you find out where Windows 10 screenshots are saved and change their default location.
Save your screenshots
TIP: By default, the Snipping Tool app saves screenshots in the Pictures folder. For more details, we created a guide to help you find out where Windows 10 screenshots are saved and change their default location.

 Press on Options to set up the Snipping Tool app
You can also access Options from the Tools menu in the app’s editing mode.
Press on Options to set up the Snipping Tool app
You can also access Options from the Tools menu in the app’s editing mode.
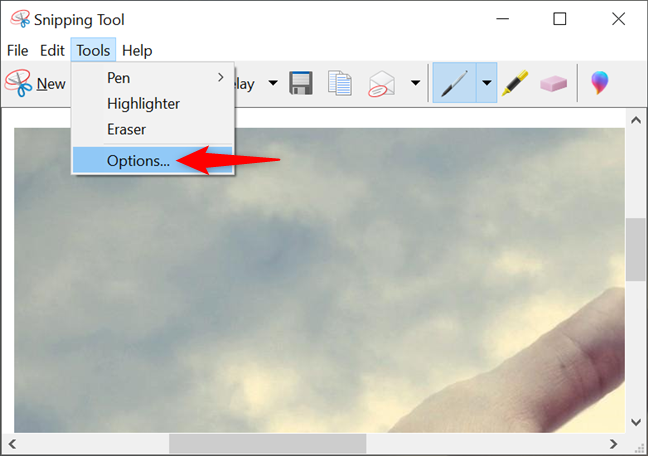
 Access Options from the app's editing mode
The available options are displayed in two sections: Application and Selection. The Application section has a set of checkboxes that you can use to make the following changes:
Access Options from the app's editing mode
The available options are displayed in two sections: Application and Selection. The Application section has a set of checkboxes that you can use to make the following changes:
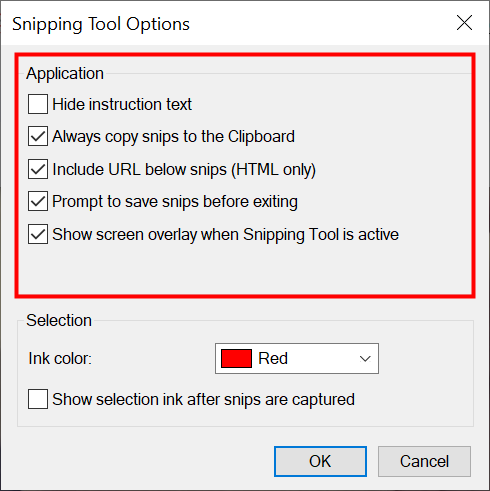
 The Application Options in the Microsoft Snipping Tool
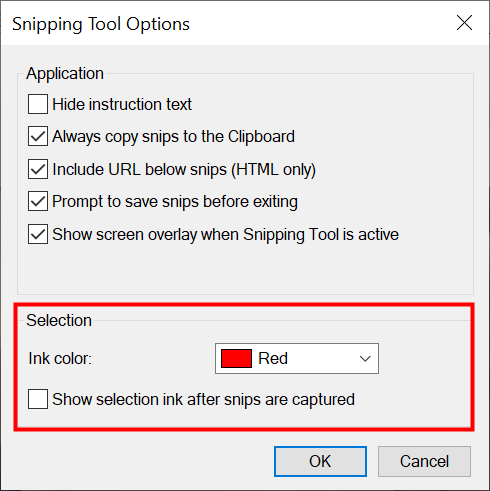 Change the Selection Options in the Windows Snipping Tool
Where is the Snipping Tool in Windows 10?
There are many different ways to open the Windows 10 Snipping Tool app, but the fastest way to launch it is to use search. Click or tap on the taskbar’s search field, type in snipping tool, and then press on the appropriate result. Alternatively, you can also click or tap on Open from the right side of the flyout.How to open the Snipping Tool for Windows 7
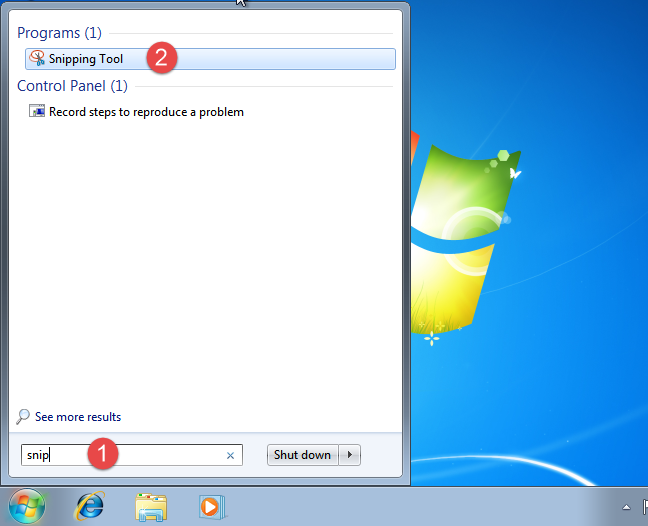
The methods to access the Windows 7 Snipping Tool are similar to the ones in Windows 10. Type “snip” in the Start Menu search box and then click on the Snipping Tool result.Understanding the Windows Snipping Tool interface
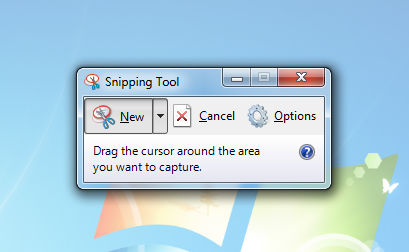
When it comes to the user interface, the Windows 7 Snipping Tool is pretty basic, with only three available buttons.- New - available on both operating systems, it initiates taking a screenshot using the selected mode.
- Mode - is available only in the Snipping Tool for Windows 10 and lets you choose what type of screenshot you take, as shown in the next chapter. If you’re using Windows 7, click the downward arrow next to New instead to reveal the same options.
- Delay - present only in Windows 10, you can use this button to delay the screen capture for up to 5 seconds. Select one of the available options from its dropdown menu to set a delay for your screenshot.
- Cancel - lets you cancel taking a screenshot. Press Esc on your keyboard for the same result.
- Options - allows you to customize different aspects of the application.
How to use the Snipping Tool on Windows to take screenshots
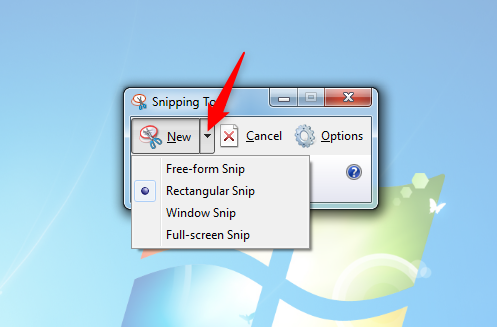
There are four types of screen captures you can take with the Microsoft Snipping Tool app. In Windows 10, you can select which one you want to use by clicking or tapping on the Mode button or the downward arrow next to it.- Free-form Snip - use it if you want to draw an irregular shape with your mouse anywhere on the screen, capturing the selected area.
- Rectangular Snip - selected by default, it lets you take a screenshot of a rectangular section.
- Window Snip - takes a screenshot of an open window or menu on your screen. Moving the cursor around highlights different elements you can capture by clicking or tapping on them.
- Full-screen Snip - immediately captures the entire screen, like the old-fashioned Print Screen key.
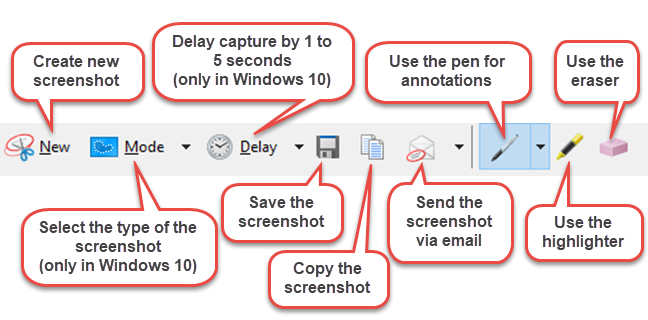
How to edit and save your screenshots with the Snipping Tool app
The Snipping Tool editing window offers useful tools for modifying your screenshots as soon as you take them. If you are not satisfied with your image, you can always make another one using the New button. Before saving your screenshot, you can use the Pen and Highlighter tools to draw and write on the capture, while the Eraser tool removes the changes you make. The image below provides an overview of the available options.Bonus: How to customize the Snipping Tool on Windows 10 and Windows 7
Regardless of your Windows version, when you start the Snipping Tool, click or tap on the Options button to set your preferences on how the program should work.- Hide Instruction Text – hide the instructions shown in the main Snipping Tool window.
- Always copy snips to the Clipboard – copy all captures to the Windows clipboard to easily paste them into other applications (e.g., word processors or image editors).
- Include URL below snips (HTML only) – save your snips as a Single File HTML or MHT documents, and a URL of the webpage is included in the screenshot.
- Prompt to save snips before exiting – gives you a heads up if you have any unsaved captures and you try to close the program.
- Show screen overlay when Snipping Tool – if disabled, when you are taking a screenshot, the Snipping Tool transparent overlay is no longer shown on the screen.
- Ink Color – changes the color of the selection border when you create a snip.
- Show selection ink after snips are captured – when enabled, the selection border is displayed around the screenshot, using the color shown above.
Discussion (39)
For anyone having image (quality) issues, note the Snipping Tool file formats available shown in the “Save your screenshots” image: PNG, GIF and JPG.
PNG is a lossless, uncompressed format and will yield the best quality (and largest file size), GIF format saves a (file-local) color index table for reduced size and even though it’s also “lossless” that makes it suitable for only simple images (and therefore can appear “grainy” when printing photos for example, images with color gradients) and JPG (or JPEG) is a compressed (“lossy”) format, which usually defaults to 90% and depending on the program can be changed (when saving), allowing a selectable trade-off between storage size and image quality.
Hope it helps!..:)
How do you Print what you snipped as in old ‘Snipping Tool’ File>Print?
After you snip an image, in the Snipping Tool editor, go to File -> Print. Also, read this guide for general printing tips on Windows: https://www.digitalcitizen.life/ways-print-any-windows-app-or-program/
Great tutorial, thanks… I am amazed I never knew such a tool existed since windows 7.
THANK YOU! for the first intelligible and effective advice I’ve found on the net for W10 issues. You guys really are amazing, as others have said.
Since typing this I lost the text twice now and it hurts like H to type, so please forgive the obvious irritability. Plus, what text does get entered inserts itself wherever it thinks it can cause the most aggravation to extricate and correct–that happens every other sentence, and I hope I can find some help on your site. If anyone knows why this might happen, I’d be very grateful. I can’t complete a single, even short, sentence without looking for where the missing text went.
Previoulys: I had just lost my rather lengthy comments, completely typical of this piece of junk HP Sceptre 360x with Windows 10 .(I purchased it due to its light weight and supposedly competent keyboard due to severely painful shoulder injuries–and, okay, it is beautiful So much for that.) It is virtually unusable as is MS’s site. I don’t know what problems are due to W10 v. the HP v. trying to use Chrome rather than MS’s own inadequate apps. (Like, how did speech-to-text deteriorate into gibberish from its former usable–while no competition to Google’s–self?)
I’m only functional myself for several hours a day now (the damage is described as ‘devastating’ and once orthopedists learned it resulted from their practices they shut down research and discussion, with a few ethical and competent MDs resisting the peer pressure. This is off topic, and I apologize, but it speaks to my level of gratitude for the help that is offered here. For some of us, these problems are not merely inconvenient or time-consuming, as they would have been for me in the past. (Anyway, if anyone wants to know what caused this, I will respond. To everyone else, I do apologize.)
I know this is old’er’ but I am so glad that I found a site that explains how to use the ‘snippy’ tool for a layman to understand. Simply explained and simply understood. Surprisingly, I was able to read only once and understand opposed to having to read instruction over and over and one more time over before finally half understanding. So, THANK YOU. (they say Windows 10 is more user friendly etc etc. Not true. Something easy for one may not be so easy for the next)
Thanks again. I think I’ll ‘snip’ this site when I have more time to explore topics!!
(Jen was on point) Only difference, I never knew about Snip until buying this PC last year and prior to that I NEVER knew how to take a screenshot..I can’t imagine this being much different than the old, but I can’t say for certain. It is difficult no more though. Now I need to figure out what this Edge thing is all about. Seems I’m being forced to create an Outlook acct. My husband bought this thing and left for Singapore a week later. I’ve had to kind of ‘wing it’ for the last 8 months, but by the time he returns I’ll be showing him, the ET (electronic technician) how to navigate.
Great article Ciprian, question, my job has security issues with the snipping tool because it includes the first and last name in the screen shot captured, is there a way to remove this and just show the screen shot? Thanks!
I have windows 7, but installed Windows 10. Can print using snipping tool, but need a way to control print size or fit to an 8 1/2 x 11 page
Amazing. Thank you! For some reason the typical way for capturing a screenshot, ALT+PRTSCREEN was NOT working. Very frustrating. I thought I had disabled, well my cats or kids disabled, my keys. Did a search, bammmm…you helped me a tun. I am on Windows 10, everything is different. I love this snipping tool, never knew about it, but I think it is better than the “old way”. I am so happy, I had to send a screenshot for some important business and was getting oh so frustrated.
Simple and easy!
Thanks!!!
I wish to use snipping tool for Windows 10.Is possible?
Yes it is. Search for it in the search box and you will find it.
How do I take a snip of the screen in full screen mode
Snippet is awful. I need to snag drop downs from a menu but when you select the snippet tool the drop downs retract and all you can get is the inactive screen. I can’t belive they put this old technology in there. Snag it would let me capture what I needed. Now I’m stuck with this p.o.s. I can’t do my job now because of the limits of snippet. Just like autodesk. Microsoft is not in touch with the real users.
If you want to capture the menus, start the snipping tool, when the window pops up, press the NEW button, it should now be UNSELECTED. Go to the window you want to capture, display the menu, and then press CTRL+PRINTSCREEN, you will get the crosshair cursor and the menu will remain visible, and you can capture what you want.
Thanks. This is a huge help.
How can I discontinue highlighting a snip once I’m done editing. I can’t “put the highlighter away” by clicking back on the icon once I’m done. Or the pen or the eraser.
hi sir really very nice tutorial. the only difficult part was the (include URL below snips (HTML only)) in Options .
I very tried and capture a lot of html webpages ,but unfortunately didn’t understand the concept of it and how it works. thanks in advance.
I want to snip an image on website and enlarge it. How can I do that?
Now that I have a new printer…HP Officejet Pro 8630, my snips do not print in their entirety. I will take a snip and paste to my Word document as I always did and now only part of the image prints. Is there something I can do in the snip it area or is this a printer setting problem?
I use snipping tool at work all the time–win 8
At home, it is there under accessories, but does not open or work–win 7 at home.
What can I do to get it to work at home?
In my keyboard print screen do not work. i was looking for an alternative option and found it here. really helpful… i didn’t know about this
Thank you so much! I have been so used to PrtScn & used it a lot, & it has become very difficult. This is a life-saver!
(From a Senior not up to date) Slick way of including your adds. I appreciate it)
How can I use this to snip something on an online site? I have been searching newspapers and my friend can snip out the articles she wants but I can’t get Snip Tool to even appear on the online page. Help
Fairly new to this myself, but can you get the Snip tool to work on this tutorial? I managed to do it just using the instructions above as the tool just copies whatever is behind it. If it works here it should work on any website, though I am happy to be corrected.
The free form snipping tool maintains the square box. So when I insert the snip into Word the text flows around the square. 2 possible solutions…..
1. How do I get snip to save the image with free form border, not the square. Or
2. How do I get Word to flow around the free form snip, not the square
The snipped image looks fine in the Word document I copied it to, but when I print the document the right side of the snip image is cut off. Any thoughts?
I have similar problem in that right side and bottom are cut off. what corrects this problem?
Is there a program to allow me to type over a screen snip?
C: It’s amazing that Snipping Tool can capture screen in irregular mode. But I have to say its editing options are too limited. I’m using Free Screenshot Capture which allows me to capture screen in rectangular mode but provides more annotating options like texts and blur.
i have seen screen shots on advice sites were the poster has fuzzed out/obliterated something personal eg username /password before posting .how do you do that ?
You need a blur tool for that. Blur is not included in the Snipping Tool. We recommend other tools for more advanced screenshot taking. SnagIt is our favorite and most of our team members use it regularly.
wow , that was quick , many thanks and will try it
Regardless of file extension used to save “snip” (or Word doct created) when it is printed on inkjet printer the output looks like dot matrix instead of high quality doct. What am i doing wrong ?
When I use the snipping tool with Win 8 or 8.1 it takes me to my desktop. So how do I take a snip od my start screen????
That is an unfortunate bug in the Snipping Tool. Try these other methods:
https://www.digitalcitizen.life/screenshot-windows/
My Snipping Tool has become corrupted. I checked the Microsoft website to download a new copy but could not find the tool. Do you have any idea where I can get a replacement ? Free or Paid.
Thanks ,Jeff
Hi Jeff,
Try looking at this video to see if it helps you.
https://www.youtube.com/watch?v=hM2Fm0vSDhU
When I use the snipping tool in Win.7 the print quality is faint. Printer checks out OK. Any suggestions? Thank you, Larry
Excellent share!!!