Did you know you can screenshot in VLC while watching movies or videos? There are several ways of using the free, cross-platform media player to take a VLC screen capture and save it as a picture on your computer or device. You can then set the VLC snapshot as wallpaper, create a thumbnail for a YouTube video, or design a funny meme to share with your friends. Whether it’s movie screenshots or favorite moments from your last home video, this tutorial illustrates how to take a VLC screen capture and shows the VLC snapshot location in Windows and macOS:
NOTE: This guide shows how to screen capture with VLC. If you want to grab the whole screen of your device, we already explored all the ways to take a screenshot in Windows or on your Mac.
Step 1: Get VLC media player on your computer
VLC media player is probably the most popular video player in the world. It can play almost any type of video file and has several options for taking a VLC snapshot. If you don’t already have it installed, access the official VideoLAN website.
You don’t even have to worry about choosing the right version for your computer. The website automatically detects your device, so all you have to do is press the big orange “Download VLC” button.
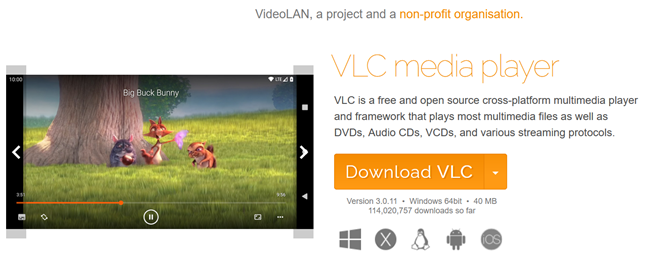
Download VLC from the official website to take movie screenshots
Save the file (or mount it on Mac) and use it to install the VLC media player on your device. When you are done, launch the app. Below, you can see a preview of what it looks like in Windows.
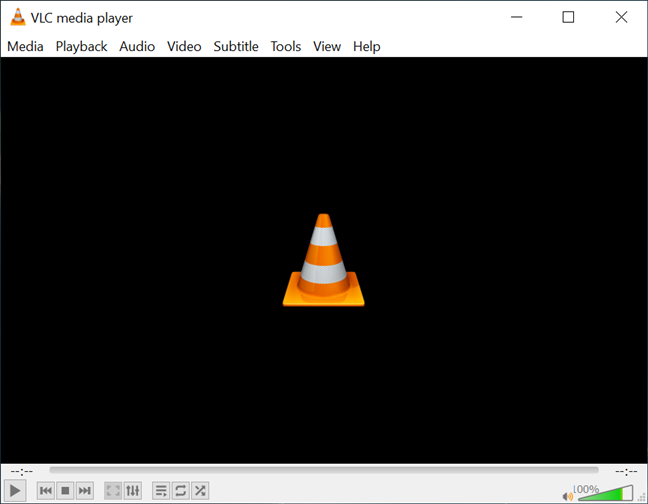
Open the app to learn how to screenshot in VLC
Step 2: Open your movie or video in VLC media player
The second step needed to extract frames from video in VLC is opening the file you want to capture.
In Windows, click or tap on Media in the top left corner of the app to reveal a menu with options for loading videos from all kinds of sources: files, folders, discs, and even streams.
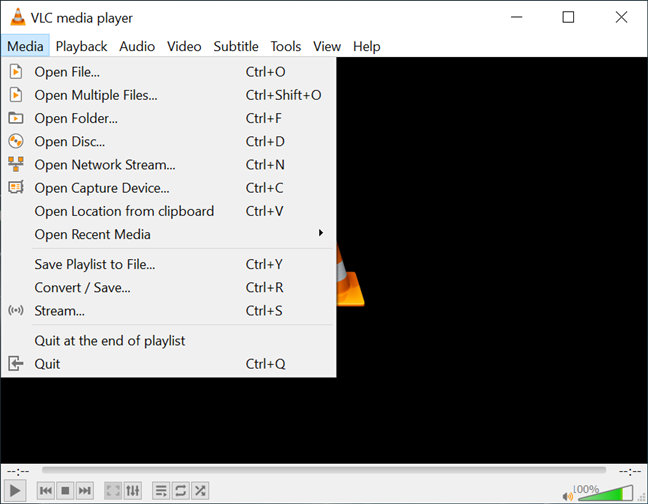
You can take VLC screenshots from videos in different locations
If you’re using a Mac, these options are found under File.
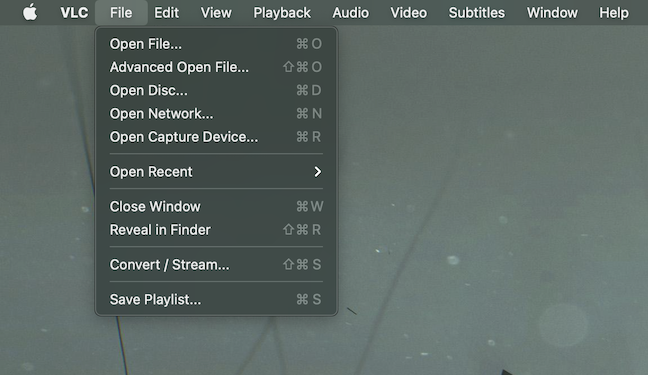
The VLC macOS menu is a bit different from the Windows one
Choose the appropriate option, browse or enter the location of your video, and then press Open or Play.
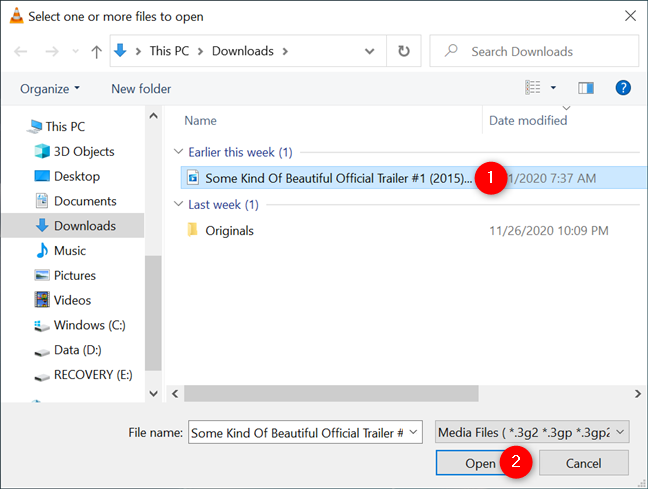
Select and open the video you want to screenshot with VLC
Alternatively, if you’re opening a file on your computer, you can right-click or press-and-hold on it to reveal a contextual menu. Go to Open with and click or tap on “VLC media player” from the available options.
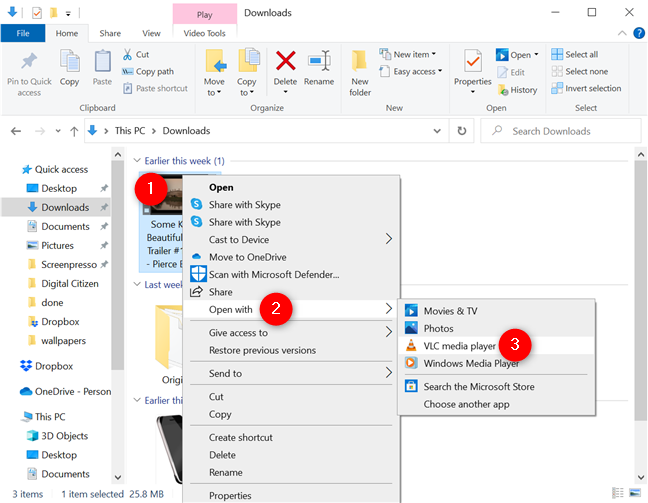
An alternative way to open videos with VLC
Your video should start in VLC.
Step 3: Take a VLC snapshot in Windows or macOS
There are four built-in ways to take a VLC screen capture in Windows, and three of those also work on macOS. You can take VLC screenshots while the video is playing, or you can use the spacebar on your keyboard to pause it at the frame you want to capture.
1. Take a VLC screen capture using keyboard shortcuts
The easiest way to extract frames from videos with VLC is with the keyboard shortcuts.
In Windows, press Shift + S simultaneously on your keyboard to take a VLC screenshot.
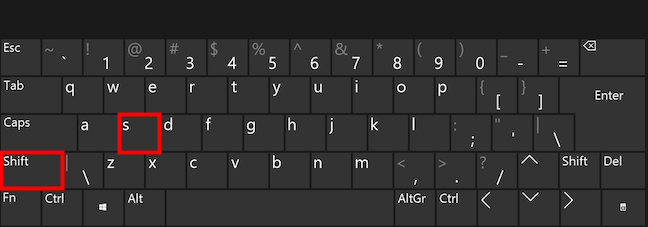
Take movie screenshots in Windows with a keyboard shortcut
On macOS, the shortcut is a bit more complicated. Press Option + Command (⌘) + S at the same time.
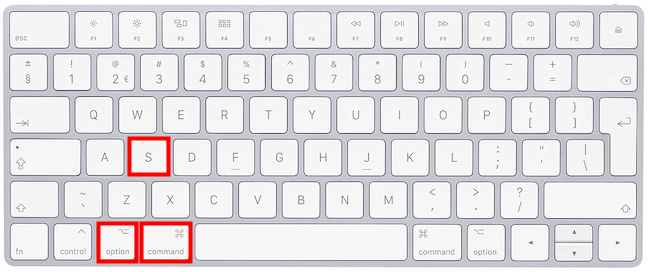
Take a VLC screen capture on Mac
TIP: You can change the VLC shortcuts to anything you want. Press Tools - or click on VLC for Mac users - from the options at the top, open Preferences, and access the Hotkeys tab. The entry is called “Take video snapshot,” and you can double-click on it to choose a new key or combination for taking screenshots.
2. Take movie screenshots from the Video menu in VLC
You can also use the Video menu at the top to take VLC screenshots. In Windows, click or tap on Video to open it, and then press the last option, Take Snapshot.
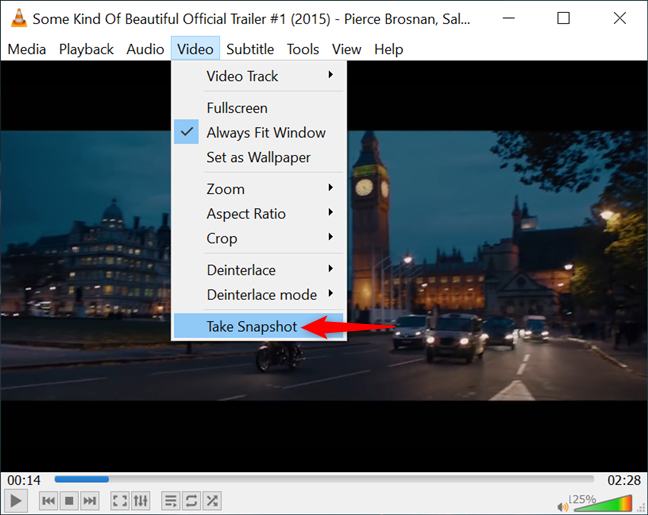
The VLC Take Snapshot option in the Video menu
On your Mac, the option from the Video menu that takes screenshots in VLC is called Snapshot.
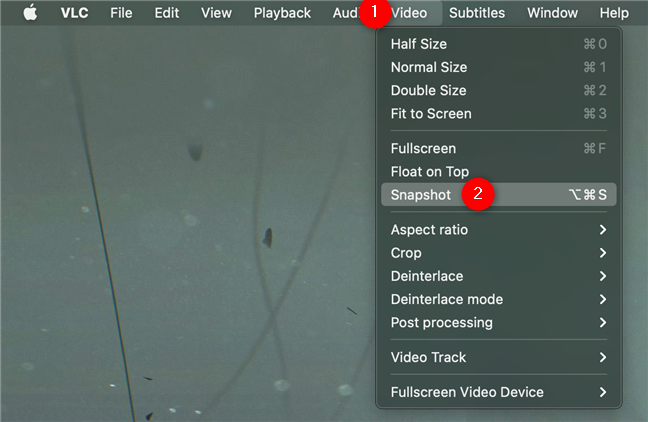
In the macOS version of VLC, save frame with the Snapshot option
3. Take a VLC snapshot from the right-click menu
Another option available on both operating systems is to right-click or press-and-hold on the video. This opens a contextual menu. Go to Video and then click or tap on Take Snapshot.
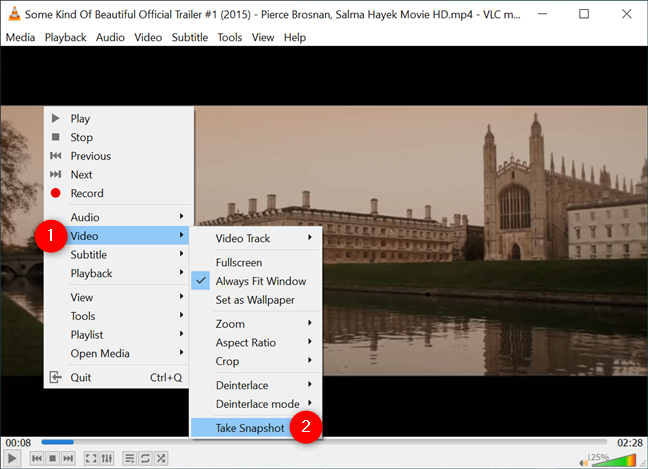
The VLC Take Snapshot option is also available from the contextual menu
If you’re using macOS, it’s easier to take a VLC screen capture this way. Right-click on the video and then press Snapshot from the contextual menu.
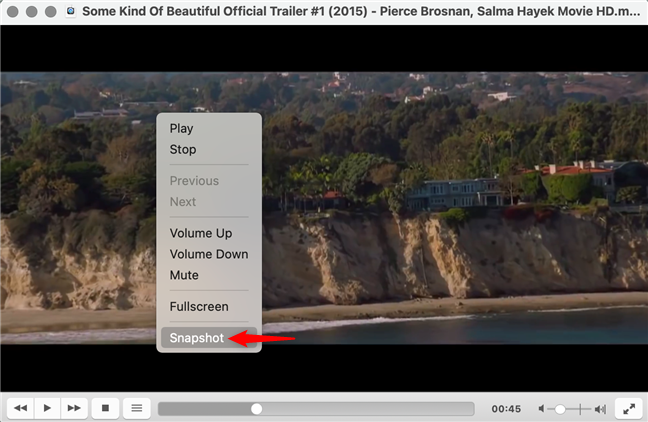
Screenshot in VLC from the right-click menu on macOS
4. Take a screenshot in VLC with the “Take a snapshot” button
Windows 10 users can enable the Advanced Controls and take a VLC snapshot by clicking or tapping a button. Access the View menu and click or tap on Advanced Controls to check the option. As soon as you do that, you can see additional buttons appear in the controls section at the bottom of the window.
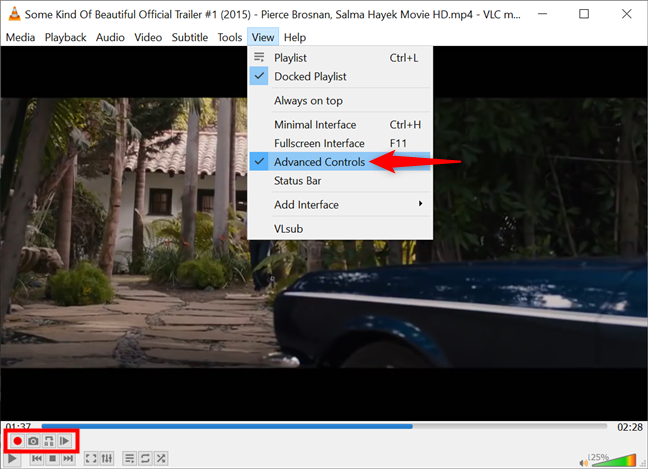
Display Advanced Controls in Windows to take a VLC snapshot
The second button is called “Take a snapshot.” Clicking or pressing on it immediately takes a VLC snapshot.
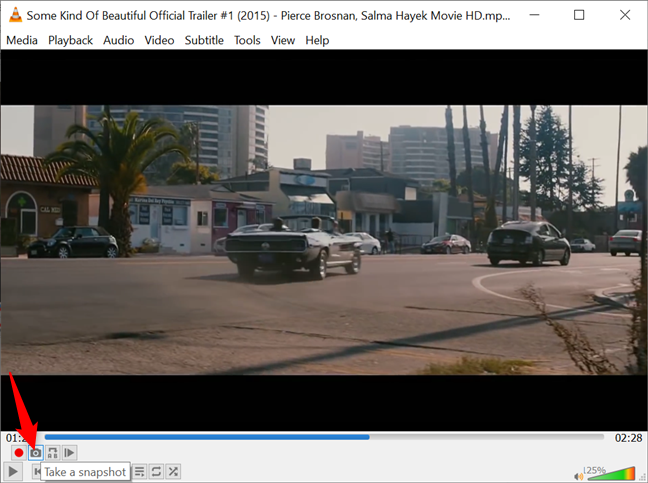
Use the Take a snapshot button to take VLC screenshots
TIP: The last button in Advanced Controls is called “Frame by frame” and comes in handy when you’re taking movie screenshots, but can’t grab the image you want. Use it to advance a single frame in your video and take the VLC screen capture you need.
Bonus: VLC snapshot location in Windows and macOS
If you’re wondering, “Where does VLC save snapshots?”, the answer is right on your screen. After capturing a frame from a video, a preview of it is briefly displayed in the top left corner of the window, followed by the VLC snapshot location and its name.
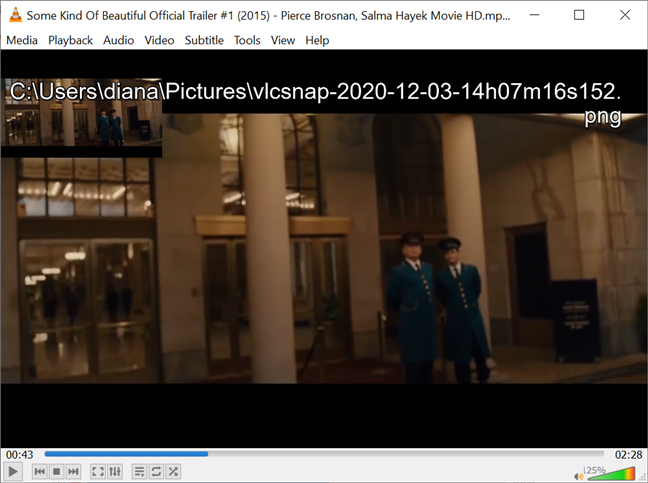
Check your screen to see where does VLC store snapshots
In Windows, the default location for VLC screenshots is: “C:\Users\[Your username]\Pictures” You can find the images saved on macOS in a similar location: “~\Users\[Your username]\Pictures” .
You can easily change the folder where VLC snapshots go. First, open Preferences with the keyboard shortcut Ctrl + P in Windows. Mac users can simultaneously press the following keys: Command (⌘) + Comma (,). Then, access the Video tab, and you can see the Video snapshot section at the bottom of the window. Press the Browse button next to Directory (Windows) or Folder (macOS) and choose a new location where you want the VLC screenshots.
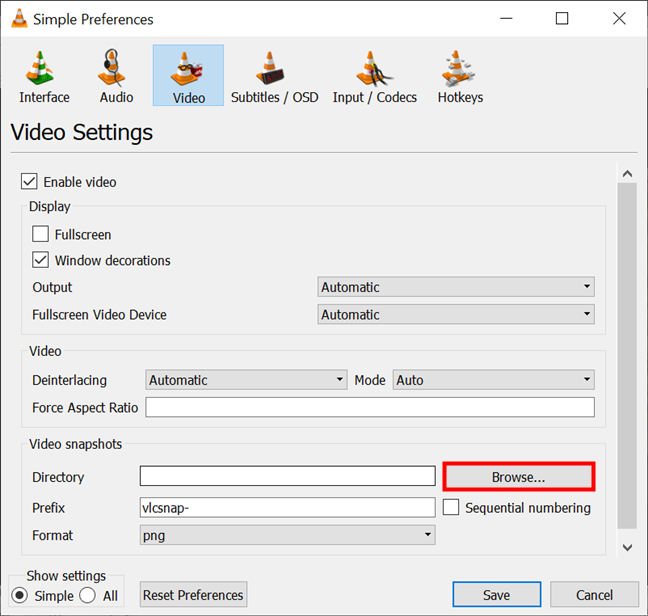
Browse to select the new location where VLC snapshots go
You can also use this section to change the VLC snapshot Prefix, displayed in the screenshot name, or its Format, if you prefer to save it as JPG or TIFF instead of the default PNG.
When you are done, press Save and the new settings are applied.
What VLC screenshots did you take?
VLC media player makes it easy to grab the frames you love from your favorite videos, no matter which operating system you’re using. Before you close this tab, let us know what method you like most. We prefer using a keyboard shortcut, but the Advanced Controls do come with other useful options, so we usually activate them as well. We’re also curious to know what you wanted to capture. Were you using VLC to take movie screenshots? What movie caught your eye? We’re always looking for new things to watch, so let us know in the comments section.


 04.12.2020