There are times when you might want or have to change the MAC address of your network adapter so that you can connect to certain networks. However, what do you do when you have to restore the original MAC address, and you do not know what that was? Fortunately, you can quickly restore the MAC address with various tools. Read on to learn six different ways in which you can revert to the original MAC address of your network card in Windows 11 and Windows 10:
1. Restoring MAC address in Windows 11 and Windows 10 using Device Manager
There are situations when you might need to change your MAC address. If you followed this tutorial and changed the network address of your adapter, you also need to know how to restore it to the default value. The most straightforward way to do it is by using the Device manager.
Regardless of whether you use Windows 11 or Windows 10, open the Device Manager on your computer or device. In the Device Manager window, expand the list of Network adapters by clicking or tapping on their entry. Then, right-click or press and hold the network card for which you intend to restore the MAC address and select Properties in the menu that appears.
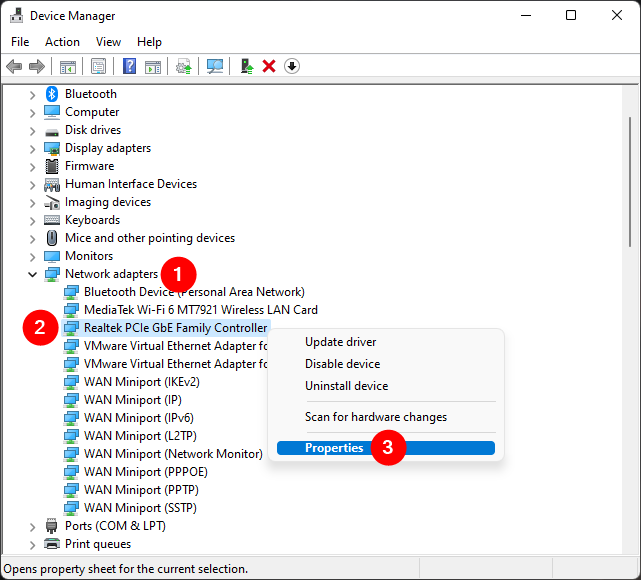
Open the Properties of your network adapter
In the network adapter’s Properties window, head to the Advanced tab. In the Property list, select Network Address, and you should see the spoofed MAC in the Value field on the right side of the window. To revert to the original MAC address, select Not Present, then press the OK button.
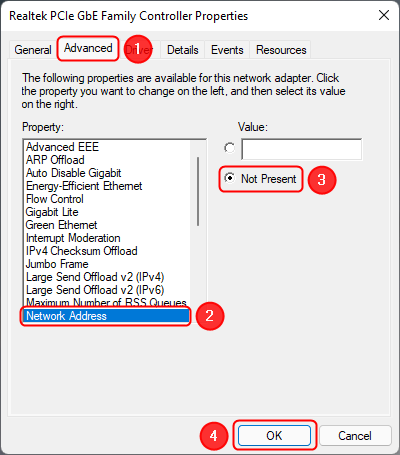
Restore MAC address using Device Manager in Windows
Reboot Windows for the changes to take effect.
2. How to restore your MAC address in Windows 11 or 10 from the Control Panel
You can also use the Control Panel to restore the MAC address. Open it and search for “network connections.” Then, click or tap the “View network connections” link from the search results list.
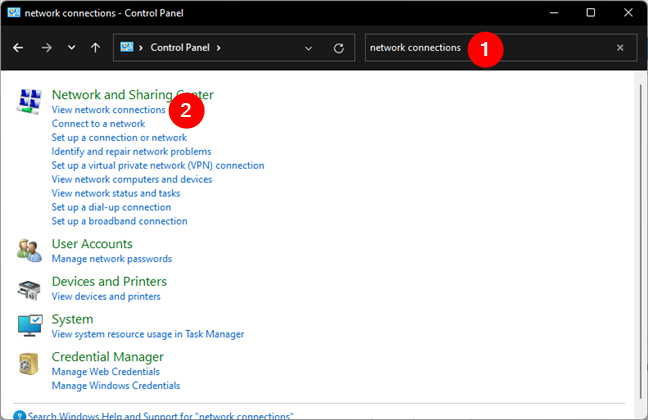
Search and open network connections in Control Panel
This brings up the Network Connections window. Locate the network connection for which you want to change the MAC address, right-click or press and hold on it, and select Properties in the contextual menu.
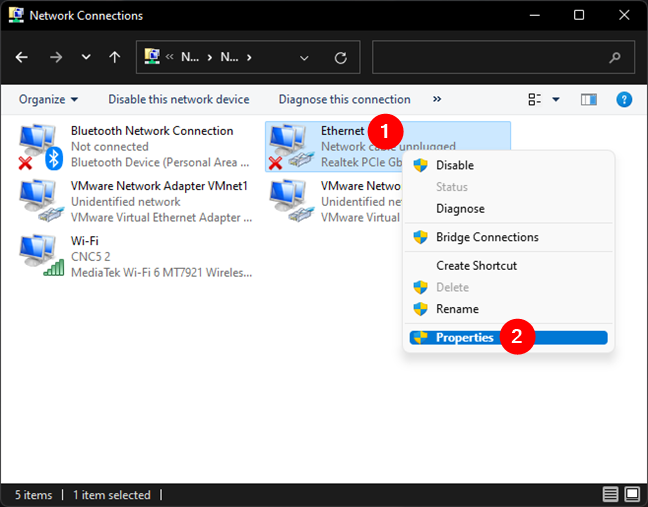
Open the Properties of your network connection
In the Properties window of the selected network connection, press the Configure button.
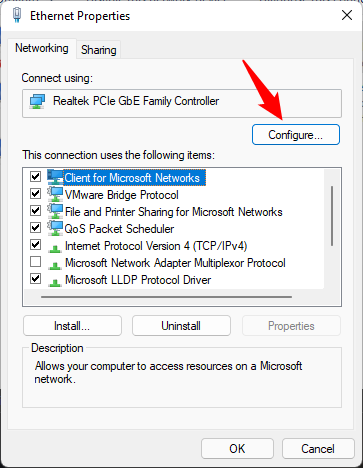
Click or tap Configure
Now, go to the Advanced tab. Locate and select Network Address in the Property list and select Not Present. Once you’re done, press the OK button.
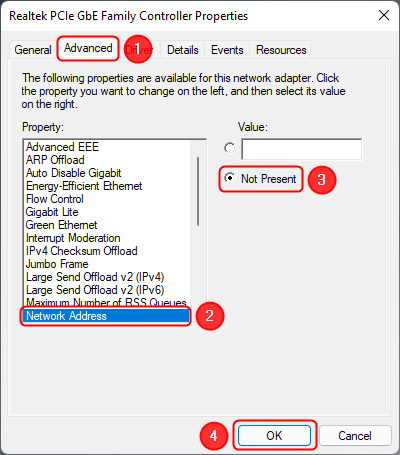
Restore the MAC address from the Control Panel in Windows
3. Restore the MAC address in Windows using third-party software
Another method of restoring the MAC address of your network adapter to its original value is to use dedicated third-party software. Technitium MAC Address Changer is an excellent choice for this purpose. You can download the app for free from this website and install it on your Windows computer or device. Run the app and wait for it to detect all the network adapters installed on your system, together with their MAC addresses.
The application includes many useful options, such as exporting reports about the network adapters, enable or disable IPv4 and IPv6 connectivity, deleting network adapters from the registry, and automatically restarting the network adapter to apply the changes you make. To restore your original MAC address, click or tap the Restore Original button.
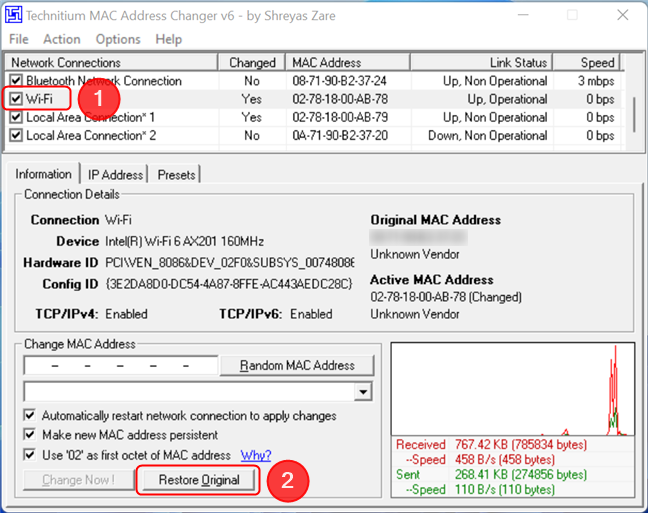
Select the adapter, then click on Restore Original
By default, Technitium MAC Address Changer instantly applies the new MAC address by automatically restarting your network connection. That means that you don’t need to reboot your PC to apply the change. However, you can modify this behavior by unchecking the option called “Automatically restart network connection to apply changes.”
4. How to restore the MAC address in Windows using the Registry Editor
Start the Registry Editor as administrator and use its address bar or its navigation panel on the left to get to this path:
The subdirectories of this location contain all the network interfaces found on your Windows PC. Browse through them and check the information displayed on the right panel to identify the one you need to change. The DriverDesc field is the most likely to help you pinpoint the right network card.
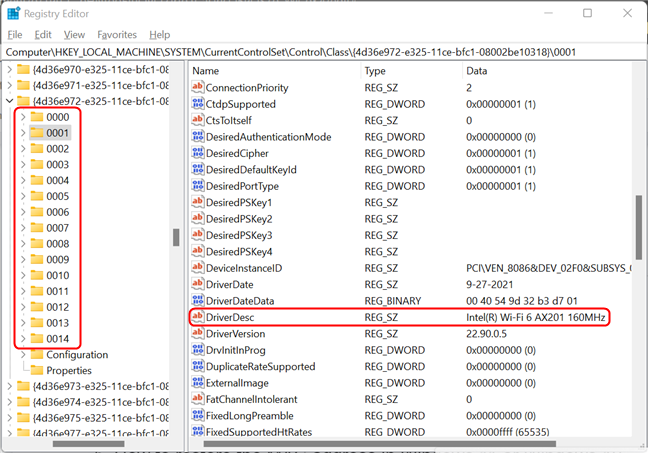
Identify the network adapter for which you want to reset the MAC address
Once you’ve identified and selected the network interface for which you need to reset the MAC address, look on the right for an entry named Network Address. Its value field should contain the spoofed MAC address. Select it and press Delete on your keyboard. Alternatively, right-click or press and hold on it, then select Delete in the contextual menu.
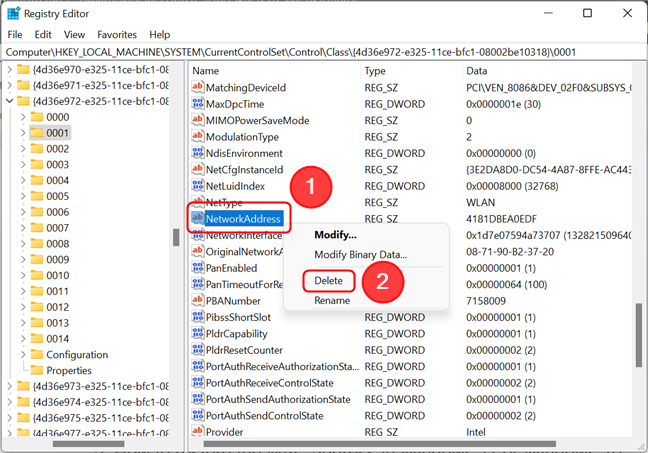
Delete the NetworkAddress entry
A message appears, warning you that the action could cause system instability. This is a standard message that appears every time you delete a registry value. Press Yes to confirm your action, then reboot your computer. The network adapter should now have its original MAC address.
5. How to restore the MAC address in Windows 11 or Windows 10 from the command line
Once we’ve learned how to restore MAC addresses from the Registry Editor, we can now speed up this change using the reg command in the command line with Terminal, Command Prompt, or PowerShell. First, open the Terminal, Command Prompt, or PowerShell as administrator, depending on which app you prefer to use.
Before you execute the command below, you need to replace the underlined numeric string. The string is associated with the network card that you want to change in Windows Registry. Review the previous section to find out how to get this number from the Registry Editor.
Confirm the action by typing Y followed by Enter. A confirmation message should appear.
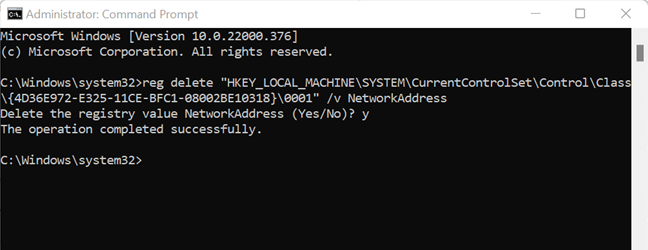
Restore the MAC address from the command line
Reboot your computer for the changes to take effect.
6. Restore the MAC address on Wi-Fi networks by disabling MAC randomization
Both Windows 11 and Windows 10 have a feature that, when activated, randomizes the MAC address each time you connect to a Wi-Fi network. Please note, though, that this feature is only supported by certain Wi-Fi network adapters. If the methods above didn’t solve the issue, this feature might be active, in which case you can return to the original MAC address for Wi-Fi networks by turning the feature off. Since the way to do this varies slightly depending on your operating system, let’s start with Windows 11:
Disable random hardware addresses in Windows 11
Launch the Settings app, select Network & internet on the left sidebar, and click or tap on Wi-Fi on the right.
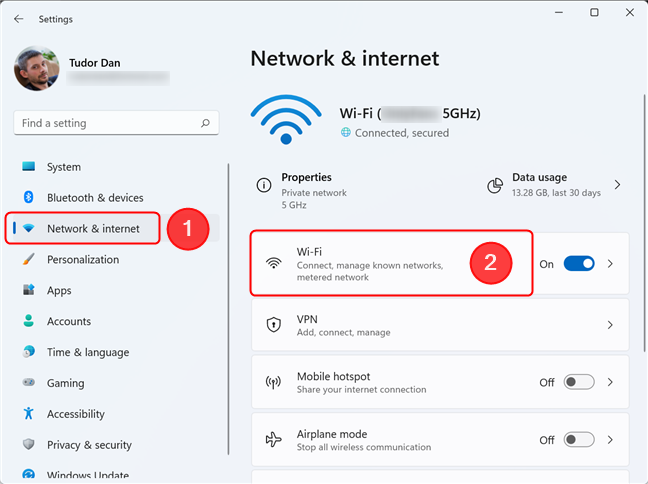
First, go to Wi-Fi in the Network & internet section of Settings
Next, check if the Random hardware address is activated for all Wi-Fi networks. If it is, deactivate it by flipping the switch to Off.
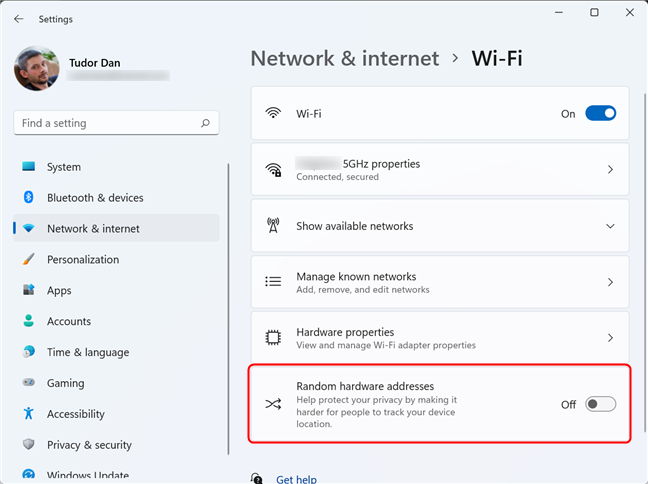
Disable random hardware address for all Wi-Fi networks in Windows 11
Now, you may have activated the randomization of network addresses for a specific Wi-Fi network, so next, let’s check that. On the same page from the Settings app, click or tap on Manage known networks.
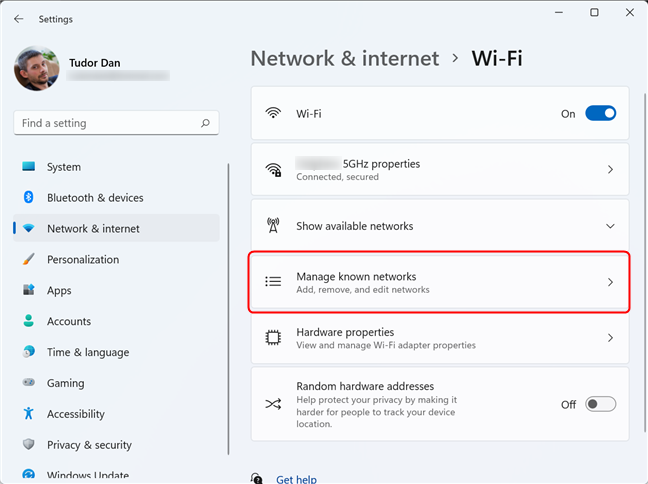
Go to Manage known networks on the Wi-Fi page
Then, choose a wireless network from the list by clicking or tapping on it.
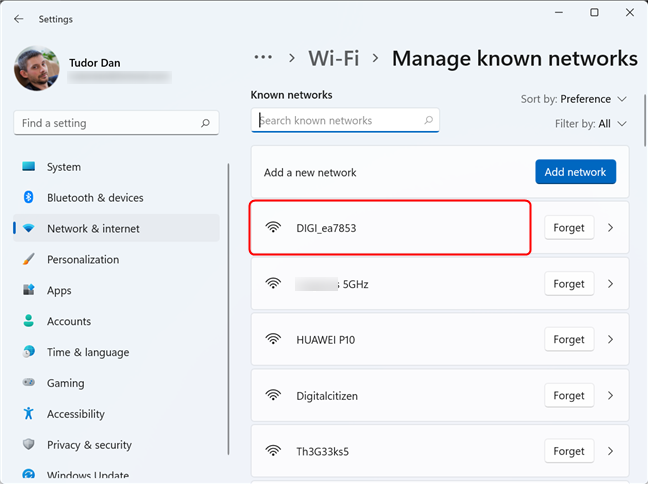
Click on the desired Wi-Fi network
On the next page, locate the Random hardware addresses setting, click or tap on the drop-down list on its right side, and select Off.
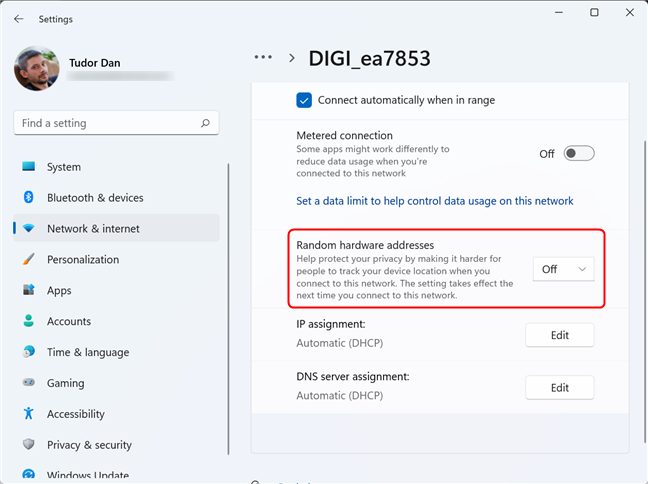
Disable random hardware address for a particular Wi-Fi network in Windows 11
Next time you connect to the selected Wi-Fi network, the MAC should revert to its default. If you want to do that right now, you need to reconnect to your Wi-Fi or disable and re-enable Wi-Fi on your Windows 11 computer or device.
Disable random hardware addresses in Windows 10
Just like in Windows 11, some Windows 10 settings also allow you to randomize your MAC address when connecting to Wi-Fi networks with certain adapters. Let’s first check if it’s on for all wireless connections. Open the Settings app, then navigate to Network & Internet and select Wi-Fi on the left sidebar. On the right side of the window, look for “Use random hardware addresses.” Check the status of the feature and turn it off if it’s active by flicking the switch next to it.
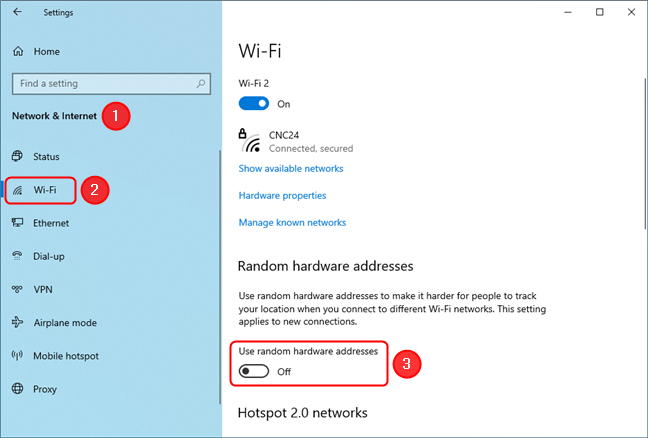
Restore your MAC for all Wi-Fi by switching off Random hardware addresses
To check if the feature is active for a particular network, click or tap the Manage known networks link in the Wi-Fi window.
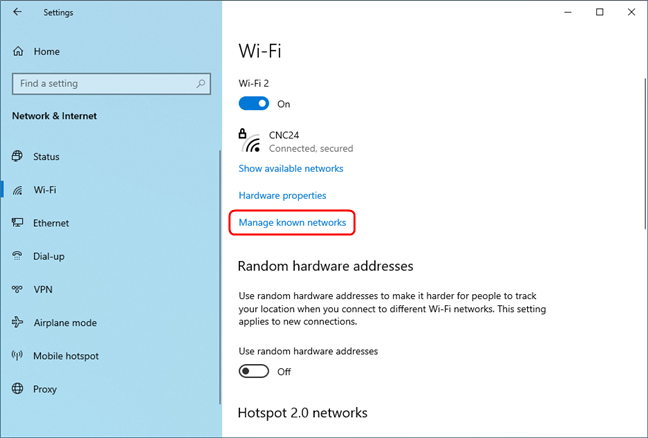
Access the Manage known networks section
On the Manage known networks page, select the Wi-Fi connection for which you want to restore the original MAC address. Click or tap on Properties.
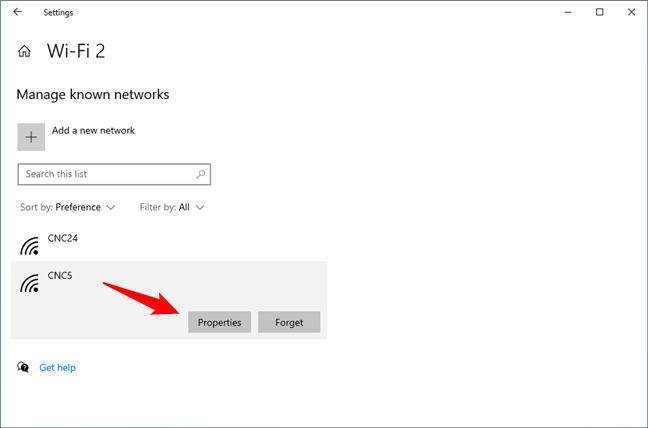
Open the Properties of the selected Wi-Fi network
Locate the Random hardware addresses section and the setting named “Use random addresses for this network.” Then, click or tap the drop-down list under the latter and select Off.
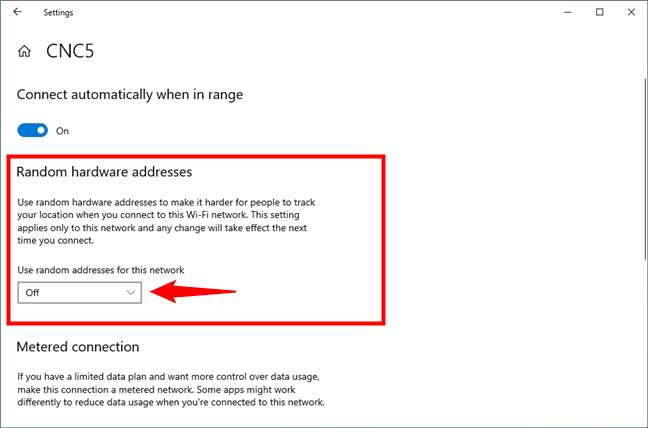
Locate the Use random hardware addresses for networks and set it to Off
As always, don’t forget to restart your computer for the changes to take effect.
Which method do you prefer for restoring your network card's original MAC address?
Now that you have six methods of restoring your original MAC address, you should not have significant problems configuring your network adapter. Do you know of other ways? Also, if you had any problems restoring a MAC address to its original value, let us know in the comments section below.


 11.01.2022