
Microsoft offers a version history service for OneDrive, OneDrive for Business, and SharePoint Server. How long older versions are stored, depends on whether you’re using a personal Microsoft 365 subscription or a business one. If you want to restore previous versions of your Excel, Word, or PowerPoint work files, as well as PDFs and other types of files, read this guide:
How to use version history in Excel to recover previous versions of your files
If you use a modern version of Microsoft Excel on your Windows computer, your data might be stored on OneDrive, OneDrive for Business, or a SharePoint Server. In that case, you start by opening the XLS or XLSX file for which you want to recover the older version. Then, in Excel, click or tap File in the top-left corner.

In Microsoft Excel, click File
A new menu opens, similar to the screenshot below. Go to the Info tab on the left and then look for the Version History button. Click or tap on it.
Excel opens a panel on the right side of your workbook with the older versions of the same file. They are shown chronologically in descending order. For each version, you see who modified it and when. Then, you can click or tap the Open version option for the date and time you want, and Excel opens it in a new window.
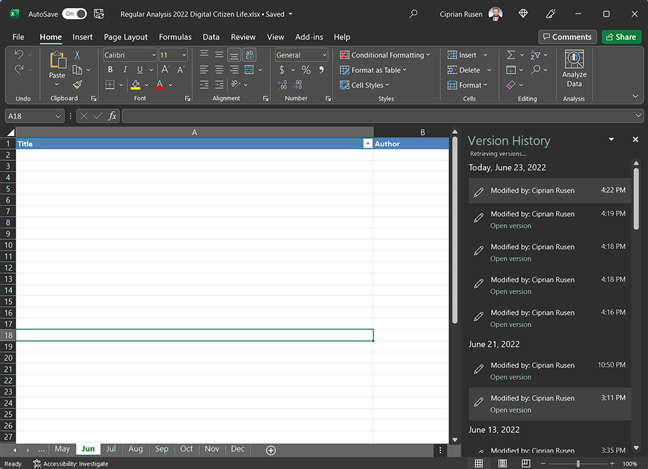
Choose the older version from the list on the right
The older version is not editable: you’re only allowed to view its contents. You can copy and paste content from the older version to the latest one or to another Excel file, or you can click or tap the Restore button shown on the top side of the Excel window.
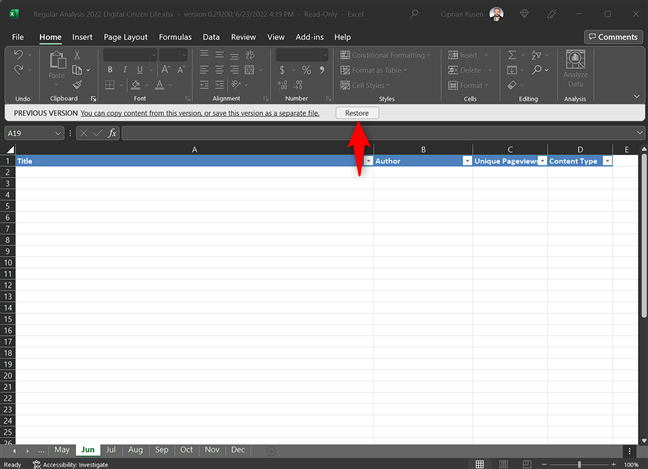
Restore the older version or copy and paste content from it
If you choose the Restore option, the older version replaces the latest one. It gets synchronized automatically with all your devices where you use the same OneDrive or Sharepoint account.
TIP: If you’re a regular Excel user, you might enjoy this article: How to delete values from cells but keep your formulas, in Microsoft Excel.
How to use version history in Word, PowerPoint, and other Microsoft 365 products
Word, PowerPoint, and other Microsoft 365 products have the same version history system, and the steps involved are identical to Excel. First, you open the file for which you want to recover an older version in the appropriate app. Then, click or tap File > Info > Version history.
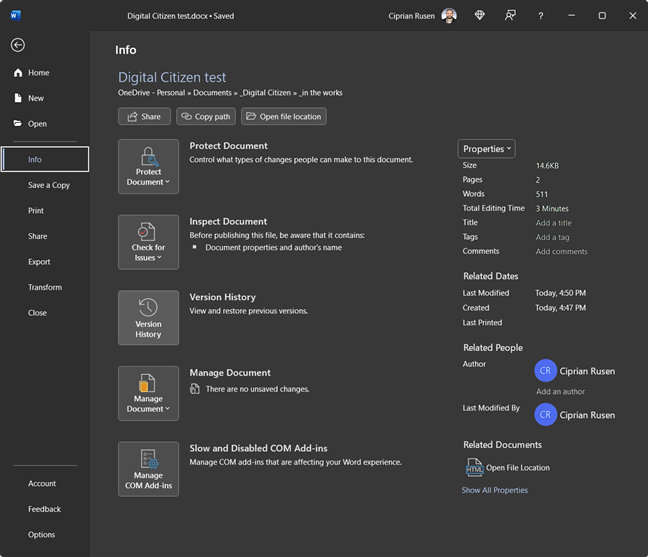
In Word, go to File > Info > Version history
Word then displays the Version history panel on the right, with the same options found in Excel.
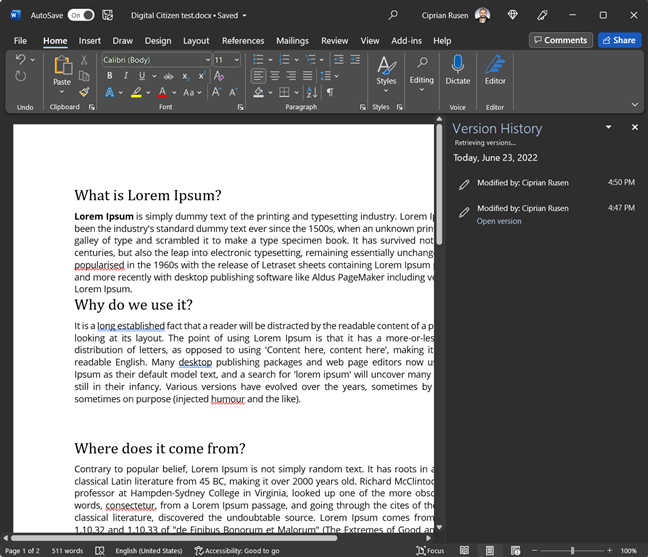
Choose the older version you want
PowerPoint does the same, and you get the same Version History panel on the right.
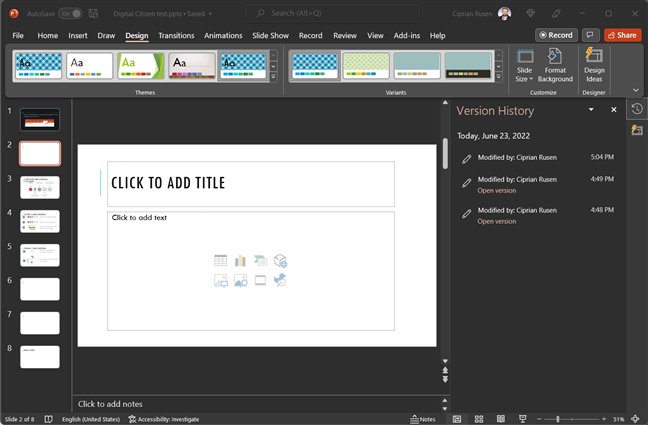
Version History works the same in PowerPoint too
TIP: If you’re creating PowerPoint presentations on a regular basis, read: How to change the PowerPoint Slide Size: All you need to know.
How to use version history on OneDrive’s website to recover older versions of your files
You can also use the OneDrive website to recover older versions of your files. First, open your favorite browser, navigate to Onedrive.com and sign in with your Microsoft or work account. In the My files section of OneDrive, navigate through your files and find the one you want to work with.
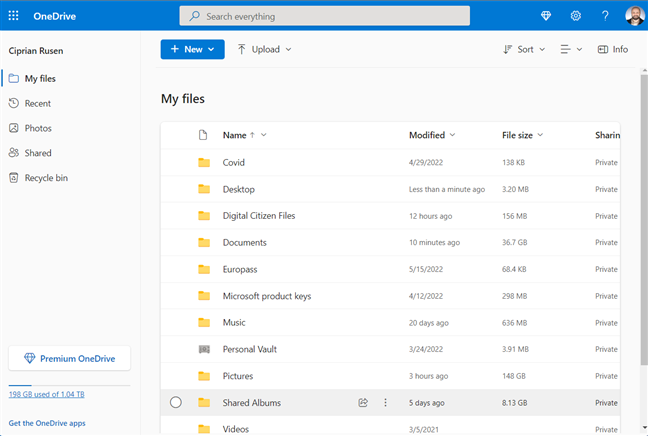
Open the OneDrive website and go to My files
Select the file, and click or tap the three dots button on the top toolbar. In the menu, choose Version history.
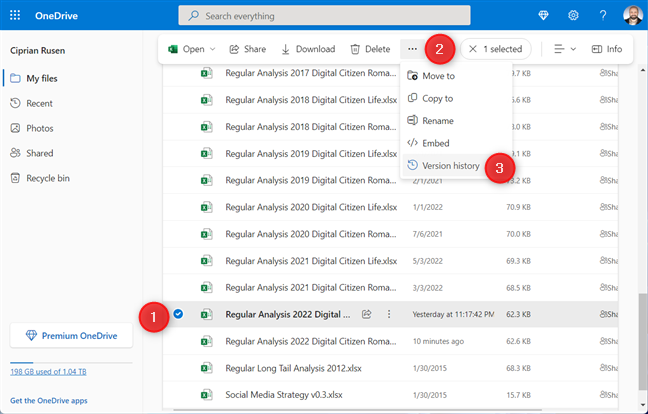
Select the file and go to ... > Version history
If you have the browser window maximized, you may see the Version history option displayed on the top toolbar directly instead of being hidden in the menu shown earlier.
Check the top toolbar for the Version history option
If you are opening a Microsoft 365 file made in Excel, Word, PowerPoint, or some other app, the web version of that app is loaded in a new tab. On the left, you see a sidebar with the older versions of that file. Click on the one you want to restore, and then choose between Restore and Download. The first option rewrites the latest version in OneDrive with the older version you restored, while the second obviously downloads the older version on your PC.
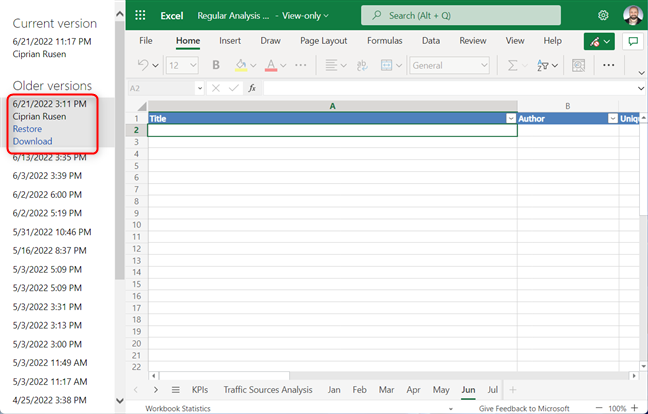
See all the older versions on the left
If you are working with a PDF, TXT, CAD file, or a picture or video, the file won’t open in a web app. Instead, you’ll see the Version History panel on the right. Click the three dots next to the version you want to recover, and choose between Restore and Open File.
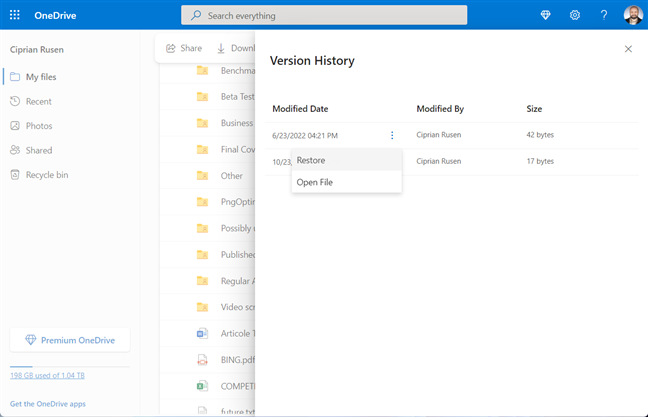
Version History works for PDFs, TXT files, and more
As you can see, restoring older versions of files from OneDrive is relatively easy.
How to use version history in File Explorer to recover older versions of your files
If OneDrive is synchronized with your Windows 10 or Windows 11 computer, you can recover old versions of your files straight from File Explorer. Fire up the File Explorer app, go to OneDrive and navigate to the file you want to revert to a previous version. Right-click or tap on hold on the file’s name. If you’re using Windows 11, in the menu, choose OneDrive and then Version history.
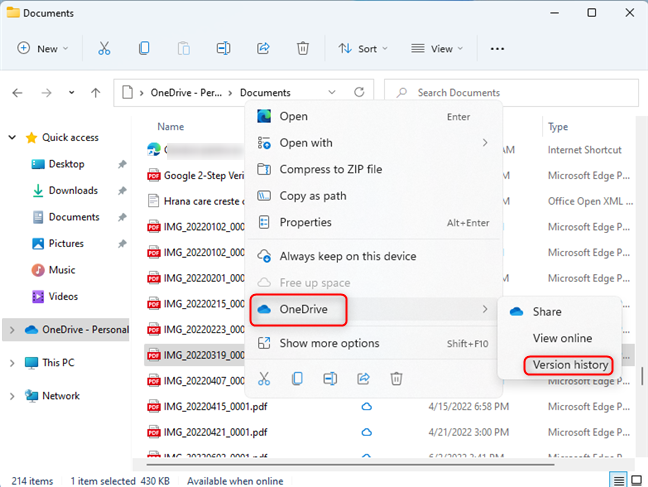
Right click and choose OneDrive > Version history
If you’re using Windows 10, the Version history option is one click away, instead of two.
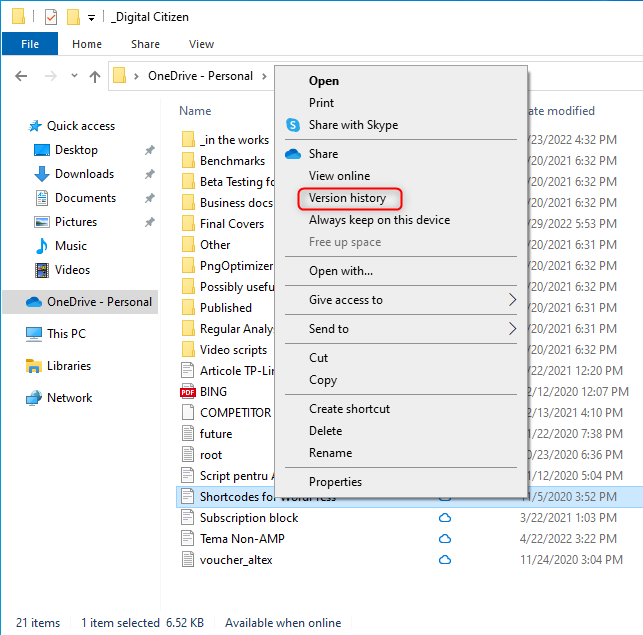
In Windows 10, Version history is easier to access
You then see a small window with all the previous versions of that file. Choose the one you want, click or tap the vertical three dots next to it, and then click or tap Restore or Download, depending on what you want.
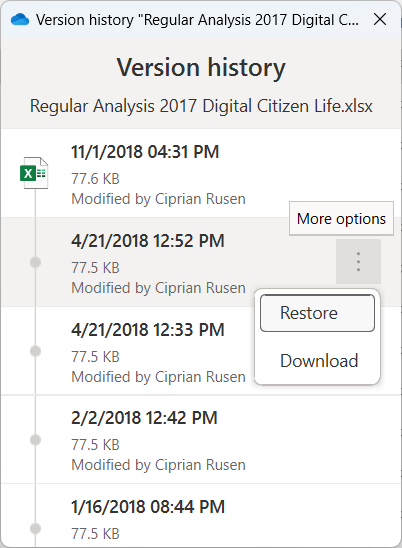
Choose the version you want
If you choose Restore, the file’s version you selected becomes the current version, and the current version shown on the top becomes the previous version in the list.
How many versions does OneDrive keep?
If you use a personal OneDrive plan with a Microsoft account, OneDrive stores the last 25 versions of your files. If you use a work or school account, the number of versions depends on how the administrator configured this service for your organization. If you’re using OneDrive as part of SharePoint Server, the admin can also turn off file versions completely.
If you’ve deleted files from OneDrive, Microsoft stores deleted files and folders in its Recycle Bin for at least three days and a maximum of 30 days. For more details, read OneDrive's Recycle Bin: How to recover deleted files.
What is your experience with the version history feature?
As you can see, this feature of OneDrive, SharePoint Server, and Microsoft 365 is useful when you mess up the versions of one workbook, document, or presentation. I personally use it at least once a month, especially on files on which I collaborate with others. Being able to restore older versions of your files saves you a lot of time and headaches. Before closing this tutorial, tell me if it worked well for you, and if you managed to safely restore the older versions of the files you’re interested in.


 24.06.2022