You can customize the new Chromium-based Microsoft Edge by adding the extensions or add-ons that interest you. They are a great way to modify your browsing experience and boost your overall productivity. For example, you can use Microsoft Edge extensions to add a password manager, a Facebook video downloader, a VPN solution that is easy to turn on from Microsoft Edge, and many other things. Your only limit is your imagination and Microsoft’s collection of Edge extensions. 🙂 This guide illustrates how to get, configure, hide, and remove web browser extensions for Microsoft Edge. If we’ve managed to make you curious, read on:
What is a Microsoft Edge extension?
A Microsoft Edge extension (or add-on) is a small program integrated into the browser and designed to personalize and enhance your every-day online experience. You can use Edge extensions to customize the browser by adding the features and functionalities you prefer. The Edge add-ons available vary in purpose and usefulness. From password managers and ad blockers to extensions that translate pages, help with online shopping, or check your spelling, it’s up to you to choose the ones that best suit your needs.
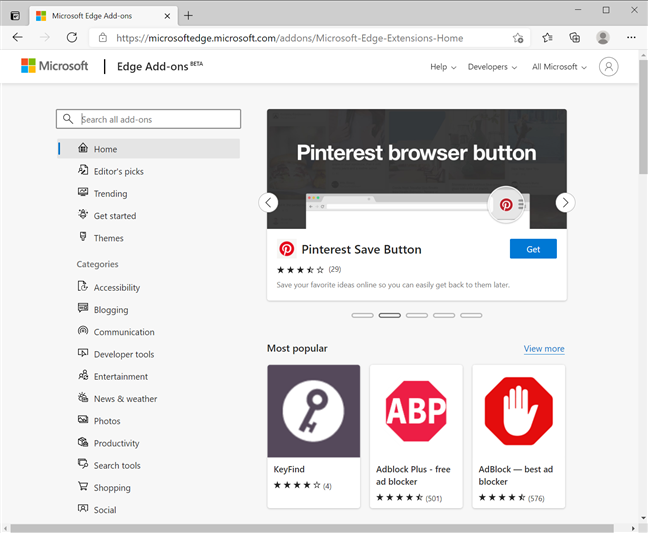
Get extensions or addons for Microsoft Edge
But the differences do not stop there. Some extensions only become active when clicking or tapping on their icon, while other add-ons run in the background. There are also extensions that extend the functionality of applications and might require you to log in.
No matter what Edge browser extensions you want, continue reading to find out how to get and make the most of them.
How to get extensions for Microsoft Edge
To begin, open Microsoft Edge and press on the “Settings and more” (...) button in the top-right corner. You can also press ALT + F on your keyboard for the same result. Then, click or tap on Extensions from the dropdown menu.
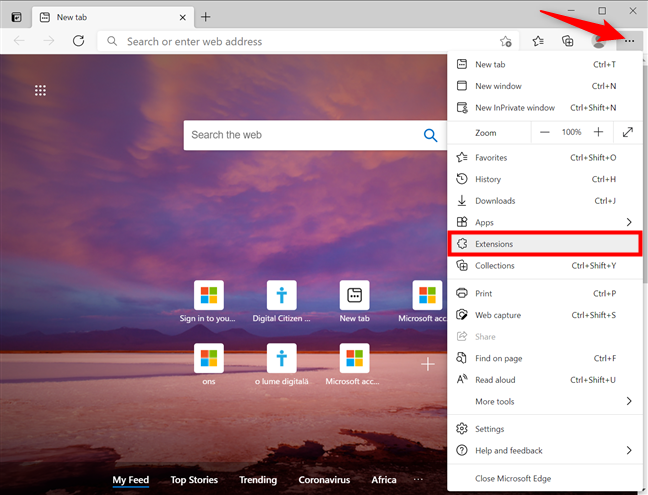
Open the MS Edge Extensions settings
The Extensions page is where you find your installed add-ons. If you’ve never installed a Microsoft Edge extension before, this page should be empty. Click or tap on the big blue “Get extensions for Microsoft Edge” button.
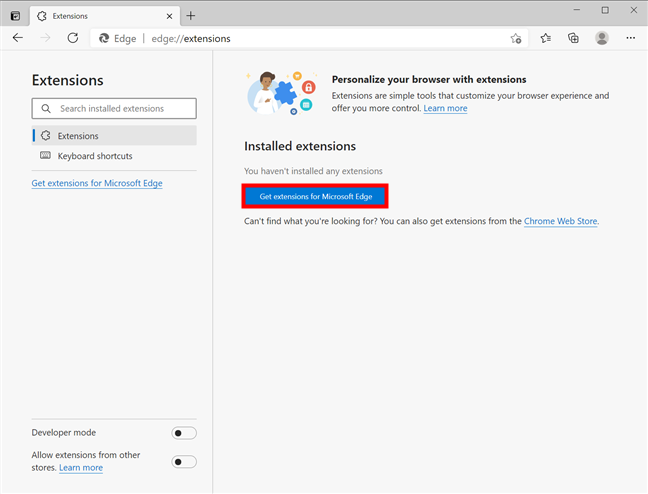
Use the button to get Edge addons
The Edge Add-ons page from Microsoft’s website opens in a new tab. Feel free to browse around through the available categories.
You can also check out our top 10 favorite Microsoft Edge extensions. If you’re looking for a specific add-on, type its name in the “Search all add-ons” field in the top-left corner.
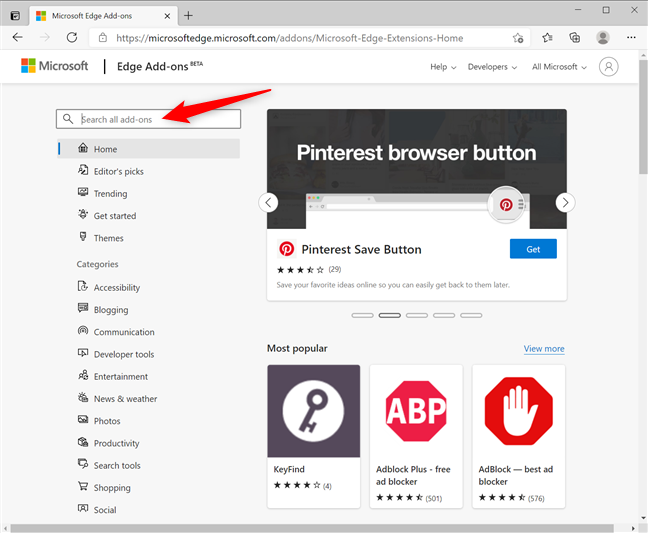
Search for the Edge browser extensions you need
Click or tap on the appropriate result to see more details about the extension you want - in our case, Grammarly for Microsoft Edge.
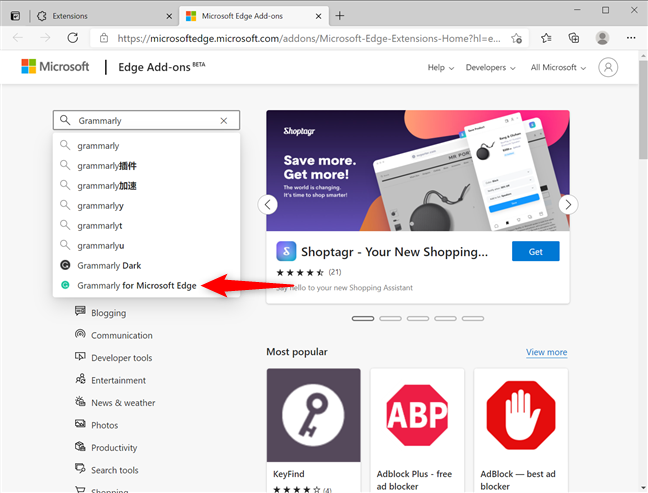
Open the Microsoft Edge extension you want to get
This opens the extension’s page, where you can find more information and user reviews. Click or tap on the blue Get button in the upper-right corner.
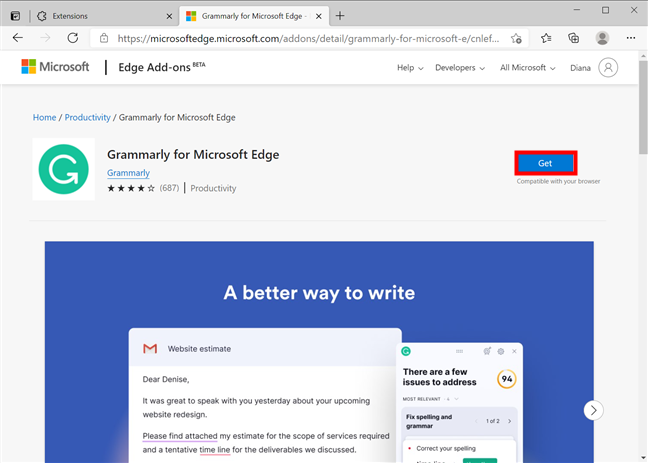
Press Get to include the extension in your browser
A pop-up window displays the permission required by the add-on. Review them and click or tap on Add extension.
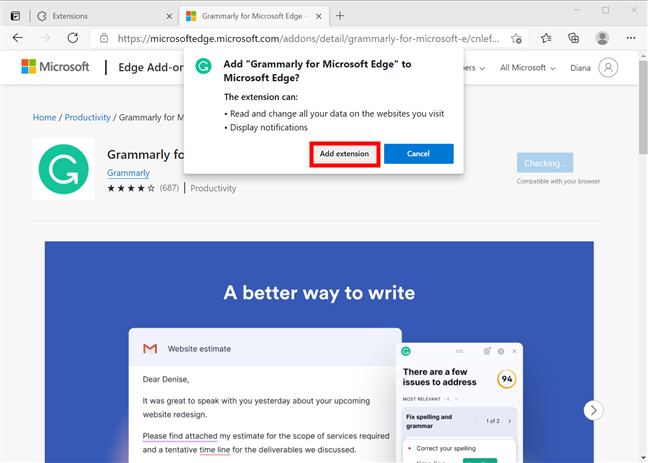
Press the Add extension button
You can briefly see Microsoft Edge downloading a file. As soon as the extension is installed, its icon is added to the right of your address bar, displaying a confirmation message. Moments after, Grammarly opens a new tab where you can log in or sign up if you want.
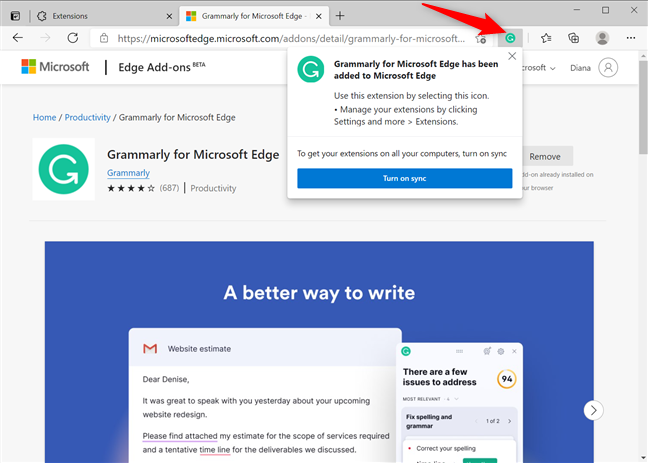
Microsoft Edge extensions add an icon to the browser
TIP: The confirmation window also offers the option to Turn on sync. Read our guide about syncing in Microsoft Edge for more details.
How to configure installed Edge browser extensions
After installing an add-on, return to the Extensions tab in Microsoft Edge, where the new addition is displayed in the Installed extensions list. To configure the extension, click or tap on the Details button shown under its name.
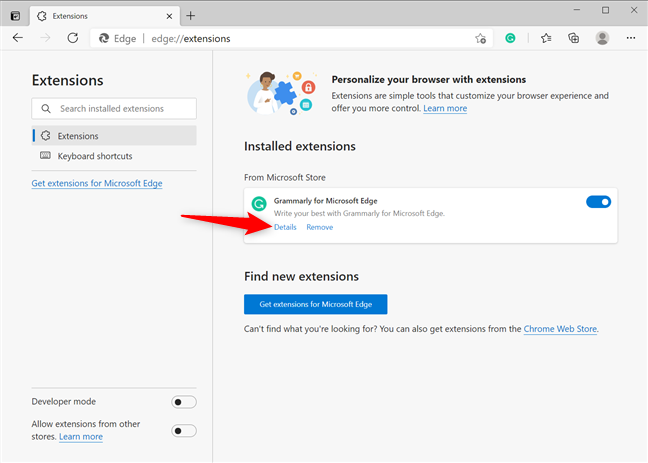
Access more Details for your Edge addons
Alternatively, you can also right-click or press-and-hold on an extension’s icon and then press Manage extensions.
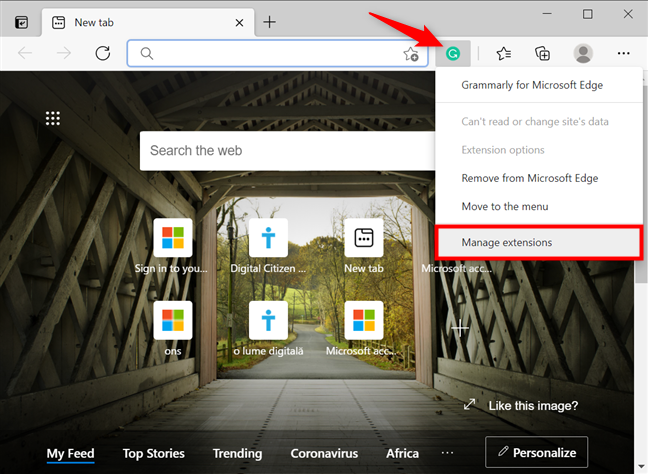
Click or tap on Manage extensions
This opens the settings available for that Edge add-on. You can modify an extension’s permissions, and some add-ons even include an Extension options link on this page. Since every extension is different, we can’t go into detail about further options, but most of them should be pretty intuitive.
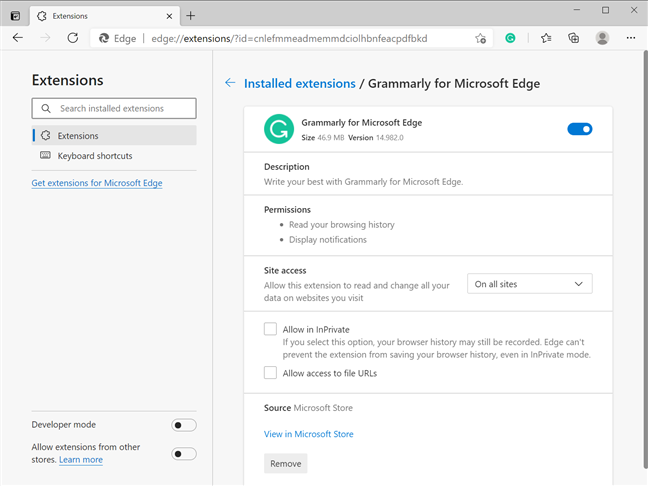
Set up your extension from Details
How to hide extensions in Edge
When it comes to MS Edge extensions you don’t use that often, you can either hide their icon or disable them altogether. To hide an add-on icon from the browser’s interface, right-click or press-and-hold on it and click or tap on “Move to the menu.”
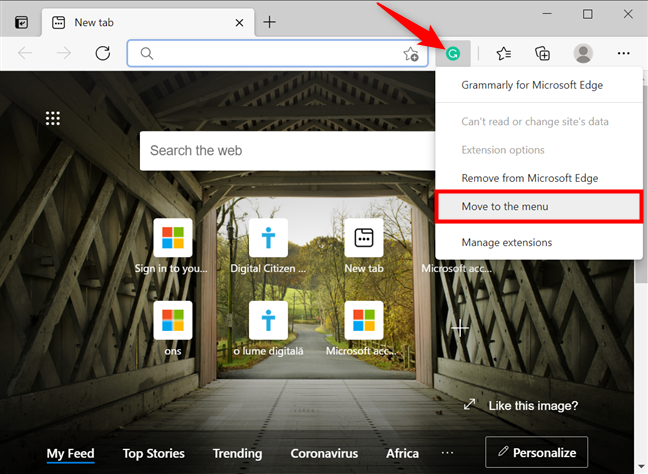
How to hide Edge extensions icons
The icon is moved at once. Clicking or tapping on “Settings and more” (...) opens a menu, and you can see the extension icon at the top of it. To return the icon to its original place, right-click or press-and-hold on it, and then click or tap on “Move to the toolbar.”
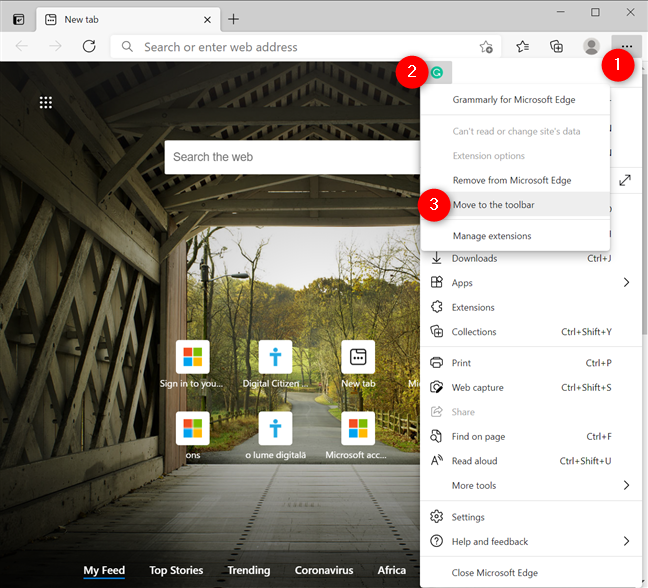
How to show an extension icon in the toolbar again
You can also choose Extensions from the “Settings and more” (...) menu and turn off the switch next to an add-on to disable it and hide its icon.
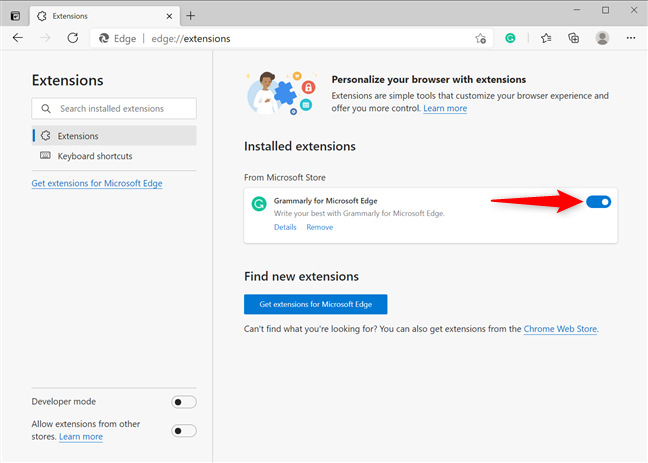
Use the switch to disable or enable installed addons for Microsoft Edge
Alternatively, you can also access an extension’s Details and use the switch at the top to disable or enable an Edge add-on.
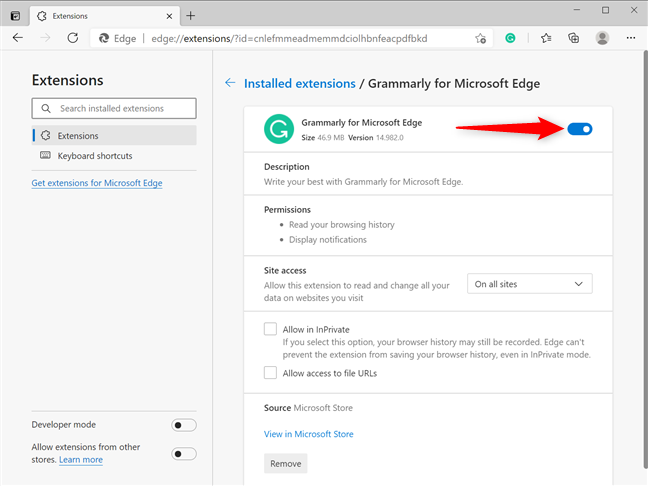
Turn off an extension from Details
How to remove MS Edge extensions
Installing too many extensions could slow down your browser, so it’s best to only keep the ones you’re using. If you decide that you no longer want an extension installed in Microsoft Edge, there are several ways to remove it. One way is to press the Remove button at the bottom of its Details page.
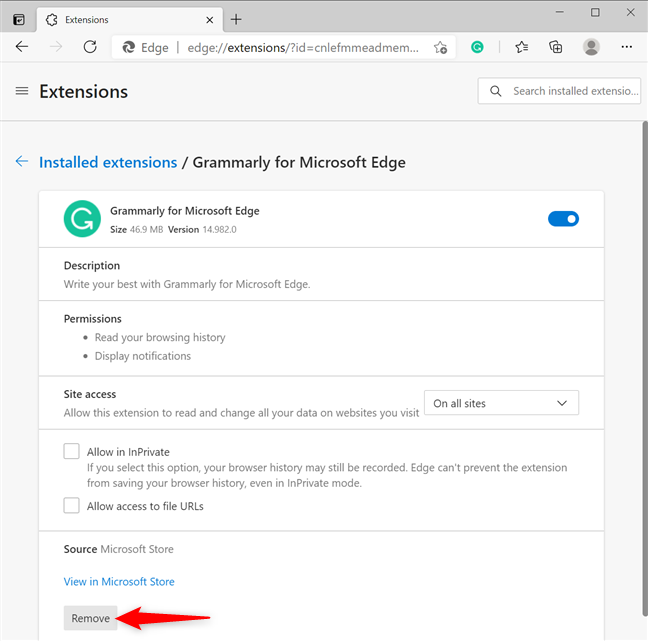
Remove an add-on from its Details
You can also open Extensions and press the Remove button found under the add-on you want to uninstall.
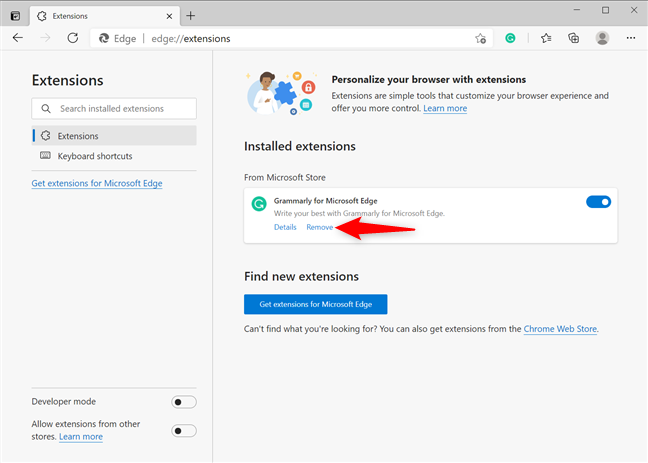
Remove an add-on from Extensions
The third and easiest way to get rid of an extension is to right-click or press-and-hold on its icon and click or tap on “Remove from Microsoft Edge.”
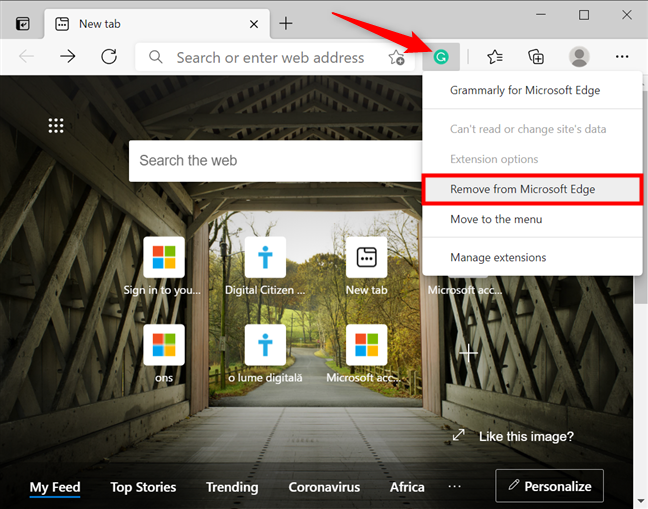
Remove Edge addons from their icon
No matter the method you chose, confirm your choice by clicking or tapping Remove in the pop-up window.
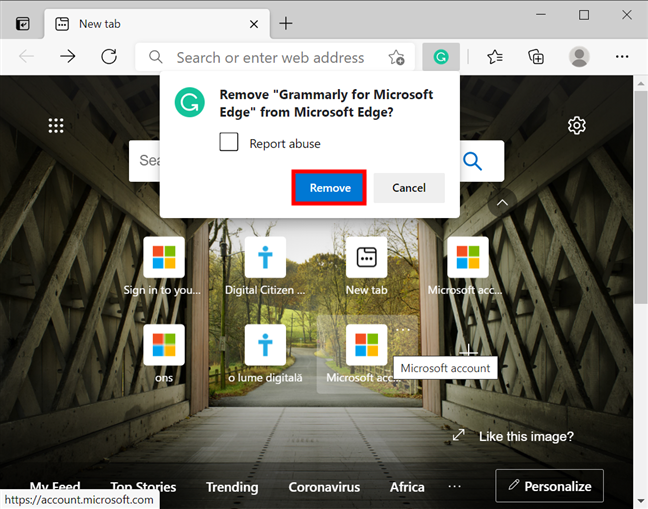
Confirm removing your Edge extension
That immediately removes the extension from Microsoft Edge.
What Microsoft Edge extensions are you using?
Extensions are simple tools that make browsing the internet with Edge more fun and productive. Before you close this guide, let us know which extensions caught your eye. Are there any add-ons you want to recommend to other readers? Let us know in the comments.


 30.03.2021