Most people are not aware of the fact that every file in your computer stores a set of information about its source, author, and other details, depending on its type. This information is called metadata, and you can say that metadata represents "data about data." Pictures are a particular type of file, not just because they store visual information, but also because they have lots of metadata. Photographers and other professionals work with the metadata stored in pictures, and they use specialized apps like Adobe Photoshop or Adobe Lightroom for this task. However, you can also use Windows 10 and its built-in features to view and add metadata. Here's how:
NOTE: To learn more about metadata and its purpose, read: What is a file's metadata
How to view the metadata of a photo in Windows 10
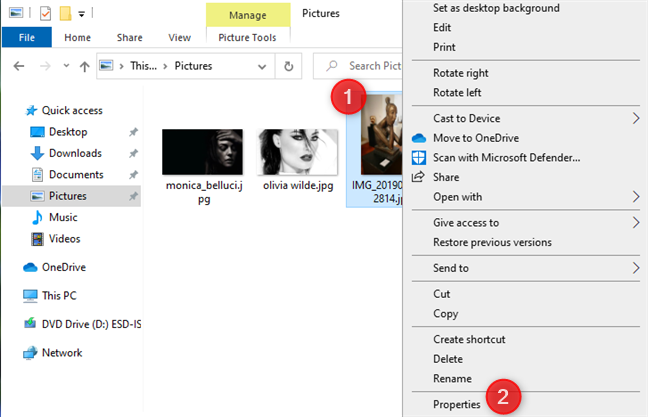
Open File Explorer and navigate to the folder where the image is stored. Then, right-click or press-and-hold on it, and in the menu that opens, choose Properties. Alternatively, you can select the image and then press ALT+Enter on your keyboard for the same result.
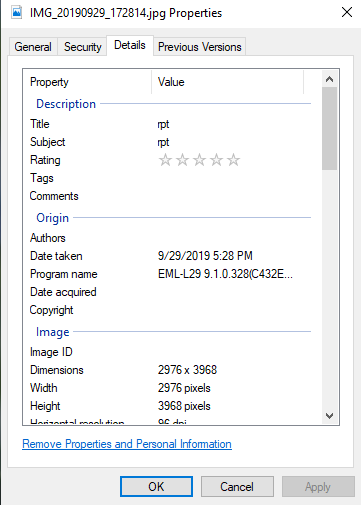
The Properties window opens for the selected photo. Go to the Details tab, and here you see the metadata stored with the picture.
The metadata is split into several sections:
- Description - you have information like the title, the subject, the rating, tags, and comments stored with the picture.
- Origin - this section gives you information about who made the picture, when, with which program, and whether there is any copyright associated with it.
- Image - you see information like the dimensions of the picture in pixels, its resolution in dpi, bit depth, compression, and color representation.
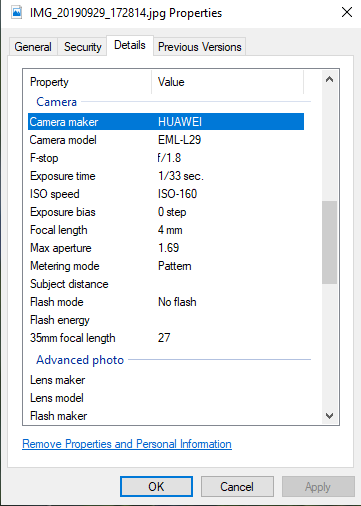
- Camera - the make of the camera that was used to take the picture, its model, exposure time, ISO speed, focal length, aperture, flash mode, subject distance, and more.
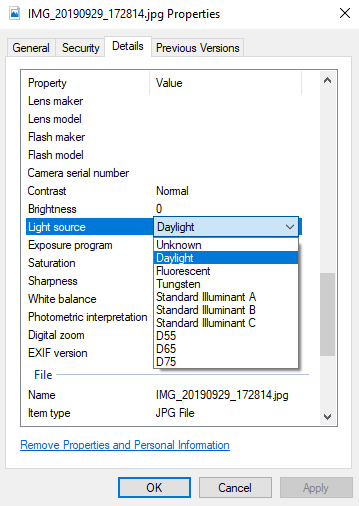
- Advanced photo - this section is usually populated with information when dealing with RAW pictures taken with professional cameras. You find information like the lens maker and model, the flash maker and model, the camera serial number (that is used in criminal investigations to identify the exact camera used to take a specific picture), contrast, brightness, light source, exposure, saturation, sharpness, white balance, digital zoom, and the EXIF version.
- File - information about the file name, file type, folder location, date created, size, attributes, owner, computer, and more.
To view all this information, scroll down through all the sections and metadata fields. You can copy and paste any information that is of interest to you.
To learn how to change the metadata of a picture, read the next section of this tutorial.
How to add metadata to an image, in Windows 10
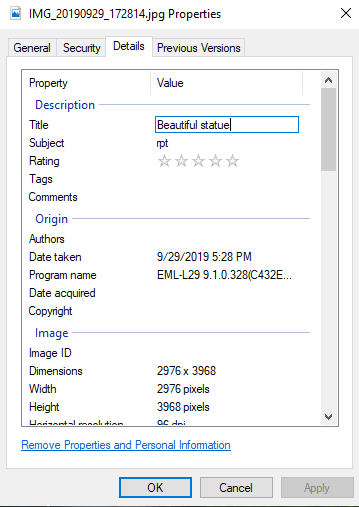
Now that you have accessed the metadata of the selected picture, you can also edit it and add or remove metadata. Most metadata fields are editable. To add metadata in a field, click or tap the Value box for that field and enter the data that you want to be saved.
Some metadata fields have predefined values that can be changed. After you click or tap inside the Value box, choose the value that you want.
You can also overwrite the metadata fields that are editable with new values. To save your metadata changes, do not forget to click or tap OK. The picture itself doesn't change; only the metadata stored with it.
TIP: If you want to remove some of the metadata stored in a picture, read: How to remove metadata from a file (PDF, JPEG, Word, etc), in Windows 10
Did you succeed in adding metadata to pictures?
Metadata can be useful if you want to keep information about your files. You can find your pictures faster, find out what camera settings were used for the photos you took, when each photo was taken, where, and other information. We like the fact that Windows 10 allows users to view and add metadata to photos without using third-party tools. Try it and tell us how well it worked in the comments below.


 07.04.2020