OneDrive is one of those cloud services that usually work well, and there aren’t many people complaining about issues with it. OneDrive’s apps generally function as expected, and syncing is not a problem. It all happens in the background seamlessly, with no required intervention from the user. However, there are cases when OneDrive simply refuses to synchronize files. If that’s an issue you’ve encountered on your Android smartphone or your iPhone, read on. In this tutorial, we’re going to show you a few things you can do to sync OneDrive on your smartphone by force:
How to force sync OneDrive on Android
The first thing you can do in order to attempt triggering a force sync of OneDrive on Android is to restart its app. To do so, open the Settings app. A quick way to do that is from the app list.
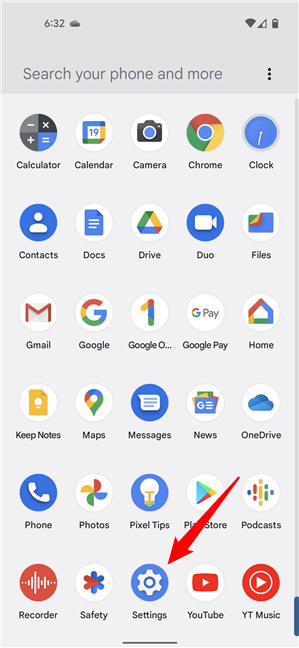
Open the Settings app in Android
In Settings, tap on Apps to see the list of available apps on your smartphone.
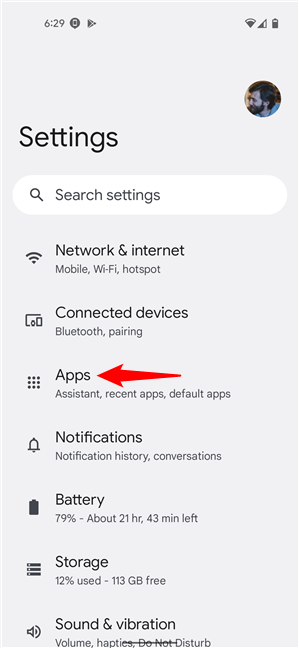
Access the Apps category of settings
Find and tap on the See all apps entry.
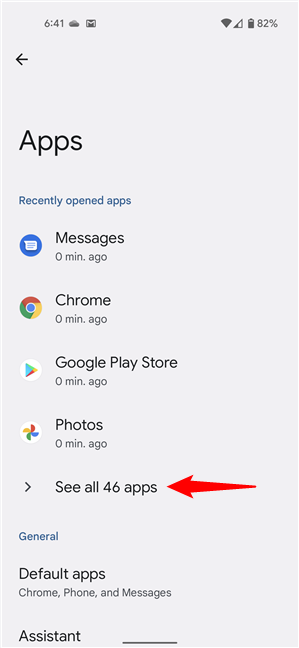
See all the apps installed on your Android smartphone
Then, Android will show you the list of apps installed on your phone. Locate OneDrive and tap on it.
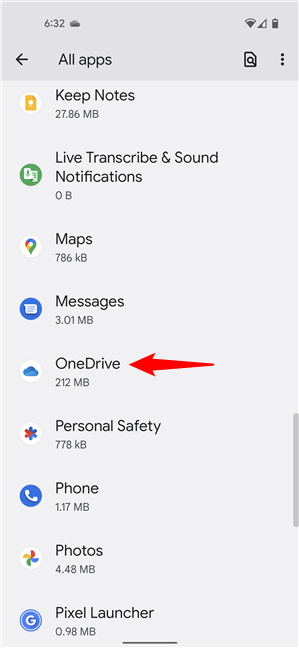
Find and tap on OneDrive
Next, tap the Force stop button on OneDrive’s App info screen.
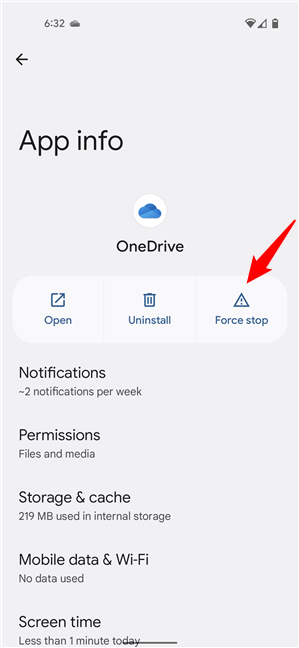
Force stop OneDrive on Android
Confirm that you want to Force stop OneDrive by tapping on OK.
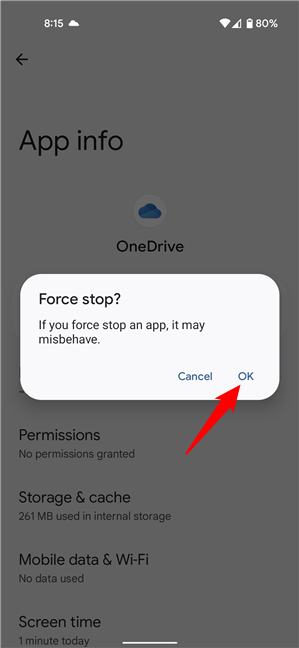
Confirm that you want to force stop OneDrive
Next, open the OneDrive app on your Android. It should now start syncing your files. If it still doesn’t, try the following steps to remove OneDrive’s cache and data:
On your Android smartphone, go back again to the Settings, access the Apps screen, and tap on See all apps to list the apps installed on your smartphone. Scroll to find OneDrive and tap on it, and on its App info screen, open Storage & cache.
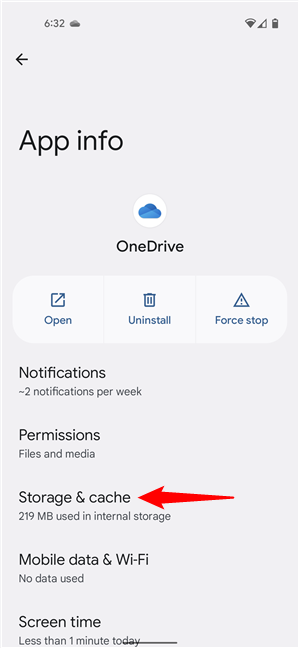
Access the Storage & cache settings for the OneDrive app
This makes Android load the Storage screen, where you get to see details about the data stored by the OneDrive app on your smartphone. On it, find and tap the Clear cache and Clear storage buttons. This removes any temporary files saved by OneDrive on your phone but doesn’t delete any of the files you’ve uploaded or created in your OneDrive cloud space!
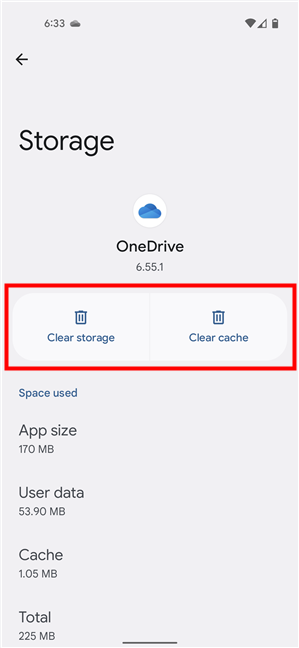
Clear storage and cache data for OneDrive
Open the OneDrive app again, and, hopefully, it will start syncing files. If it still doesn’t, the last thing you can do is reinstall it. For that, follow the steps described in this tutorial: 4 ways to uninstall apps on Android.
How to manually sync your Samsung Gallery to OneDrive
In addition to the default OneDrive options and troubleshooting presented in the previous section of this tutorial, there is one more thing you can do to force sync OneDrive, but it’s available only on Samsung Galaxy devices. You can manually sync your Samsung Gallery to OneDrive by following these steps:
On your Samsung smartphone, open the OneDrive app and tap the Me button in the bottom-right corner of the screen.
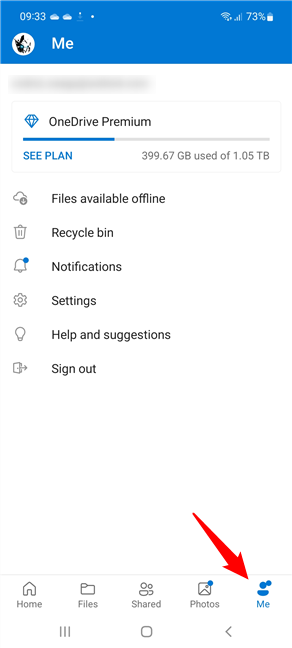
Tap on Me in OneDrive for Samsung Galaxy
On your account’s page, tap Settings.
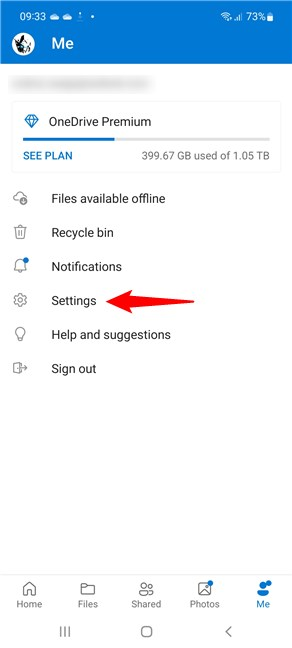
Access the OneDrive Settings on your Samsung Galaxy
Find the Gallery sync entry in the list of OneDrive Settings and tap on it.
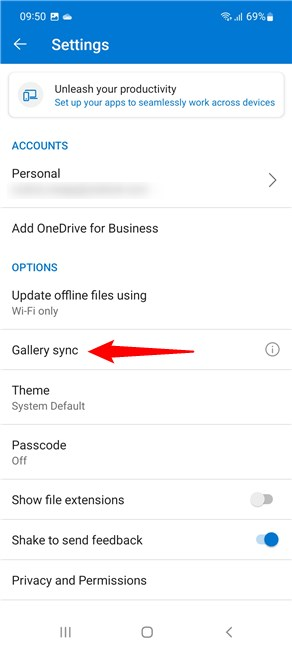
Find and tap on Gallery sync
The previous action loads a new screen called “Gallery sync with OneDrive.” On it, make sure that the first switch is On.
This is the setting that allows your Samsung smartphone to sync your photos with your OneDrive.
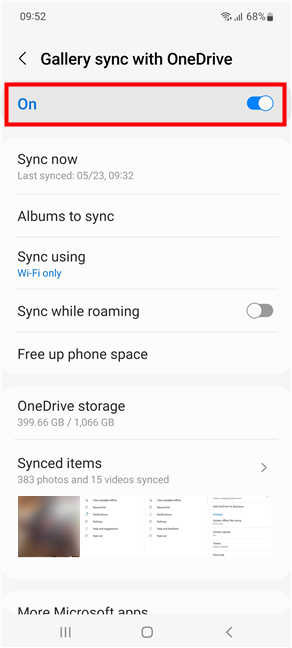
Enable the first switch from Gallery sync with OneDrive
Right below the first switch, there’s an entry called Sync now. If you want to manually trigger a forced Samsung Gallery sync to OneDrive, tap on it.
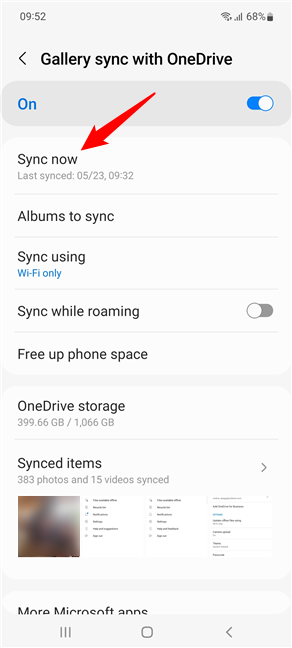
Tap Sync now to force sync your Samsung photos with OneDrive
As soon as you do that, your Samsung smartphone starts to sync your photos with your OneDrive. While that happens, the entry changes its name to Syncing.
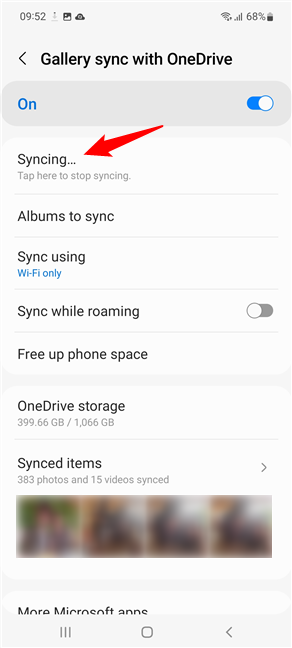
Syncing photos from your Samsung Galaxy with OneDrive
TIP: Under the Sync now entry, in smaller characters, you can see when your Samsung Gallery was Last synced.
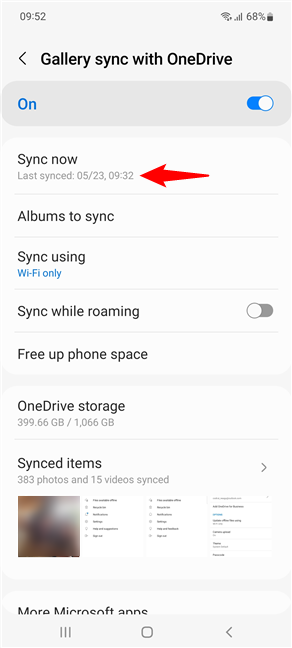
See when your photos were last synced with OneDrive
How to force sync OneDrive on an iPhone
There’s not much you can do on iPhones to force OneDrive to sync if it misbehaves. Practically, the only thing you can try is to reinstall its app and make sure a few specific settings are correctly configured. Here’s what to try:
First, uninstall OneDrive: tap and hold its icon on the home screen, and select Remove App from the context menu.
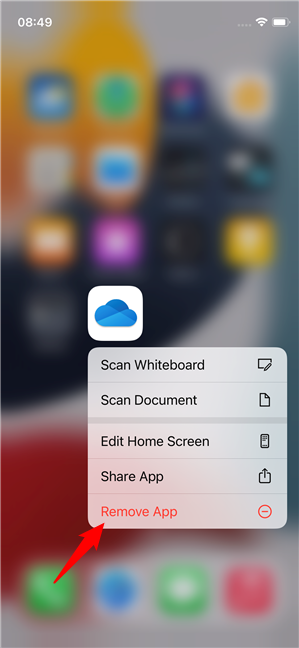
Uninstall OneDrive from iOS
TIP: There are more ways in which you can uninstall apps on iPhones. If you want details on them, read How to delete apps on iPhone or iPad: 4 ways.
Confirm that you want to remove OneDrive from your iPhone, by tapping on Delete App and then on Delete.
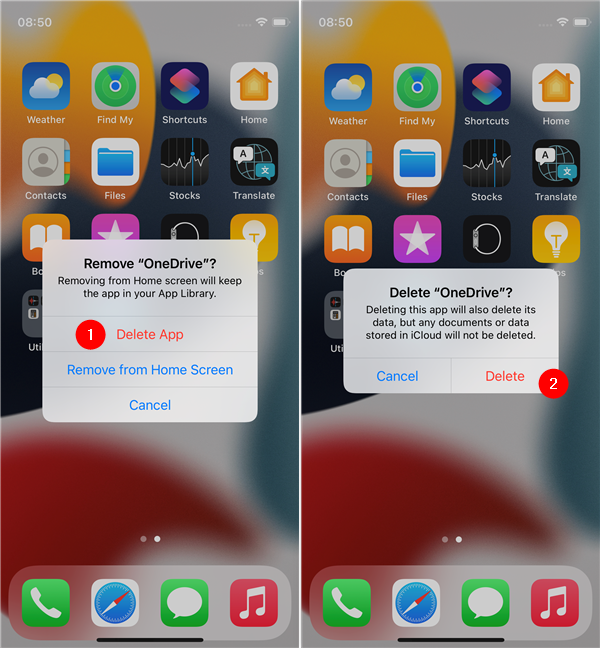
Confirm that you want to delete the OneDrive app
Next, make sure Location Services are enabled on your iPhone. To do that, open its Settings and go to Privacy.
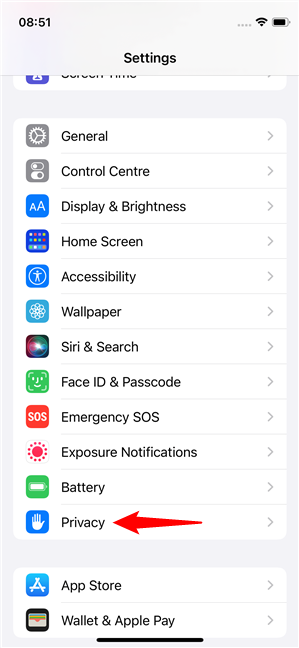
Access your iPhone's Privacy settings
On the Privacy screen, access Location Services and make sure you enable the Location Services switch if it’s not already turned on.
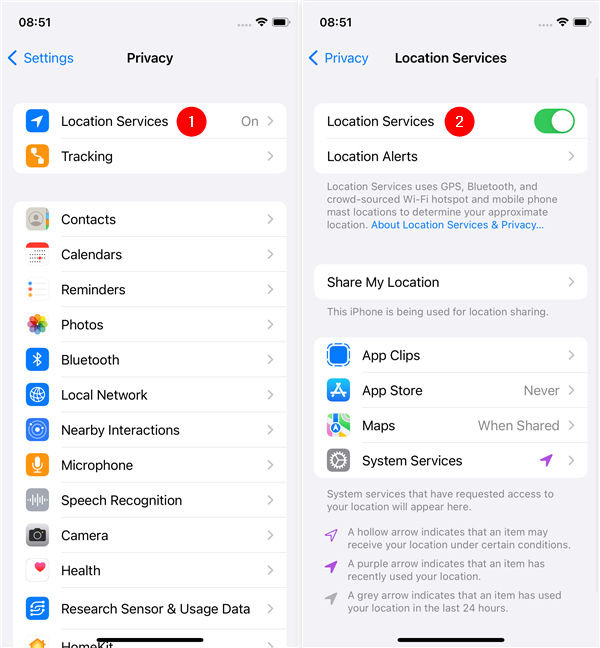
Enable Location Services on on your iPhone
Next, you’ll have to perform a “soft reset.” Depending on your iPhone model, the procedure differs. If your iPhone has a Home button, press and hold the Power and Home buttons simultaneously for about ten seconds until the Apple logo shows up. If your iPhone doesn’t have a Home button, press and quickly release the Volume Up button, press and quickly release the Volume Down button, and then press and hold the Side button until the Apple logo appears.
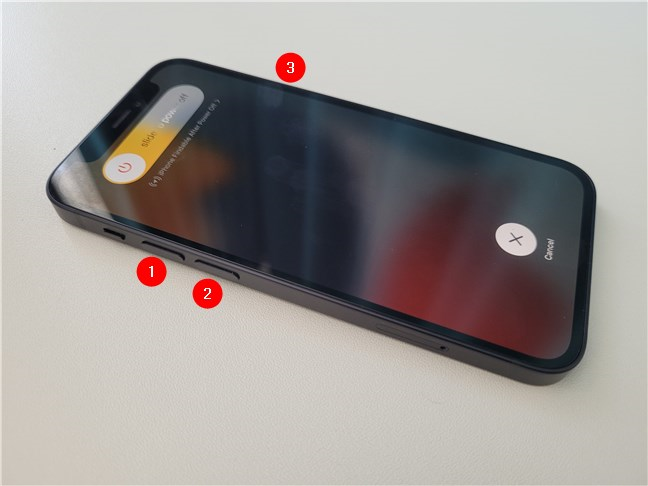
Perform a soft reset on your iPhone
After your iPhone reboots, reinstall the OneDrive app from the App Store. If you need help with that, check the first section of this guide: How to add, open, and configure OneDrive on an iPhone or iPad.
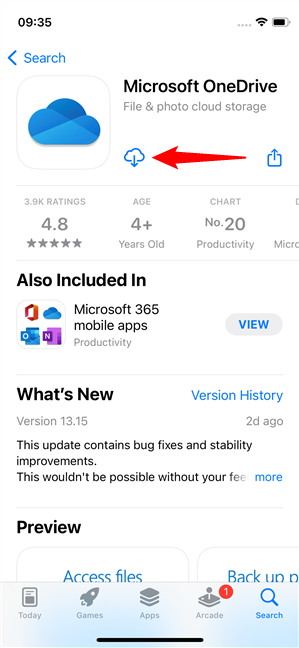
Reinstall OneDrive on your iPhone
And last but not least, there’s one more setting to check: Background App Refresh. Open the Settings app on your iPhone, and go to General > Background App Refresh.
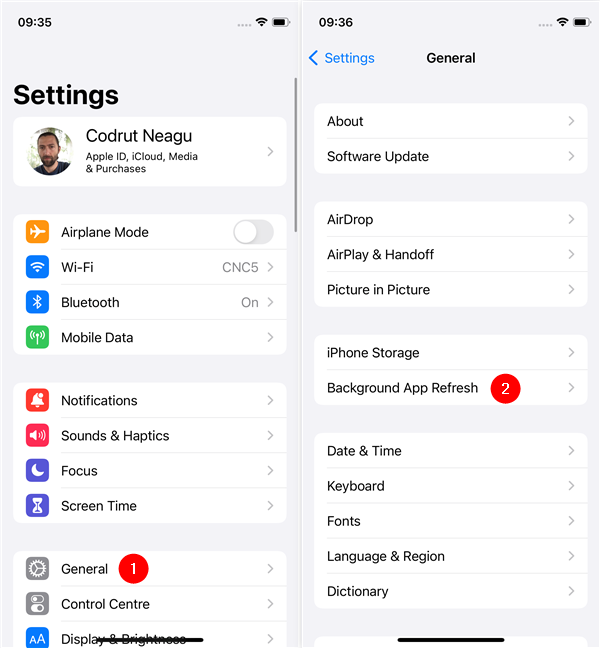
Access the Background App Refresh on your iPhone
Make sure that Background App Refresh is turned on: it’s the first thing you see on the screen, and you should see On next to it. If it says Off, tap on Background App Refresh, and then select Wi-Fi or Wi-Fi & Mobile Data. Wi-Fi allows apps to refresh in the background when you’re using wireless networks, while Wi-Fi & Mobile Data allows it when you’re connected to mobile networks.
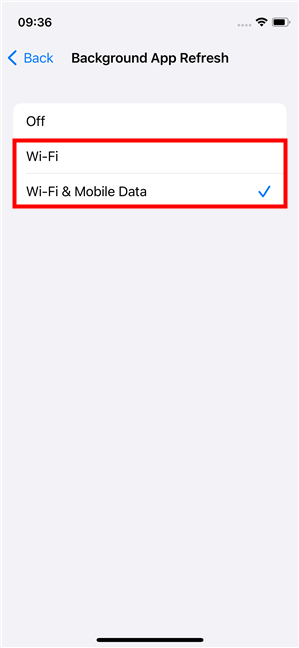
Enable Background App Refresh on your iPhone
Once you’ve made sure that the Background App Refresh feature is enabled, check the list under it. Find OneDrive in the list and ensure that its switch is On too. That allows OneDrive to sync in the background on your iPhone.
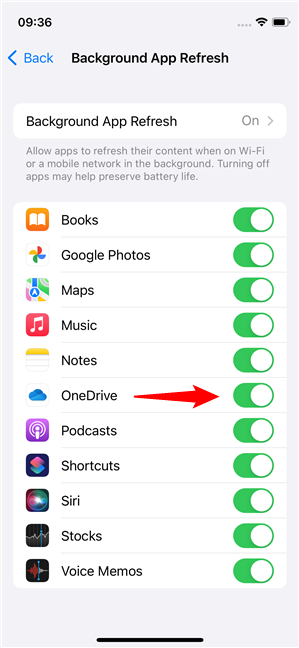
Allow OneDrive to refresh in the background
That’s all! Hopefully, OneDrive can now sync your data on your iPhone.
Did OneDrive fail to sync on your Android or iPhone?
These are the ways we know for making sure that OneDrive’s apps for Android and iOS work and sync properly. Hopefully, if you’ve encountered OneDrive syncing problems, the ideas in our tutorial helped you. If you know other ways or if you have something to add to this guide, don’t hesitate to let us know in the comments section below.


 25.05.2022

