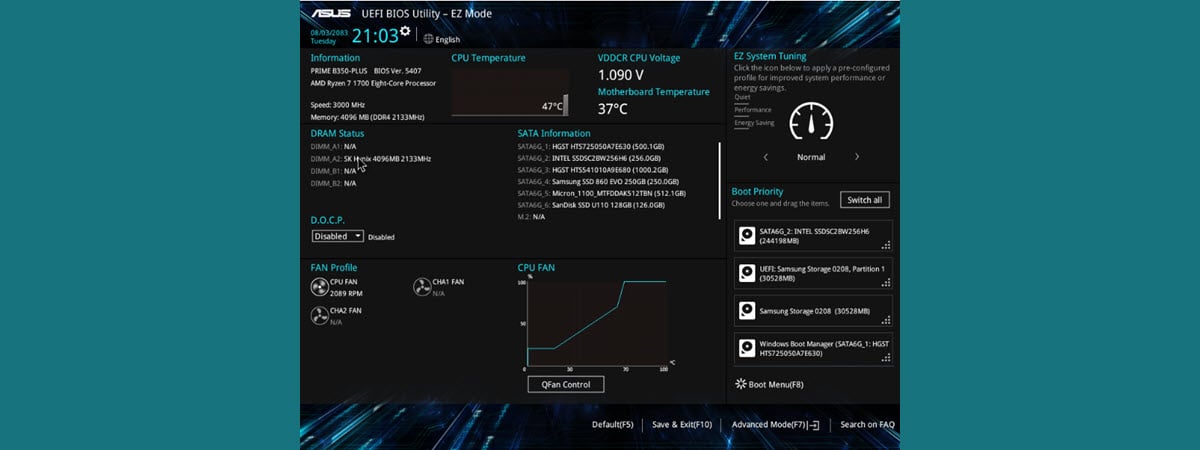
Do you have a Windows 11 computer or device and don’t know how to access the UEFI or BIOS settings? Are you facing issues with your PC, like booting or hardware configuration problems, that you think can be repaired from there? Are there performance tweaks you’d like to make in the UEFI (BIOS)? Whether you need to enter UEFI/BIOS to troubleshoot your computer or adjust settings to improve its performance, in this tutorial, I show you how to access UEFI/BIOS on a Windows 11 PC in seven different ways:
NOTE: If you want to know more about what UEFI/BIOS is and what it’s used for, first read What is BIOS? What is UEFI? How are they different?.
1. How to open UEFI (BIOS) from boot on a Windows 11 PC
If you need to access the UEFI (BIOS) on your Windows 11 PC from boot, you can do so using special keys during the startup process. This method is especially helpful when you can’t load the operating system. Here’s how to access the UEFI BIOS directly from boot:
Start by turning your computer on, or by restarting it if it’s already on. Depending on your device’s make and model, as well as how its UEFI/BIOS is configured, it may display a quick message on the screen during startup, letting you know which key to press to enter the BIOS or UEFI firmware settings.

Some PCs display the key used to enter the UEFI/BIOS at boot
If you see this prompt, press the specified key immediately. Typically, it is a function key, like F1, F2, or F10, the ESC, or the Delete key.
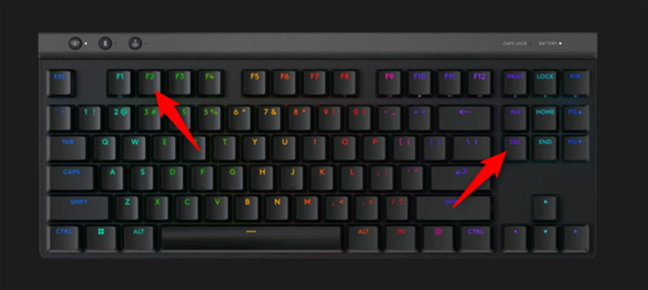
You can usually enter UEFI/BIOS by pressing the F2 or Del key during boot
If you’re not sure which key to press to enter the BIOS/UEFI, and it’s not shown on the screen while booting, here’s a list of keys used by well-known manufacturers:
- ASUS: F2 or Delete (sometimes, Insert or F10)
- HP: ESC or F10 (in some cases, F1, F2, F6, or F11)
- Dell: F2 or F12 (sometimes, F1, F3, or Delete)
- Acer: F2 or Delete
- Toshiba: F2 (in some cases, F1 or ESC)
- Samsung: F2
- Lenovo: F1 or F2 (sometimes, Fn + F2)
- MSI: Delete
Note that you may need to press the key repeatedly to make sure you catch it before the operating system starts loading.
TIP: Have you ever wondered what the F1, F2, F3 to F12 keys are used for?
2. How to enter the UEFI/BIOS from Windows 11’s Settings
One of the most straightforward ways to access the UEFI/BIOS in Windows 11 is available in the Settings app. First, open the Settings (Win + I) and in the System tab, scroll down until you see the Recovery section and click or tap it.
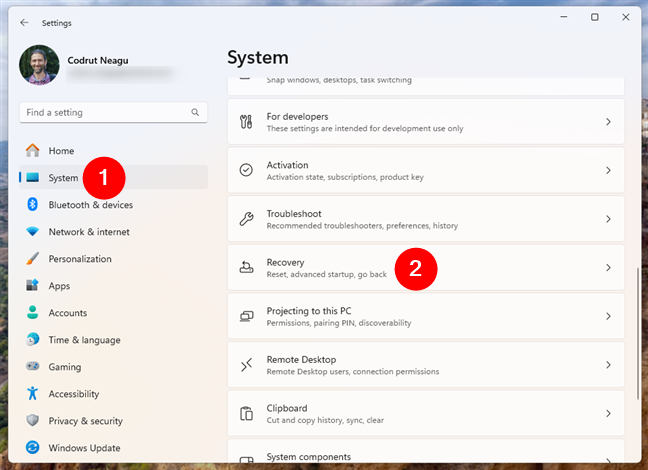
Open Recovery from the System page of the Windows 11 Settings
On the Recovery page, find the Recovery options section and access it. There, you should find the Advanced startup option. Press the Restart now button shown next to it.
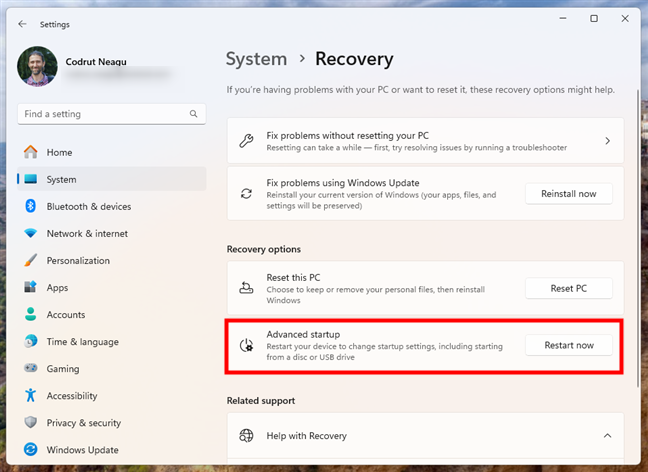
Press Restart now next to Advanced startup
Windows 11 now warns you that it’s going to restart your device. Make sure you’ve saved your work in any of your open files, and then press Restart now once more.
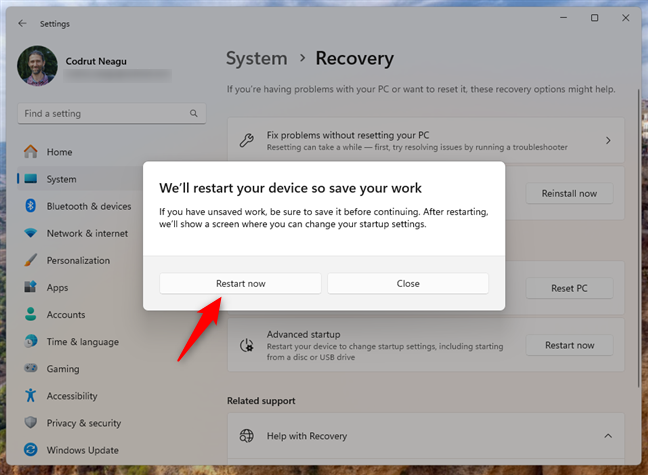
Save your work and restart your Windows 11 PC
After Windows 11 restarts, you see the Choose an option screen. Here, you get access to the advanced startup options, as well as other recovery tools. On it, click or tap Troubleshoot (Reset your PC or see advanced options).
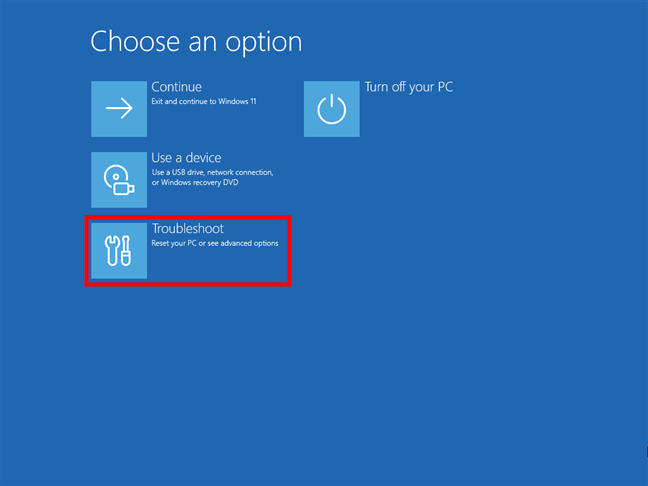
Select Troubleshoot
On the Troubleshoot screen, click or tap Advanced options.
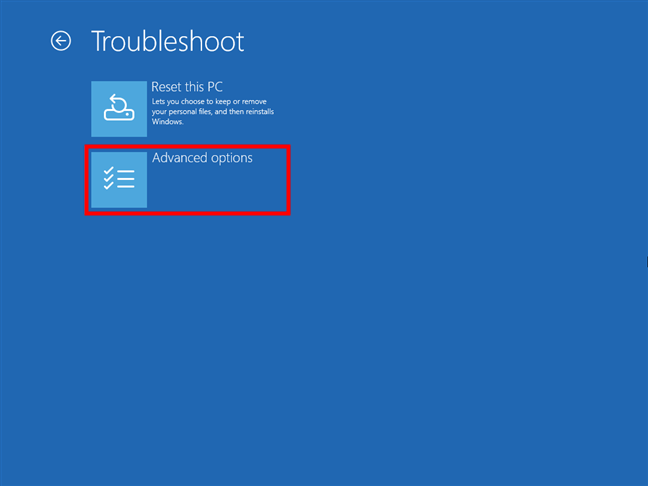
Go to Advanced options
In the list of Advanced options, click or tap UEFI Firmware Settings.
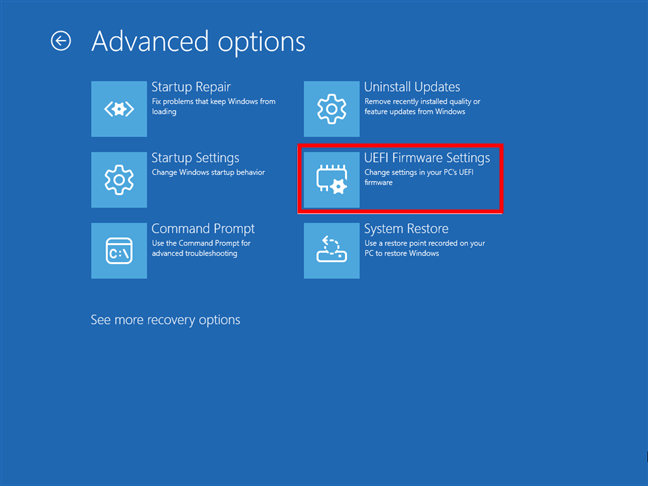
Click or tap UEFI Firmware Settings
Windows 11 now informs you that you have to Restart to change UEFI firmware settings, so press Restart to continue.
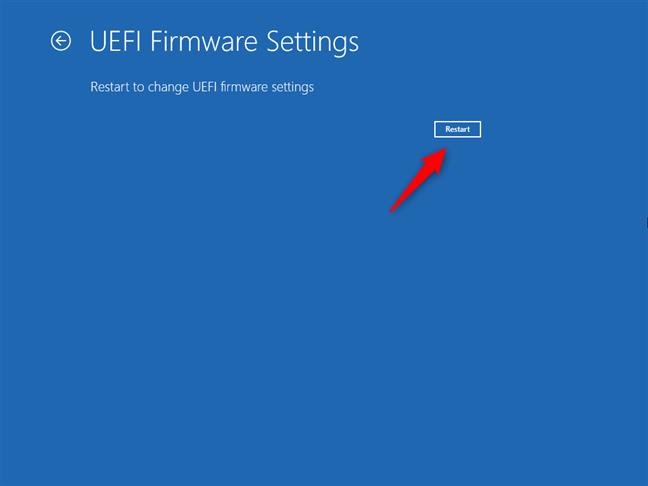
Restart to get into Windows 11's UEFI BIOS
After your PC reboots, you are taken directly to its UEFI/BIOS.
3. How to restart into UEFI/BIOS in Windows 11 (Shift + Restart)
A fast and easy way to access the UEFI/BIOS from Windows 11 without even having to sign in is to use the Shift + Restart keyboard and mouse shortcut. On the sign-in screen, while holding down the Shift key, click or tap the Power button in the bottom-right corner of the screen, and then select Restart in the menu.
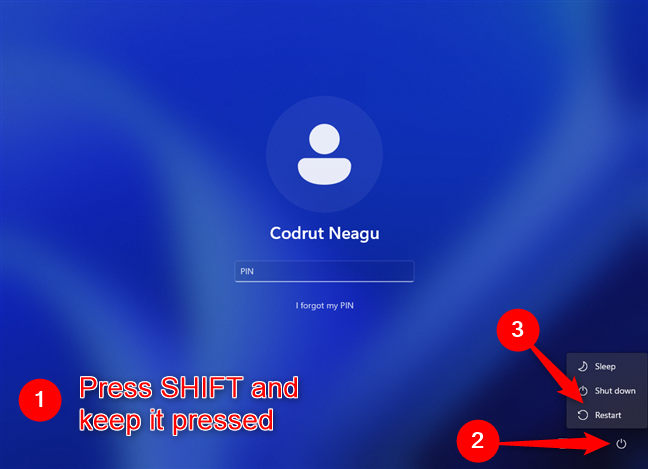
Restart while pressing Shift on Windows 11's sign-in screen
Similarly, you can also press Shift on your keyboard and use the Restart button from the Start Menu Power options.
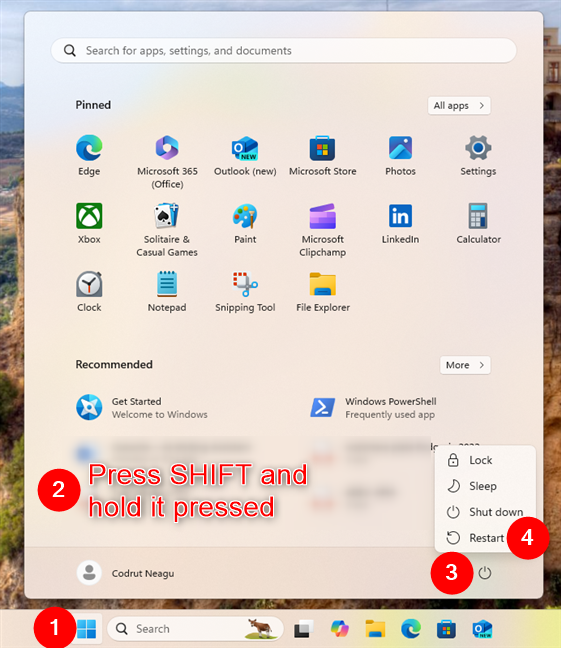
How to access Windows 11's UEFI/BIOS from the Start Menu
After Windows 11 restarts, you get to the Advanced startup (Choose an option) screen. There, navigate to Troubleshoot > Advanced options > UEFI Firmware Settings and press Restart, as shown in this guide’s previous method. Once you do that, Windows 11 restarts and enters UEFI/BIOS immediately.
4. How to get to the UEFI/BIOS from Windows 11’s Run window
One other way to enter UEFI/BIOS on a Windows 11 PC is available via the Run window. Open Run (Windows + R) and type:
Then, click/tap OK or press Enter on your keyboard.
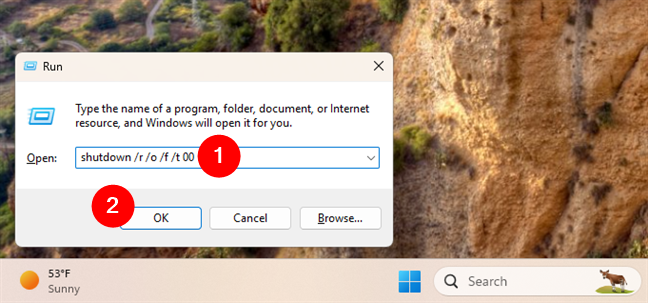
Get into UEFI/BIOS from Windows 11's Run box
To access the UEFI/BIOS, you could also run the slightly shorter command:
… but it’s not as fast as the previous command.
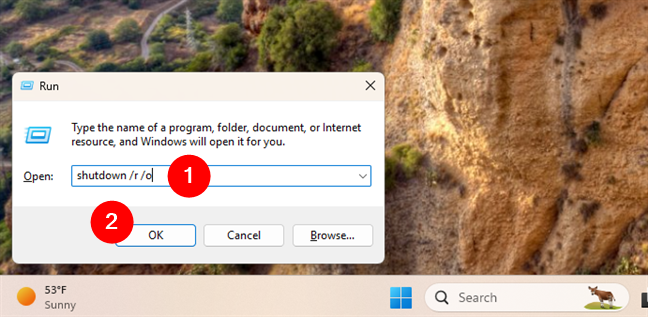
Restarting into UEFI (BIOS) with a shorter command is slightly more time-consuming
Why is it not that fast? Because with this command, Windows 11 first notifies you that your computer has to shut down (restart). So, you have to wait for a couple of moments before it gets you to the UEFI/BIOS.

Windows 11 shut down notification
After restarting, Windows 11 loads the same Choose an option screen. Use it to navigate to Troubleshoot > Advanced options > UEFI Firmware Settings and press Restart, just like I showed you in the second section of this tutorial. Then, Windows 11 restarts, and your PC enters its UEFI/BIOS environment.
5. How to enter UEFI/BIOS from Windows 11 using a shortcut
Perhaps the fastest way to access the UEFI/BIOS on a Windows 11 PC is to create and use a shortcut for that. We’ve already described everything you have to do in this tutorial: Shortcuts for the UEFI BIOS & Windows 10’s Recovery Environment. However, if you don’t have the time to read it, the short version is that you can create a regular shortcut anywhere on your Windows 11 PC and set its location as the shutdown /r /o /f /t 00 command shown in this guide’s previous section.
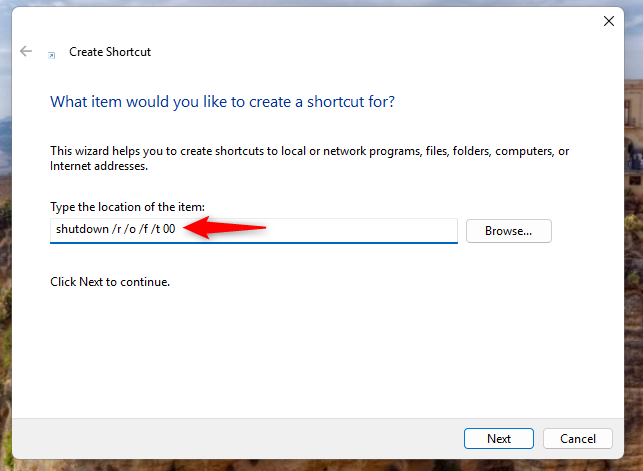
Shortcut for UEFI (BIOS) in Windows 11
Once you have the shortcut, double-click or double-tap it, and it takes you to the Choose an option screen. There, go to Troubleshoot > Advanced options > UEFI Firmware Settings and press Restart. Then, Windows 11 restarts again, and your PC enters its UEFI/BIOS environment.
6. How to enter the UEFI/BIOS from Windows 11’s Command Prompt, PowerShell, or Terminal
If you prefer command-line environments, you can run in Windows 11’s Command Prompt, PowerShell, or Terminal the same commands shown in the previous sections of this tutorial. Open the command-line app you want, and then type:
… and press Enter on your keyboard. Next, your Windows 11 PC restarts, and you’re taken to the Advanced startup (Choose an option) screen.
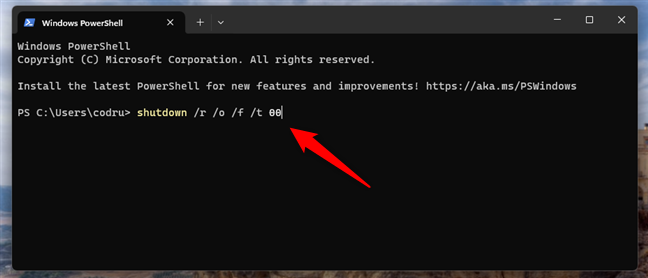
Running the command for accessing UEFI/BIOS in Windows 11's Terminal
If you prefer to run the shorter…
… command, Windows 11 first notifies you that your PC will shut down (restart) in less than a minute. Wait it out.
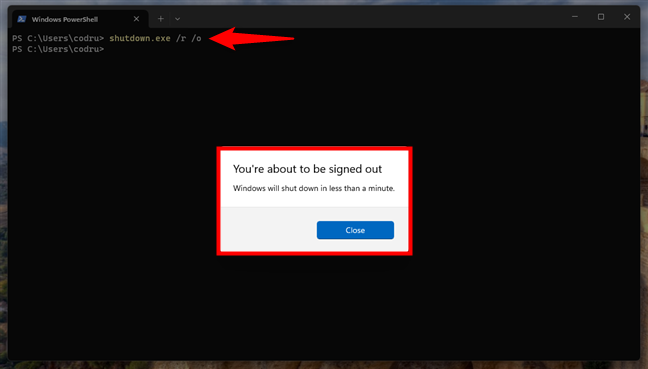
Windows 11 informs you that it will shut down
Next, after Windows 11 restarts, you get to the Choose an option (Advanced startup) screen. Use it to go to Troubleshoot > Advanced options > UEFI Firmware Settings. Then, click or tap on Restart, as shown in the second section of this guide. Once your computer or device reboots again, you’re taken to its UEFI/BIOS.
7. How to get to the UEFI firmware settings on a Surface Pro (eligible models)
If you have a Surface tablet, a fast way to access the UEFI/BIOS is to use its buttons. First, shut down your Surface. Then, locate the Volume Up (+) button on its side, press and hold it down.
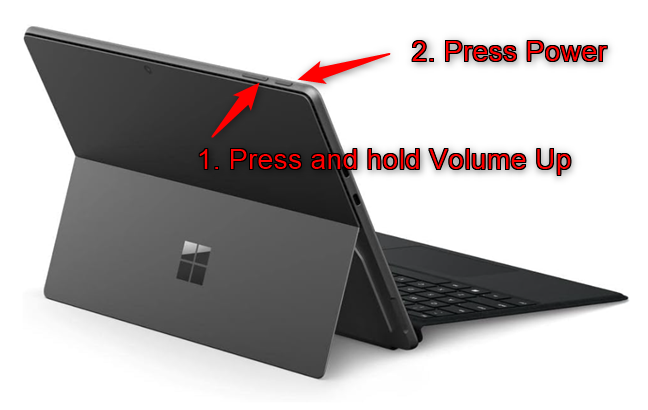
Push Power while holding down the Volume Up button
While you’re still holding down the Volume Up (+) button, push and release the Power button, and wait until you see the Microsoft or the Surface logo displayed on the screen. When the logo shows up, you can release the Volume Up (+) button. You should now be taken to your Surface’s UEFI/BIOS.
Did you encounter problems accessing the UEFI/BIOS on your Windows 11 PC?
You now know not one, but seven different ways to open UEFI (BIOS) on a Windows 11 computer or device, including those from the Surface line-up created by Microsoft. Try them out, see how they work, and share your favorite one. I’m curious if you found it easy to enter UEFI/BIOS, and whether you stumbled upon issues while attempting it. Do you know other ways to get into the UEFI/BIOS? Let me know in the comments below.


 29.10.2024