
Cookies are small pieces of data stored in your browser by the websites you visit. Third-party cookies, on the other hand, originate from websites other than the one you intended to visit. Typically, these cookies are used by advertising services to deliver targeted ads based on your browsing history and online searches. However, there are instances where you might want to enable third-party cookies. This process of enabling third-party cookies is slightly different depending on the web browser you’re using. That’s why I made this tutorial for enabling third-party cookies in the most popular browsers, Chrome, Edge, Firefox, Opera, and Opera GX:
NOTE: In this tutorial, I start from the assumption you’ve either blocked all third-party cookies in your web browser, or you’ve blocked them only on certain sites.
How to enable third-party cookies in Chrome
There are three ways I know to allow 3rd-party cookies in Google Chrome. Here they are:
1. How to enable third-party cookies in Chrome for all websites
Open Chrome and click or tap the three-dot menu icon in the top-right corner. In the dropdown menu, select Settings.
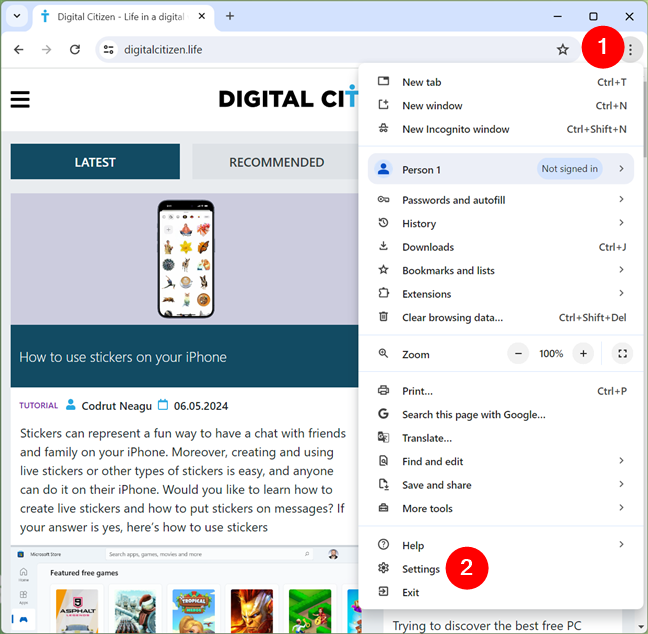
Open Chrome's Settings
This opens Chrome’s Settings in a new tab. Select the Privacy and security entry in the left-hand sidebar, and click or tap Third-party cookies on the right.
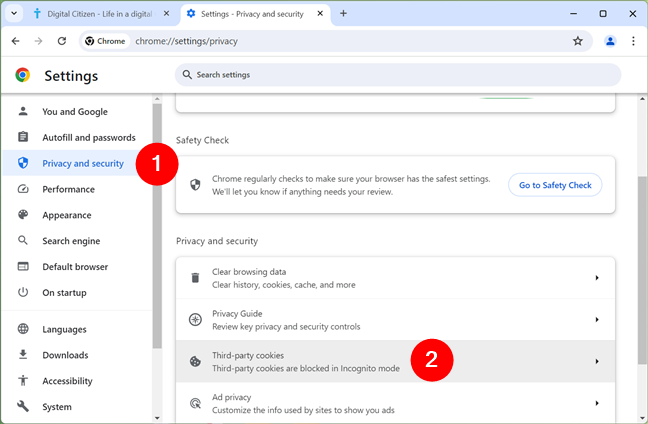
Access Third-party cookies
Then, to enable 3rd party cookies in Chrome for all the websites you visit, enable the Allow third-party cookies option.
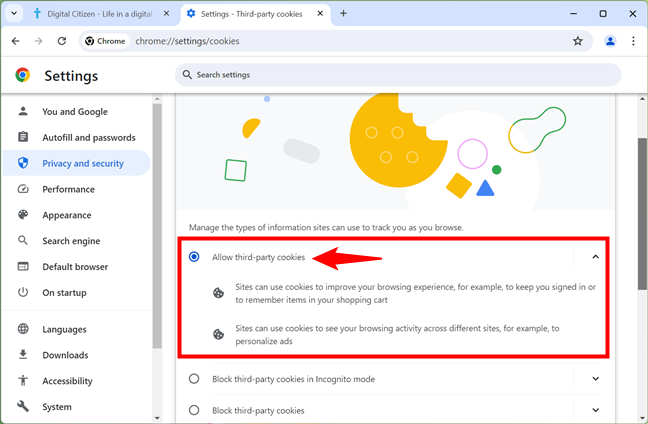
Allow third-party cookies
TIP: If you want to allow 3rd party cookies when browsing the web normally but would rather block them when going incognito, you can choose the Block third-party cookies in Incognito option instead.
2. How to enable third-party cookies in Google Chrome for individual sites
What if you want to enable 3rd party cookies only for some websites while keeping them blocked for all the others? A quick way to do that, albeit temporarily, is to visit the site in question, and click/tap the small eye icon. If cross-site cookies are disabled, the eye icon is slashed, like in the picture below.
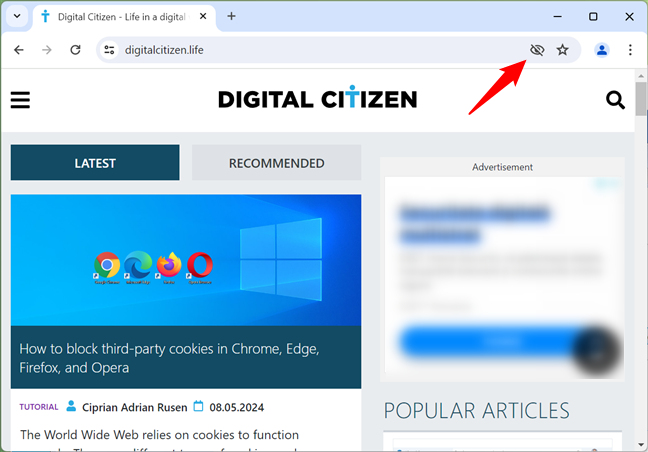
The eye icon when cross-site cookies are disabled
When you click/tap the eye icon, you get a popup. In it, enable the Third-party cookies switch, as illustrated in the next screenshot. This will allow 3rd-party cookies for 90 days on the current website. Then, you’ll have to re-enable the switch.
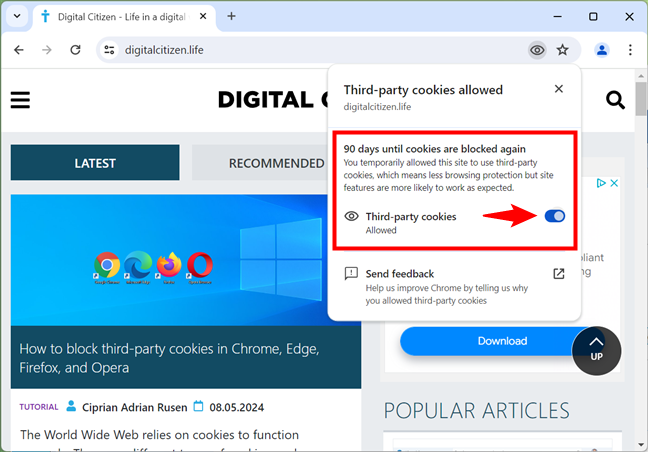
Enable the Third-party cookies switch
There’s also another slightly different way of doing the same thing: click or tap the View site information icon to the left of the site’s address, and select Cookies and site data in the menu displayed.
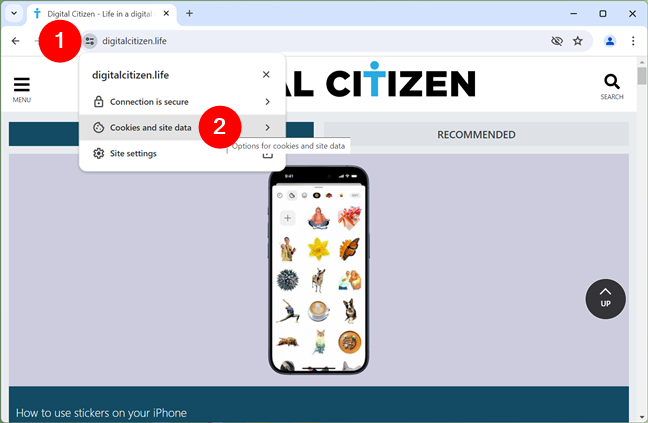
Go to Cookies and site data
Then, enable the Third-party cookies switch.
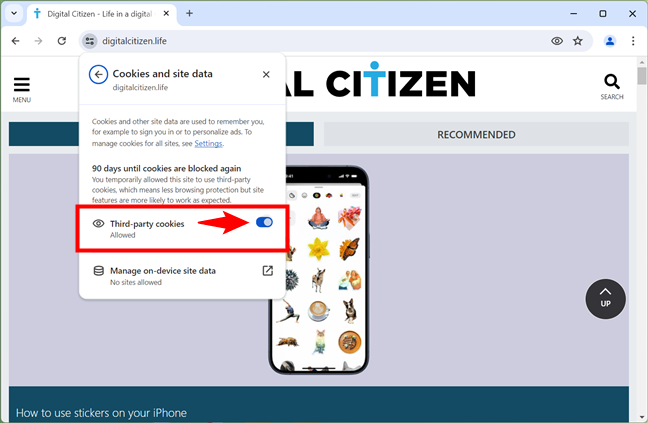
Enable Third-party cookies
This will allow the website to use third-party cookies in Chrome for 90 days. Once the period ends, the browser will block them again, so you’ll have to re-enable this option.
3. How to permanently allow third-party cookies in Chrome for a website
There’s also another way to enable third-party cookies for a website, and this one is permanent. It won’t be automatically disabled by Chrome, but it requires a few manual steps:
Follow the same steps shown earlier to get to the Third-party cookies section: open Chrome’s Settings, select Privacy and security, and click or tap Third-party cookies. Then, look for the “Sites allowed to use third-party cookies” entry and click or tap the Add button.
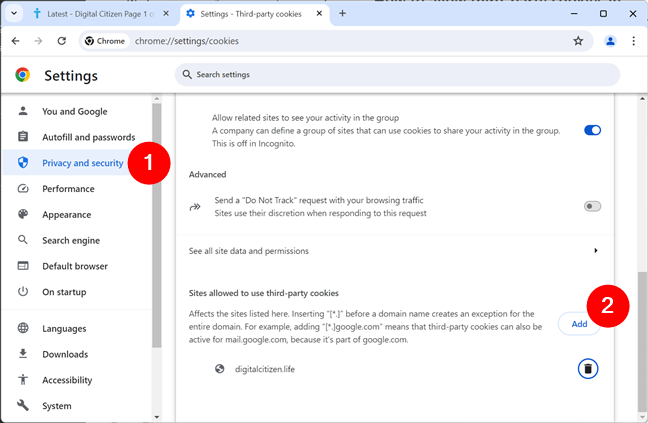
Click Add under Sites allowed to use third-party cookies
This opens a dialog called Add a site. In its text field, type the address of the website you want to allow using third-party cookies and click/tap the Add button.
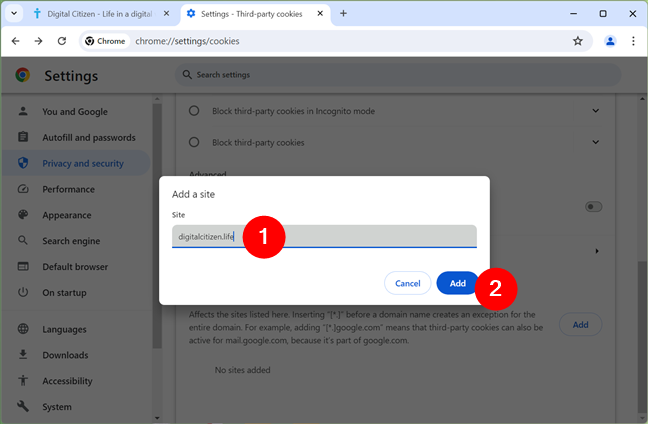
Type the site's address
The website you’ve entered is now added as an exception to the 3rd-party cookies blocking list.
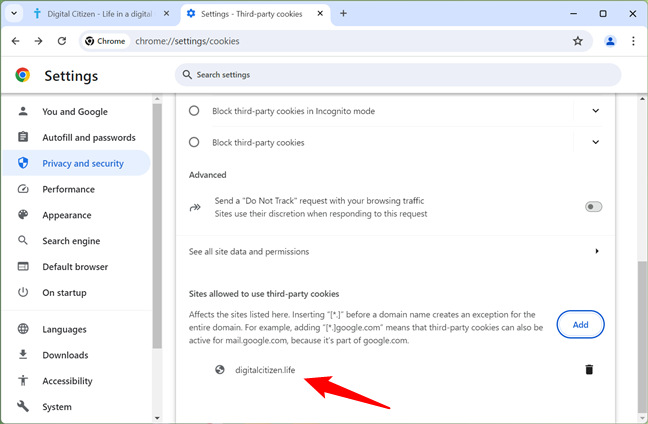
The site is added to the list of exceptions
From now on, this website will forever be able to use third-party cookies in Chrome.
TIP: Did you know that you can also delete cookies in Chrome? Here’s how to clear cookies from Google Chrome.
How to enable third-party cookies in Microsoft Edge
Microsoft Edge is a browser based on the same Chromium engine as Google Chrome. Things are similar yet not quite the same, but enabling cross-site cookies is fairly easy in this browser, too. Here are the methods you can use to do that:
1. How to enable third-party cookies in Microsoft Edge for all websites
Open Edge and click on the three-dot menu icon in the top-right corner. Select Settings in the menu.
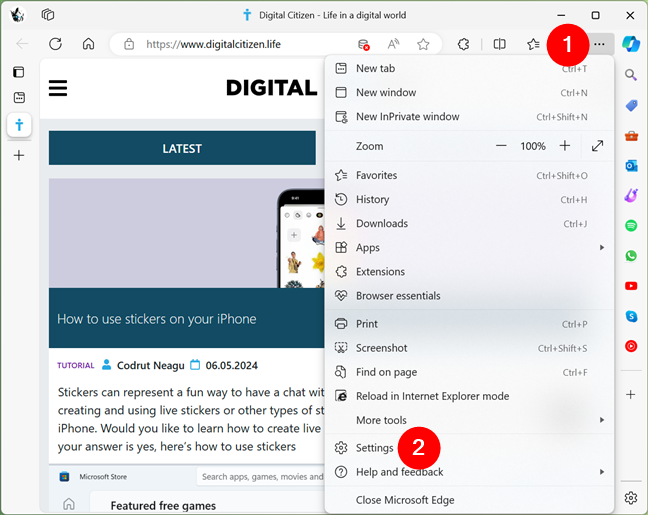
Open Edge's Settings
In the left sidebar, click or tap Cookies and site permissions.
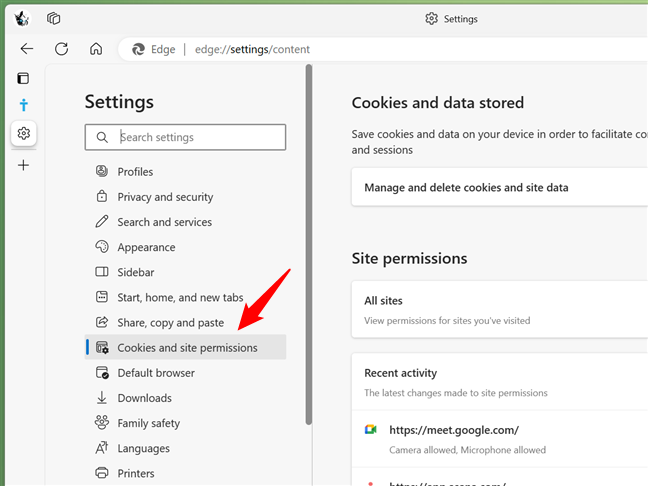
Go to Cookies and site permissions
If you can’t see the sidebar, click or tap the hamburger icon next to Settings, in the top-left corner of the window.
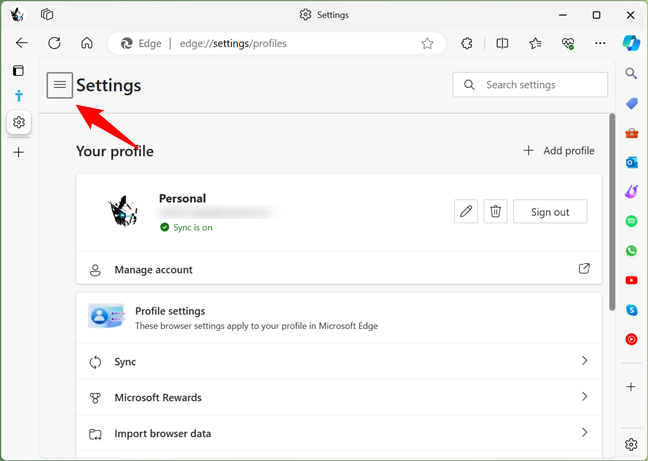
Click the hamburger icon
Then, click or tap the Manage and delete cookies and site data entry.
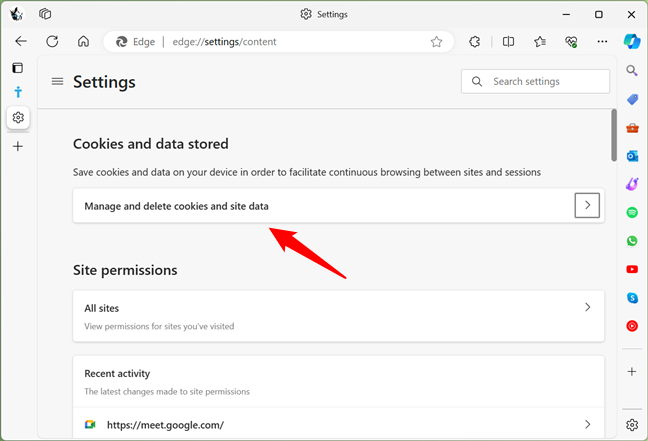
Manage and delete cookies and site data
Turn the Block third-party cookies switch off.
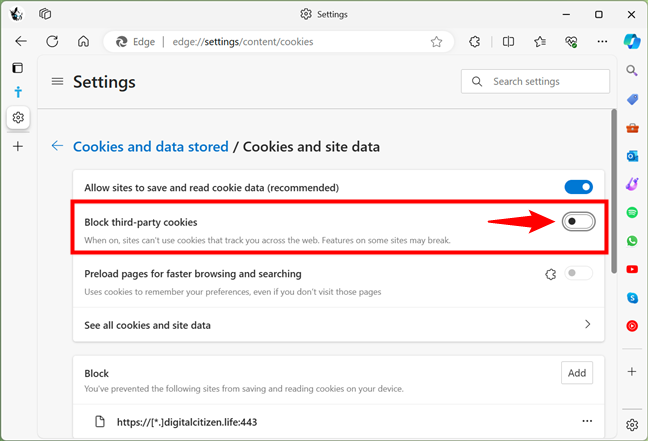
Block third-party cookies
This enables cross-site cookies in Microsoft Edge on all websites. What if you want to keep this setting on and allow third-party cookies only for some sites? Here’s…
2. How to enable third-party cookies in Microsoft Edge for individual sites
When you visit a website and it’s not allowed to use third-party cookies, Edge shows a small eye icon next to the address. Click or tap it.
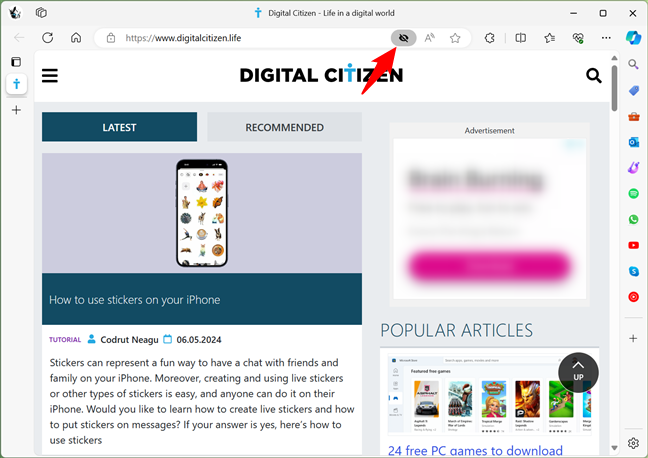
Click or tap the eye icon
This makes Edge show a small popup. In it, enable the Third-party cookies switch to allow the website to use them.
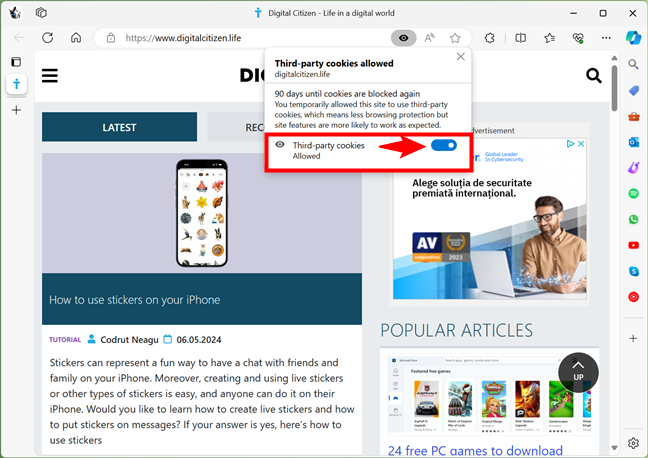
Enable the Third-party cookies switch
Unfortunately, this setting will stay on for 90 days, then Edge will automatically disable it. If you don’t want it to go away, read the next section:
3. How to permanently allow third-party cookies in Edge for a certain website
If you want to make sure a certain website will always be allowed to use 3rd-party cookies in Edge, go back to the Cookies and site data page: open Settings, select Cookies and site permissions in the sidebar, and click or tap Manage and delete cookies and site data. Then, scroll to the Allow section and click or tap the Add button.
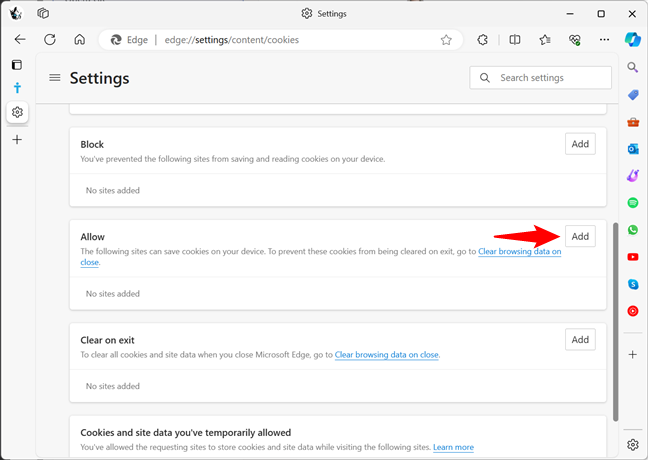
Go to the Allow list and click or tap Add
This opens an Add a site dialog window. In it, type the address of the website you want to allow third-party cookies for. Make sure to also check the “Include third-party cookies on this site” option and click or tap the Add button.
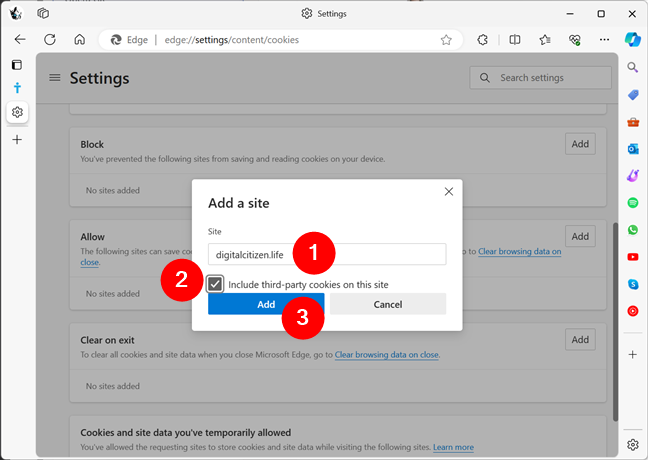
Type the address and check the Include third-party cookies on this site option
Once you’ve done that, Microsoft Edge will never block third-party cookies for the website you’ve specified.
TIP: Here’s how you can delete cookies from Microsoft Edge when you need to.
How to enable third-party cookies in Firefox
Compared to Google Chrome and Microsoft Edge, Firefox’s way of handling third-party cookies is quite different. This browser blocks third-party cookies by default, and the steps to allow 3rd-party cookies are unalike those in other browsers. This is how you do it:
1. How to enable third-party cookies in Firefox for all websites
Open Firefox and click on the three-line menu icon in the top-right corner. In the menu shown, select Settings.
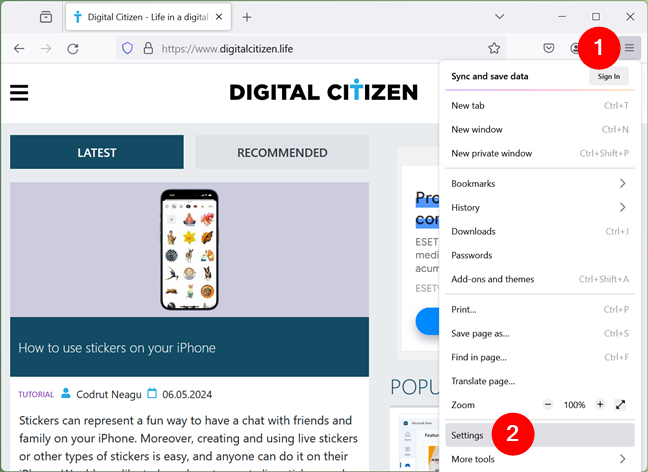
Access Firefox's Settings
In the left-hand sidebar, click or tap Privacy & Security. Then, on the right, under Enhanced Tracking Protection, select the Custom mode and uncheck the Cookies option.
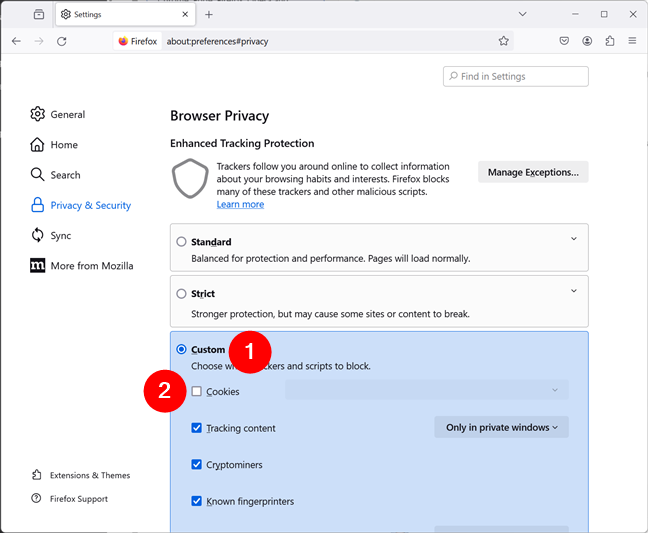
Select Custom and uncheck the Cookies option
This will allow all websites to use third-party cookies in Firefox. If you’d rather let only some websites use 3rd-party cookies, follow the next steps instead:
2. How to enable third-party cookies in Firefox only for a specific website
Visit the website whose third-party cookies you want to allow and click or tap the small shield icon to the left of its address.
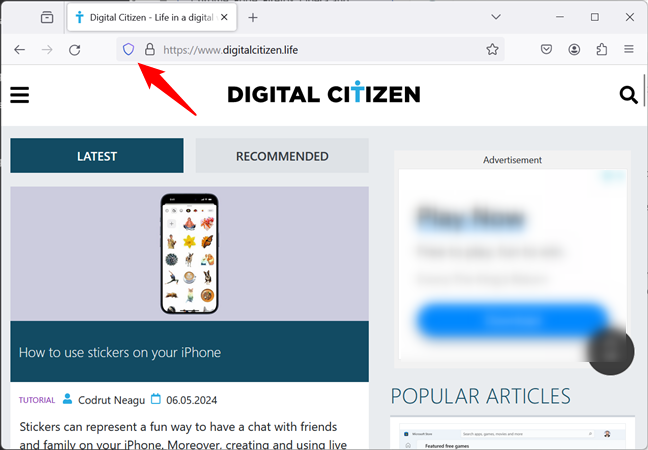
Click or tap the shield icon
In the popup displayed, disable the Enhanced Tracking Protection switch.
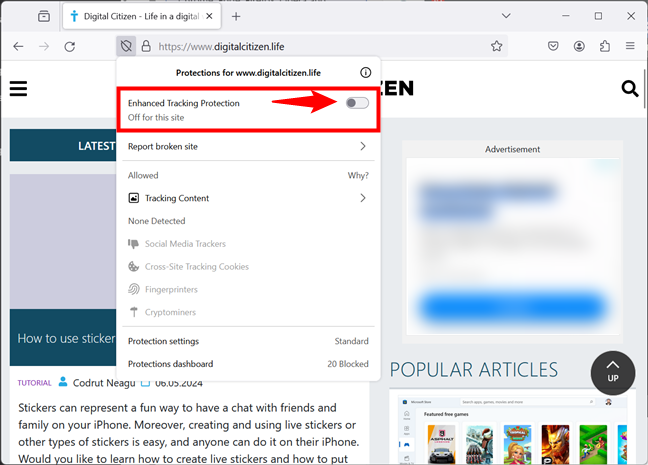
Disable the Enhanced Tracking Protection switch
This will make Firefox allow the use of third-party cookies by the website you’re on.
TIP: If you want to delete cookies, follow the instructions in this guide: How to clear cookies on Firefox in Windows and macOS.
How to enable third-party cookies in Opera and Opera GX
Opera and Opera GX are two browsers that share a lot of things, and the way they handle third-party cookies is one of them. Note that although I’m using screenshots from Opera, the next steps are identical in Opera GX.
How to allow third-party cookies in Opera or Opera GX for all websites
Open the Opera or Opera GX browser and click or tap the Opera logo in the top-left corner. In the dropdown menu, select Settings.
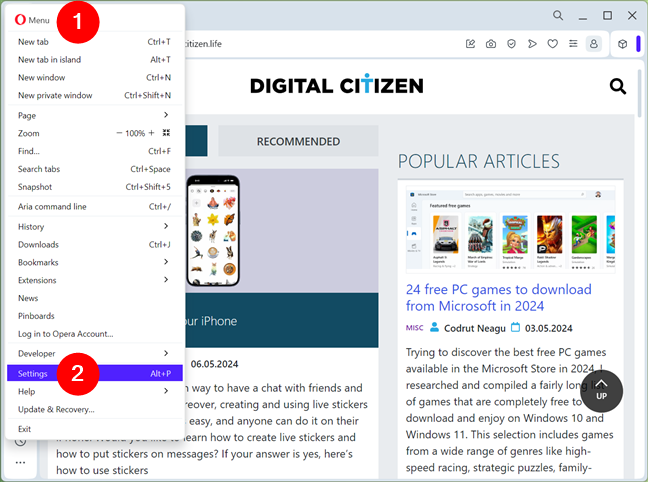
Go to Opera's Settings
On the Settings tab, select Privacy & security in the left-hand menu and click or tap the Third-party cookies on the right.
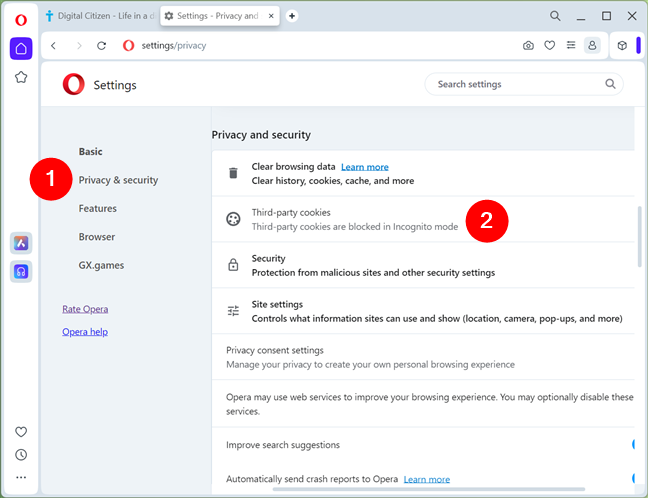
Click or tap Third-party cookies in Privacy & Security
Then, select the Allow third-party cookies option to let all websites use cross-site cookies in Opera.
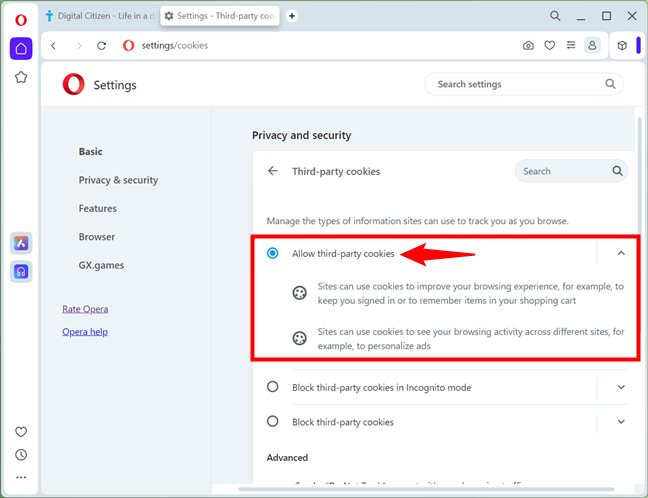
Enable the Allow third-party cookies switch
TIP: If you prefer to allow third-party cookies during regular browsing but wish to block them while in incognito mode, you can opt to enable the Block third-party cookies in Incognito mode instead.
2. How to enable third-party cookies in Opera or Opera GX for individual sites
You can also enable third-party cookies for specific websites while maintaining them blocked for others. To do so temporarily, visit that site, click or tap the small Page information icon (it looks like a lock) to the left of its address, and select Cookies and site data in the menu displayed.
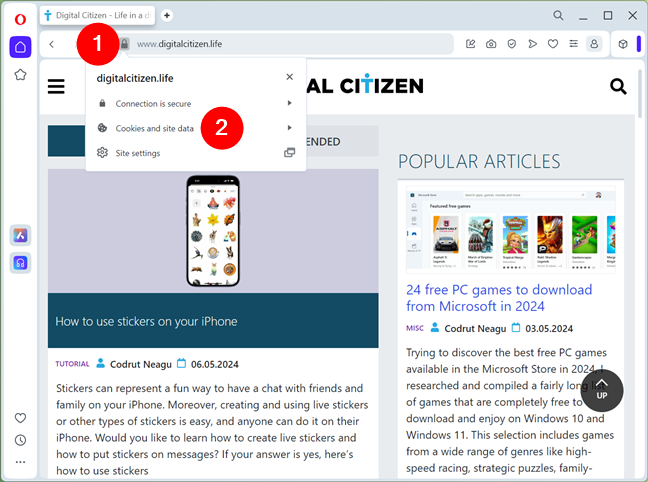
Click or tap the lock icon and go to Cookies and site data
Next, toggle the switch for Third-party cookies.
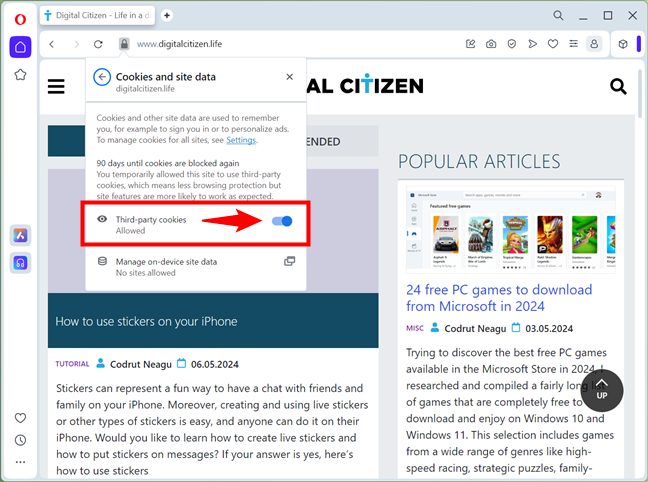
Toggle the Third-party cookies switch
This action lets the website use third-party cookies in Opera or Opera GX for the next 90 days. Once this period ends, the browser will resume blocking them, so you’ll have to re-enable this option.
3. How to permanently allow third-party cookies in Opera or Opera GX for a website
Alternatively, there’s a permanent method to enable third-party cookies for a website. Unlike the previous one, this setting won’t be automatically disabled by the browser, but it does require a few manual steps:
Access the Privacy & security settings, following the same steps as before: open Settings, select Privacy & security in the sidebar, and click or tap Third-party cookies on the right. Then, locate the section labeled “Sites allowed to use third-party cookies” and click or tap the Add button.
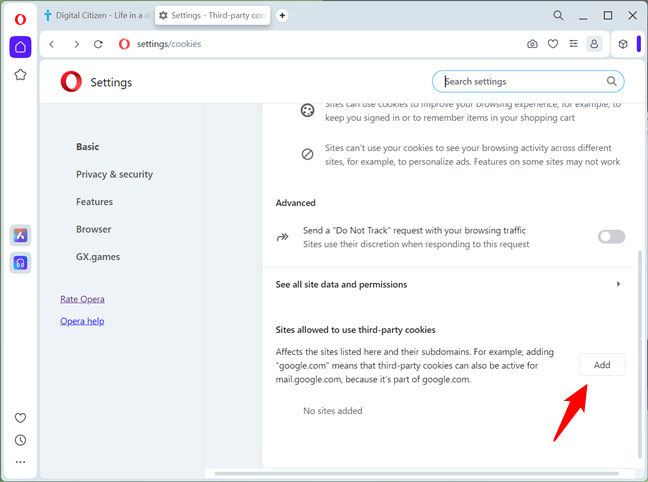
Go to Sites allowed to use third-party cookies and click Add
This action makes Opera/Opera GX show a dialog titled Add a site. In its text field, enter the URL of the website for which you want to allow 3rd-party cookies, then click or tap the Add button.
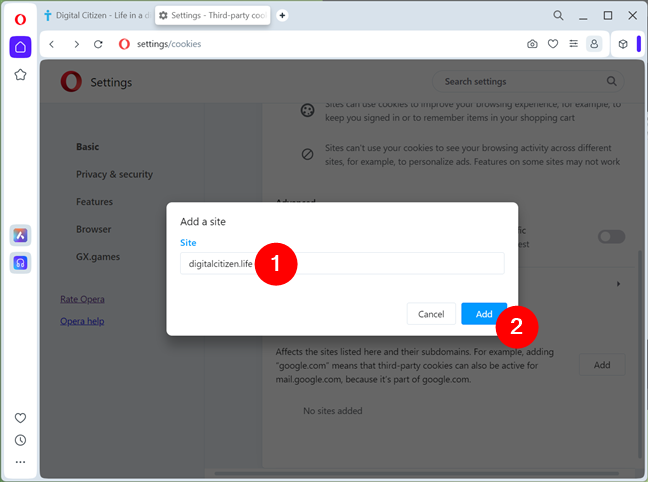
Enter the address of the site and click Add
The website you’ve specified is immediately added as an exception to the list of sites allowed to use third-party cookies.
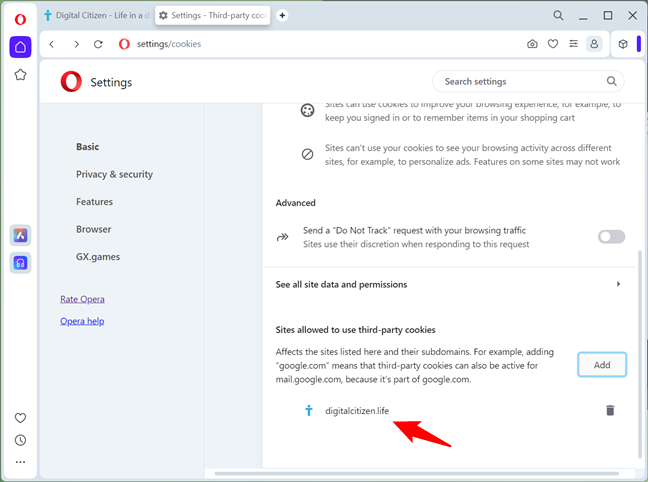
The site is allowed to use cross-site cookies
From this point forward, the website will have permanent access to third-party cookies in Opera or Opera GX.
TIP: If something isn’t quite right with a website, you may want to try deleting its cookies. Here’s how to see and clear cookies in Opera and Opera GX.
Did you enable third-party cookies?
Now that you know how to allow 3rd-party cookies in all major web browsers, I think it’s important to keep in mind that enabling third-party cookies can have significant privacy implications. Such cookies allow websites other than the one you’re currently visiting to track your online activity. This means collecting sensitive information about your browsing habits is possible, so you should think twice before making this change for websites you don’t trust. Having said that, I’m going to close this tutorial by inviting you to let me know your opinion about third-party cookies and whether you’ve had any issues with them. Feel free to use the comments section below.


 10.05.2024
