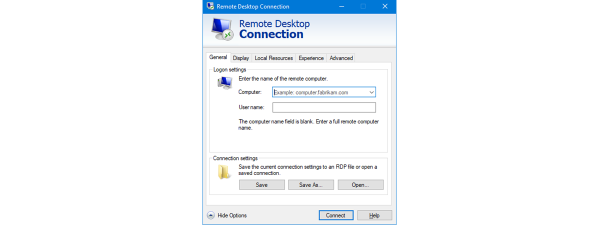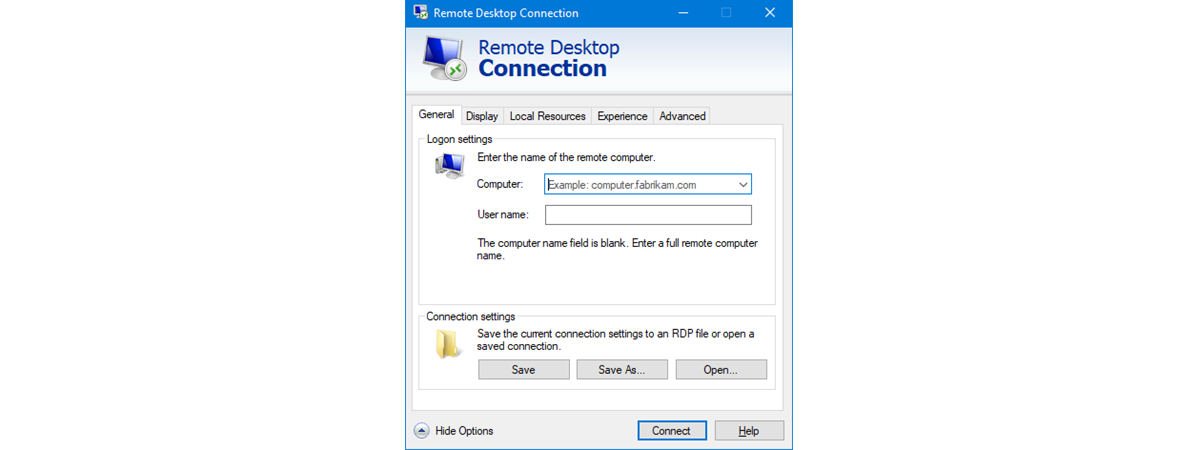
Remote Desktop connections allow you to connect to a PC or device through the internet or a local network. When you are connecting to a Windows 10 or Windows 7 PC, you see that computer's desktop, and you can access its apps, files, and folders as if you were sitting in front of its screen. This is useful for IT professionals and business users who have to work remotely. Here is how to enable Remote Desktop Connections in Windows 10 or Windows 7:
NOTE: If you are interested in enabling a Remote Desktop for a Windows 7 PC, skip to the second section of this article. After enabling Remote Desktop Connections on your Windows PC or device, it is a good idea to configure the user accounts that can access your PC remotely. To learn how that is done, read the fourth section of this guide.
How to use the Settings app to enable Remote Desktop on Windows 10
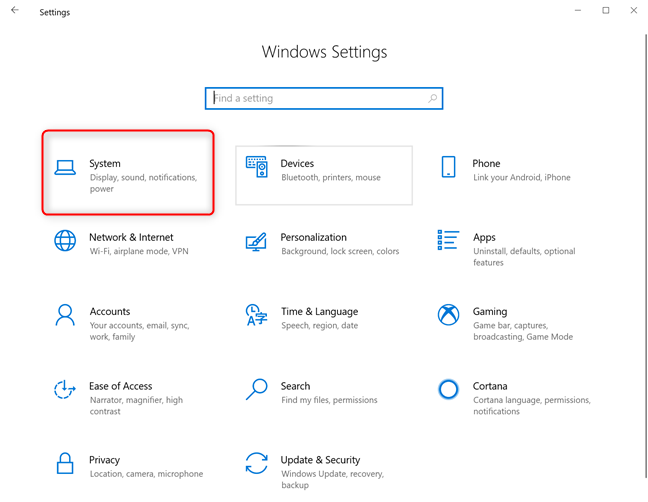
The quickest way to enable Remote Desktop in Windows 10 is from the Settings app. Start Settings by pressing on its shortcut in the Start Menu or hitting the Windows +I keys on your keyboard. Then, open the System category.
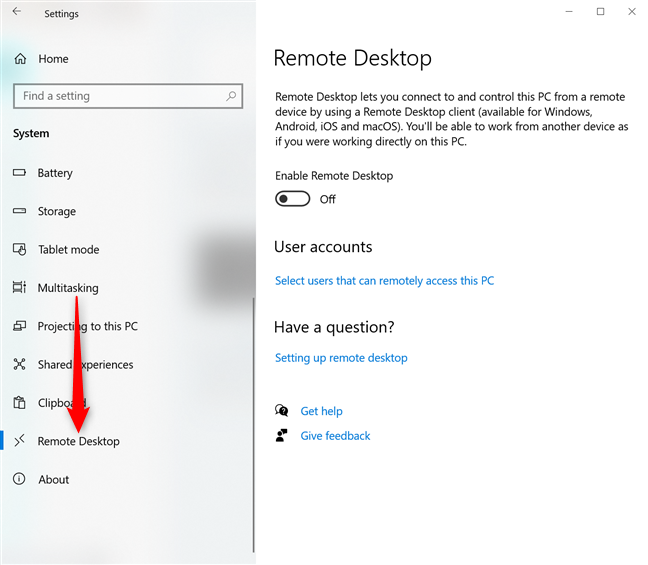
Scroll down to Remote Desktop in the column on the left, and click or tap on it. On the right, you should see a switch for this feature called "Enable Remote Desktop," as shown in the screenshot below.
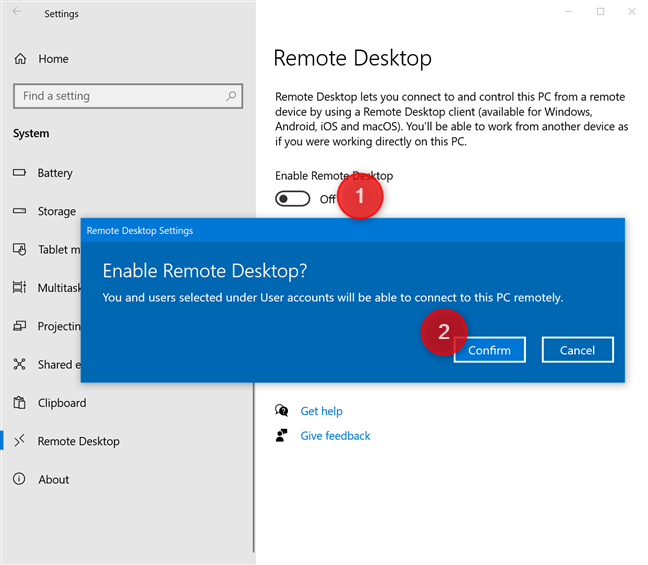
Set the "Enable Remote Desktop" switch to On, and Confirm that you want to enable Remote Desktop.
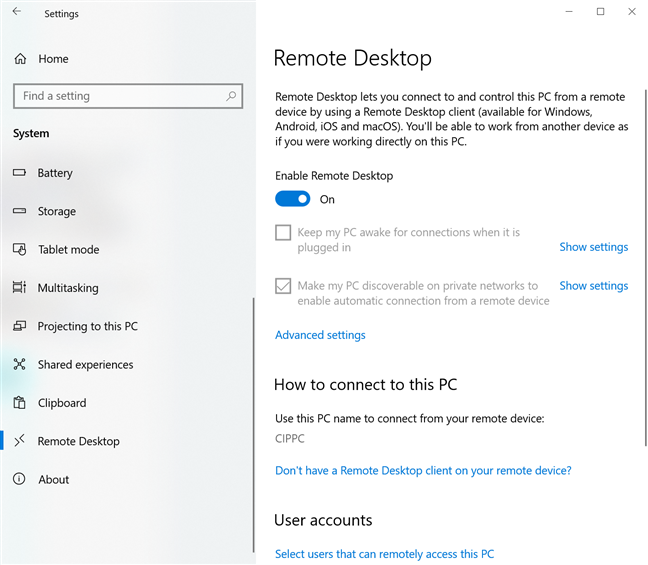
The "Enable Remote Desktop" switch is On, and a couple of settings are shown beneath it, as you can see in the screenshot below:
- "Keep my PC awake for connections when it is plugged in"
- "Make my PC discoverable on private networks to enable automatic connection from a remote device"
Close the Settings app, and Remote Desktop connections can now be established to your Windows 10 PC. To connect remotely to your PC, read: How to use Remote Desktop Connection (RDC) to connect to a Windows PC.
How to enable Remote Desktop from the Control Panel on Windows 10 or Windows 7
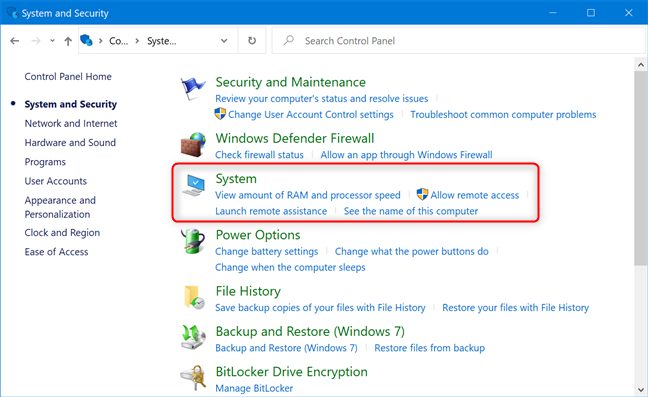
You can also enable Remote Desktop from the Control Panel, no matter which version of Windows you use. However, if you are on Windows 7, the Control Panel is your only option for enabling it. First, open the Control Panel and go to "System and Security -> System."
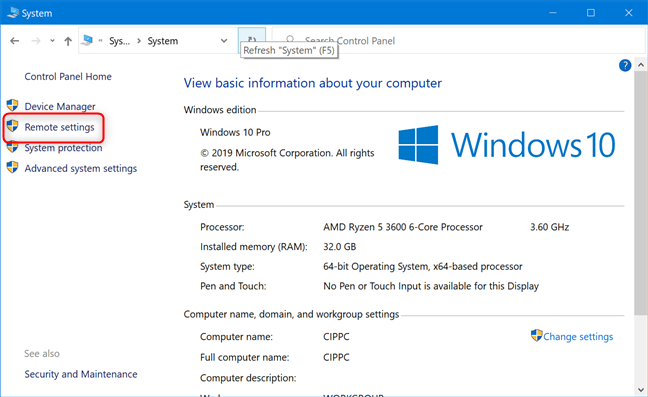
On the left side of the System window, click or tap the link called "Remote settings."
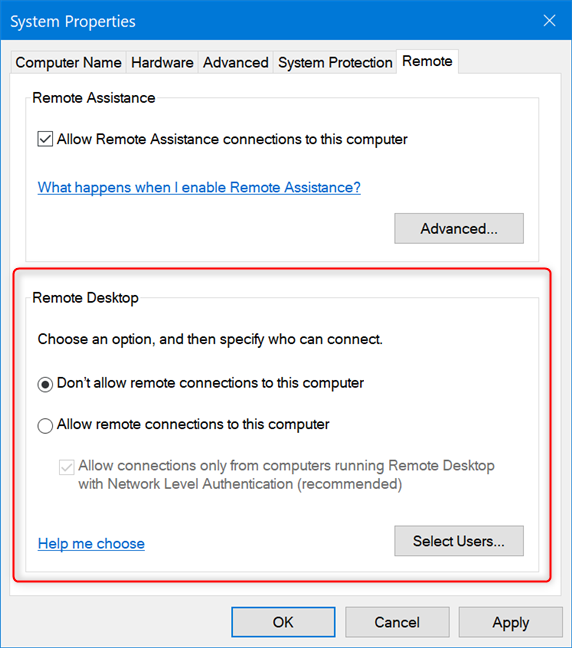
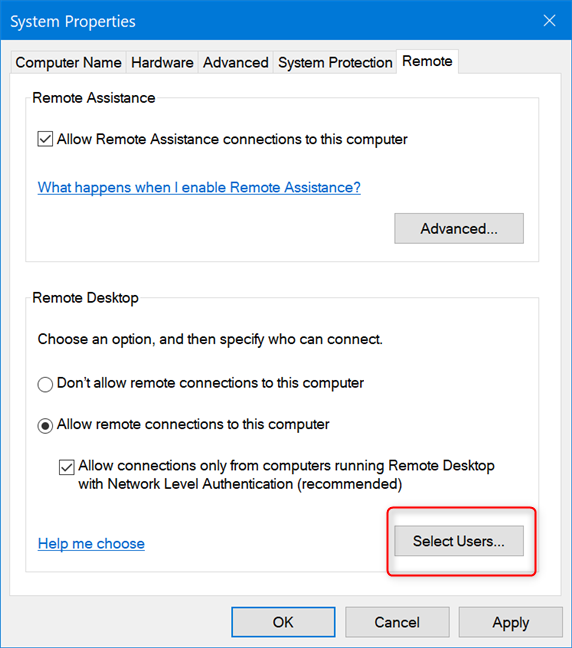
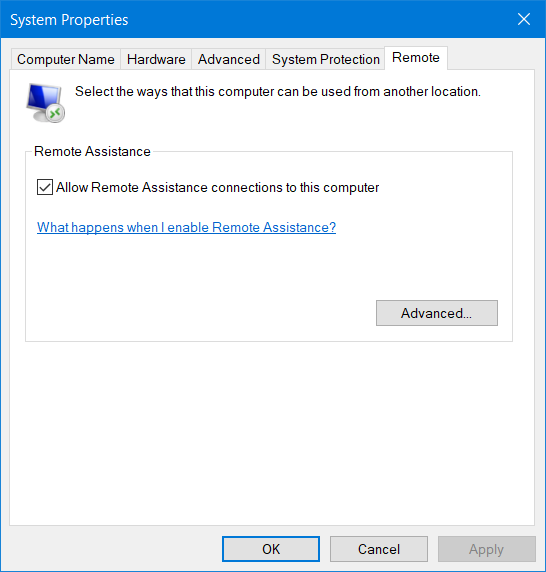
The System Properties window opens. On its Remote tab, go to the Remote Desktop section.
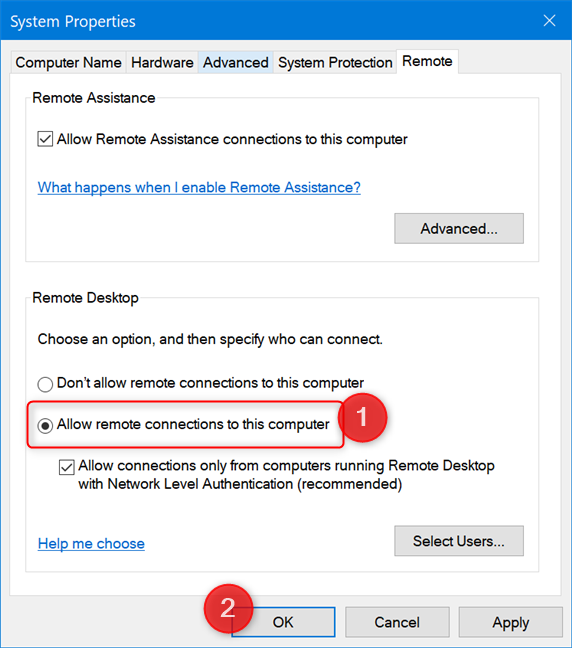
Check the option that says "Allow remote connections to this computer," and click or tap OK. If you are not sure which version of Remote Desktop is used by the client that is going to connect to your PC, uncheck the option that says: "Allow connections only from computers running Remote Desktop with Network Level Authentication."
After enabling Remote Desktop, on some Windows 10 PCs, you might also see a warning saying that "This computer is set up to go to sleep or hibernation when not in use. While this computer sleeps or hibernates, people cannot connect to it remotely." Press OK and you are done.
Important note for Windows 7 users enabling Remote Desktop
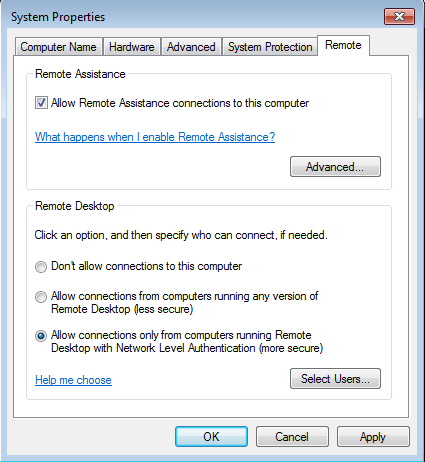
In Windows 7, the available Remote Desktop options are organized and named slightly differently. See the screenshot below for details.
In the Remote Desktop area from Windows 7, choose one of the available settings to enable it:
- "Don't allow remote connections to this computer" - turns off Remote Desktop.
- "Allow connections from computers running any version of Remote Desktop" - allows users running any version of Remote Desktop Connection to connect to your PC. Use this if you are not sure about the version of Remote Desktop used by the client, or if they are using a third-party Remote Desktop Connection application. For example, Linux clients likely require this option.
- "Allow connections only from computers running Remote Desktop with Network Level Authentication" - restricts Remote Desktop Connections to those running versions of Remote Desktop that have Network Level Authentication. Network Level Authentication was introduced in Remote Desktop Client 6.0. If the client computer is running Windows, or they have recently downloaded the Remote Desktop Connection client, use this option, as it is more secure.
How to select the users that are allowed to connect through Remote Desktop
By default, Windows 10 allows connections only from devices running Remote Desktop with Network Level Authentication. If the client computer or device is running the Remote Desktop Connection (RDC) from Windows, the Microsoft Remote Desktop app from the Microsoft Store, or the Microsoft Remote Desktop app for Android, iOS, or macOS, you should have no issues in connecting to your PC using the login credentials of an administrator account. However, you probably don't want to give out your administrator credentials to others without good reason. To avoid this situation, you should configure the users allowed to initiate remote desktop connections.
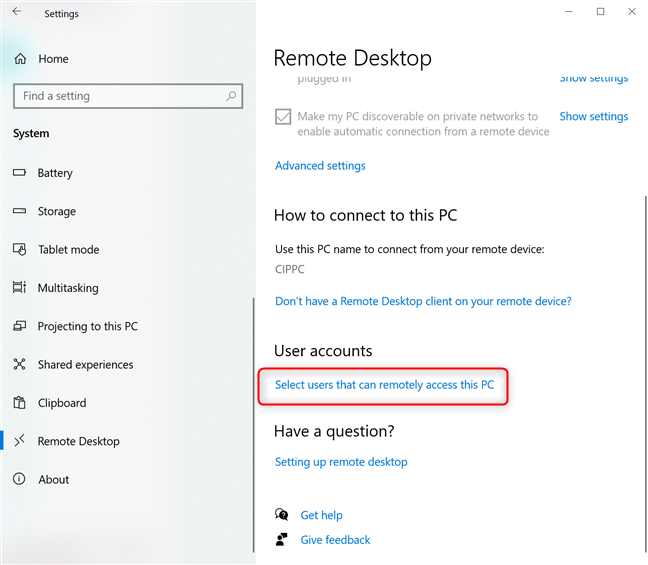
If you have enabled Remote Desktop from the Settings app, click or tap the "Select users that can remotely access this PC" link. This opens the Remote Desktop Users window.
If you have enabled Remote Desktop from the Control Panel, in the System Properties window, click or tap the Select Users button to open the Remote Desktop Users window.
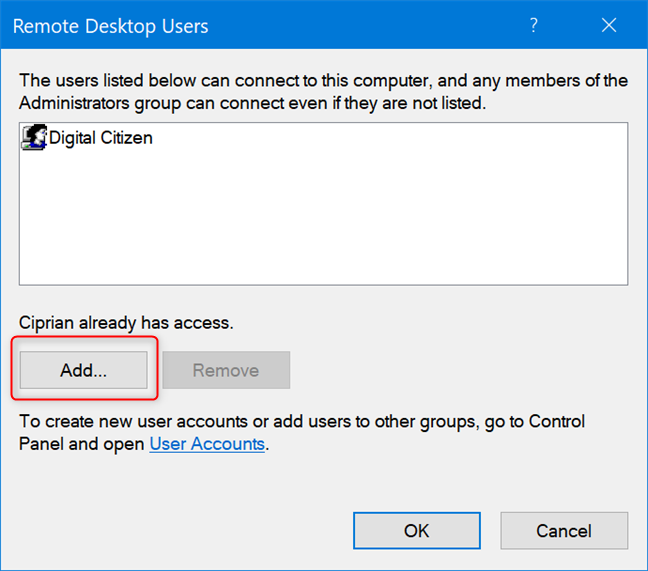
To add the users to whom you want to give permissions, in the Remote Desktop Users window, click or tap on Add.
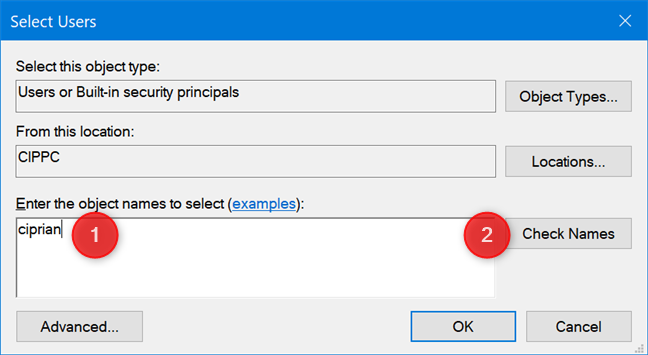
In the Select Users window, type the user account name that you want to give access to, and click or tap on Check Names.
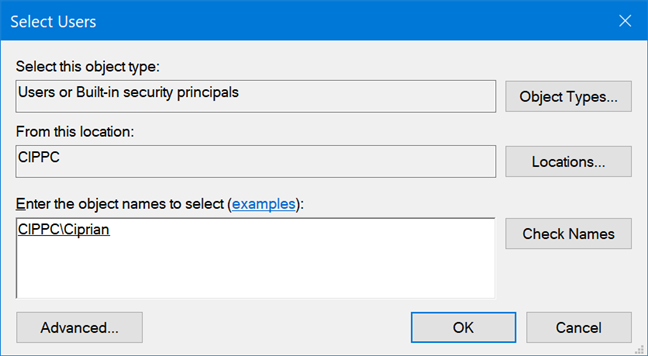
Windows checks that a user account with that name exists and adds the location in front of it if you are using a local account, or completes the email address if you are using a Microsoft account. When done, click or tap on OK.
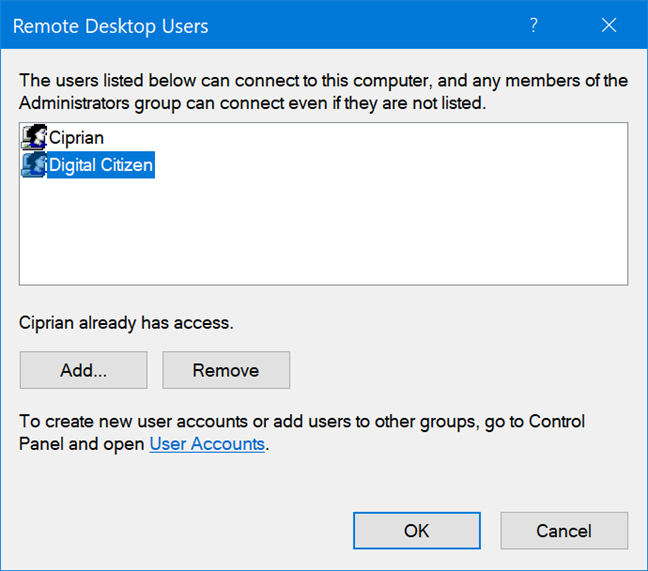
You are back to the "Remote Desktop Users" window where you see the user account you just added. To remove an account from this list, click or tap on it and then press Remove. When you are done setting up the users that can connect to your PC through Remote Desktop, press OK.
Remote Desktop is not available in the Home editions of Windows 10 and Windows 7
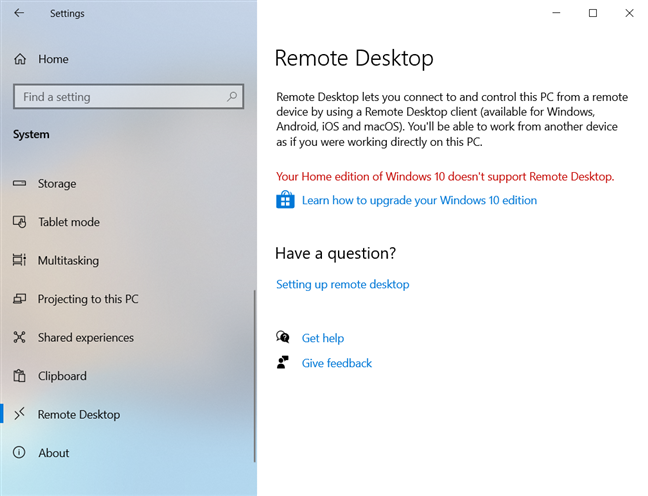
If you run Windows 10 Pro or Enterprise, Windows 7 Professional, Windows 7 Ultimate, or Windows 7 Enterprise, you can enable Remote Desktop. If you run any other edition, like Windows 10 Home or Windows 7 Home, you cannot enable this feature. In Windows 10 Home, when you open the Remote Desktop section in the Settings app, you see this message: "Your Home edition of Windows 10 doesn't support Remote Desktop."
When you're using a Home edition of Windows and you open the System Properties window, you do not see any settings or notes related to Remote Desktop.
Did you succeed in enabling Remote Desktop on your Windows PC?
After you enable Remote Desktop on your Windows 10 or Windows 7 PC, other users, including yourself, can connect to it remotely. Any devices running Linux, macOS, or Windows can connect using the Remote Desktop protocol, if they know the appropriate details like the IP address of your computer, and the user account allowed to connect remotely. Before closing this tutorial, tell us whether you succeeded in enabling Remote Desktop.


 20.03.2020