Do Not Track or DNT is a web browser feature that lets websites know you don’t want to be tracked. When you enable the DNT setting in your web browser, it sends a Do Not Track request with your browsing traffic to all the websites you visit and the third-party services they’re using, asking them not to collect data about you and your browsing habits. This guide explains how DNT works and shows how to start sending Do Not Track requests in Google Chrome, Mozilla Firefox, Microsoft Edge, and Opera:
What is a Do Not Track request?
A Do Not Track request is a signal sent by your browser to the websites you visit, telling them that you don’t want their cookies and asking to disable user tracking. While you can enable DNT on any browser to send this request, there is no standard for how web companies, websites, and web services interpret and use DNT. If the websites you visit are set to respect your browser’s Do Not Track setting, ad networks should refrain from tracking you for advertising purposes and stop personalizing the ads they display in your web browser. Furthermore, websites should limit the information they collect about your browsing activity on their pages.
When our website receives Do Not Track requests from our visitors’ browsers, it collects less information about that visit. Another significant change is that we do not record the keywords you used in Google Search to reach one of our guides. In a nutshell, when DNT is turned on, we know less about how you reach and use our website.
If you’re not sure about your browser’s current Do Not Track setting, visit All About DNT to determine whether or not you’re being tracked.
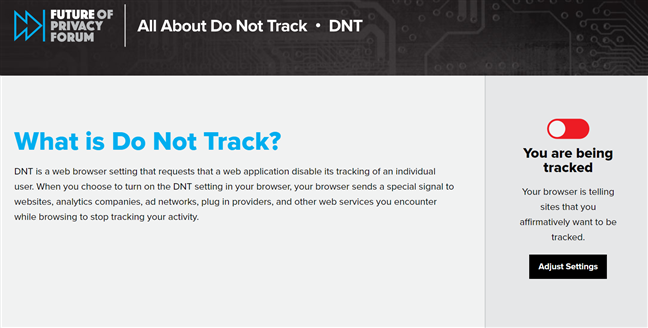
Find out if your browser sends Do Not Track requests
Since 2010, the Do Not Track (DNT) setting has been available in all web browsers. The first one to implement this feature was Mozilla Firefox, followed shortly by other web browsers. The next chapters show how to enable DNT in most major browsers, so find the one you’re using and take the necessary steps to prevent tracking while browsing the internet.
How to enable Do Not Track in Google Chrome
To enable the Google Chrome Do Not Track setting, press the “Customize and control Google Chrome” button in the top-right corner. It looks like three dots arranged vertically. In the menu that opens, click or tap on Settings.
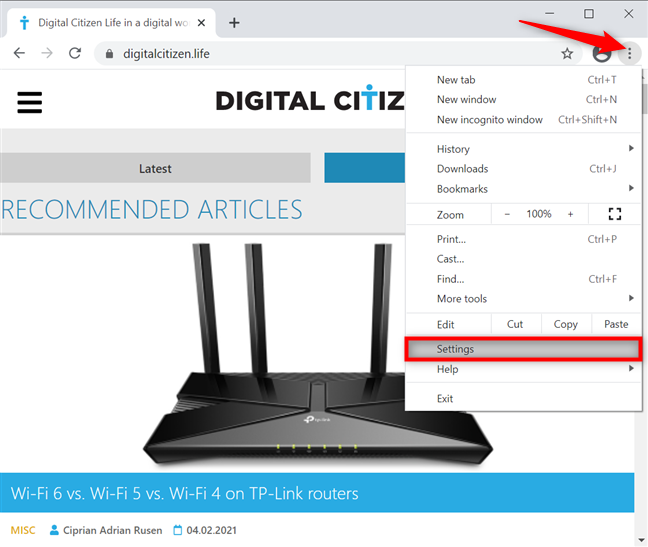
Access Chrome's Settings
Next, access the “Privacy and security” tab or scroll down until you reach this section. Click or tap on “Cookies and other site data.”
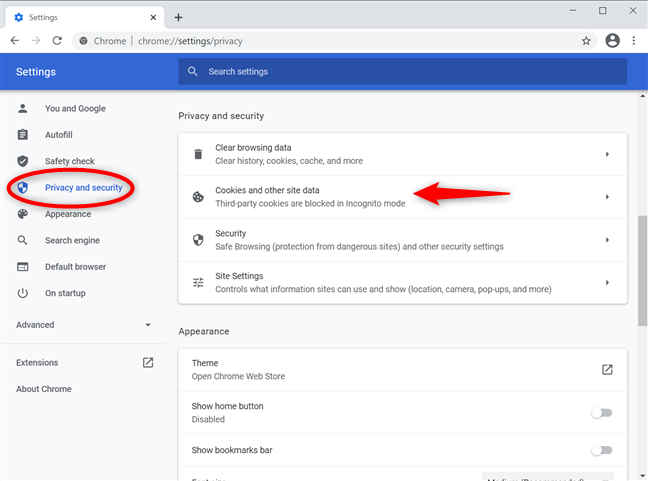
Open Cookies and other site data
Scroll down and click or tap on the ‘Send a “Do Not Track” request with your browsing traffic’ option to enable it.
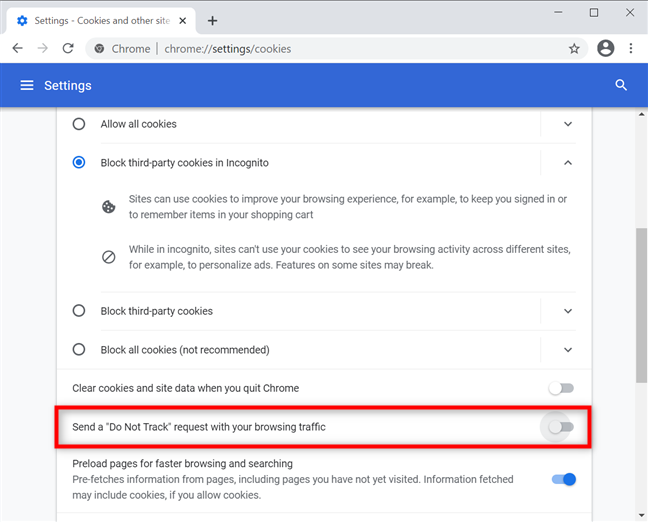
Press to Send a Do Not Track request with your browsing traffic
A pop-up lets you know what it means to enable Do Not Track. Click or tap Confirm.
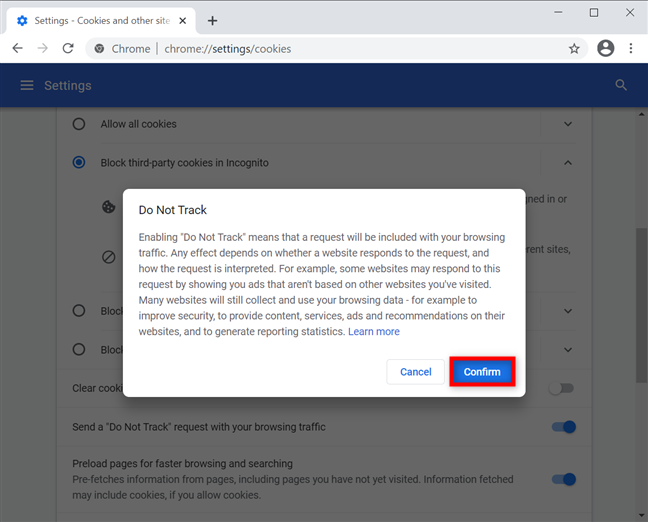
Confirm to enable the Google Chrome Do Not Track
The switch is turned on, as seen below. Close the Settings tab and, from now on, Google Chrome sends a DNT signal to all the websites and web apps you visit.
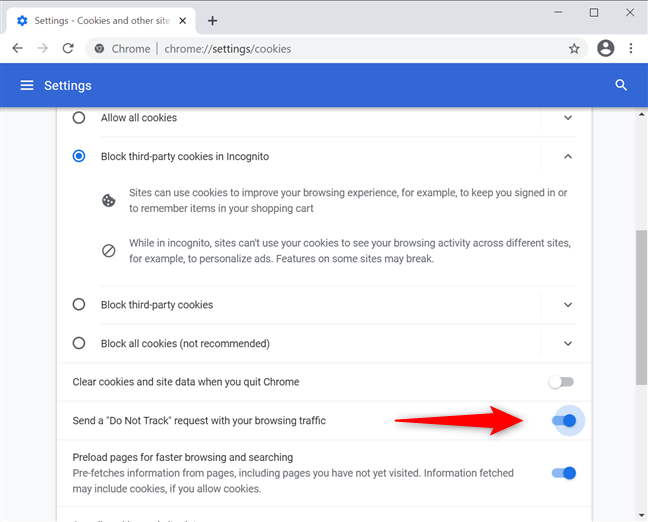
The Google Chrome Do Not Track switch is enabled
TIP: You can also block third-party cookies that track your activities on the internet in Chrome, Firefox, Opera, Edge, and Internet Explorer.
How to enable the Mozilla Firefox Do Not Track setting
To enable Do Not Track in Mozilla Firefox, press the Open menu hamburger button in the top-right corner. Then, click or tap Options.
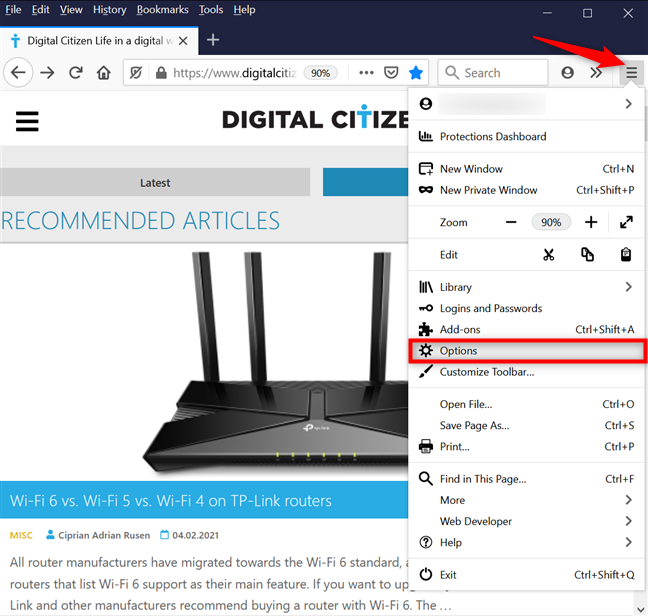
Open the Firefox Options
Access the Privacy & Security tab on the left. On the right, scroll down to find the ‘Send websites a “Do Not Track” signal that you don’t want to be tracked’ setting and select Always.
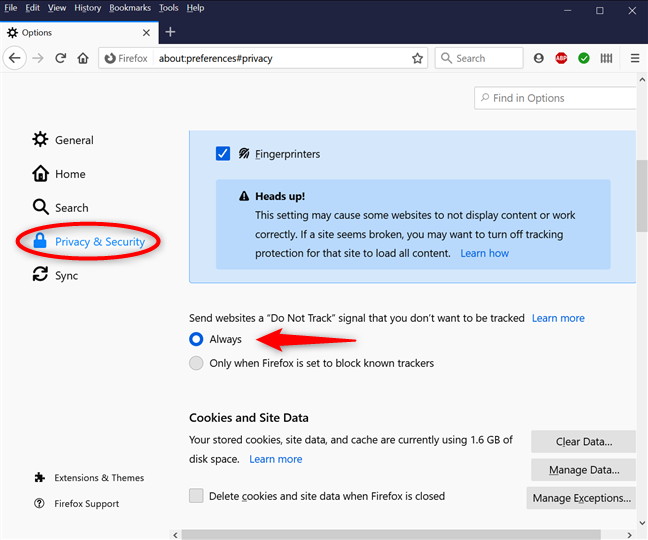
Enable the Firefox Do Not Track setting
Close the Options tab, and Mozilla Firefox now sends DNT signals.
How to turn on Do Not Track (DNT) in Microsoft Edge
Open Microsoft Edge and click or tap the “Settings and more” button from the top right. Go to Settings from the subsequent dropdown menu.
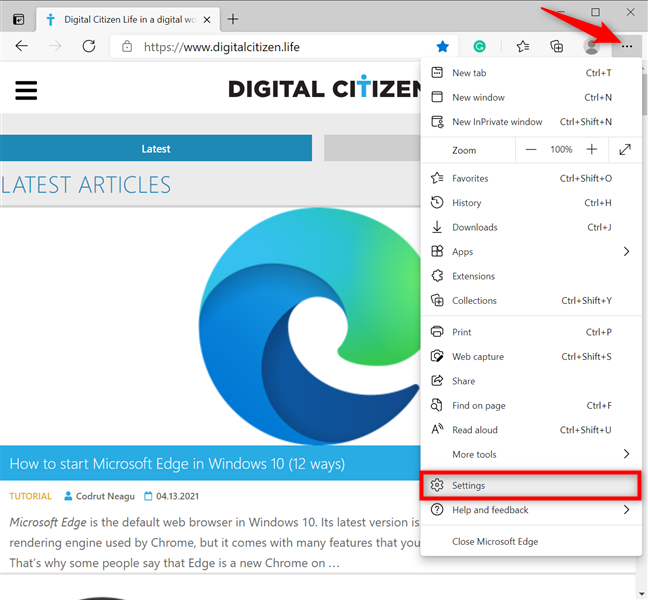
Access Edge's Settings
Access the “Privacy, search, and services” tab from the left column. Then, on the right pane, scroll down to “Privacy” and press on the ‘Send “Do Not Track” requests’ entry to activate it.
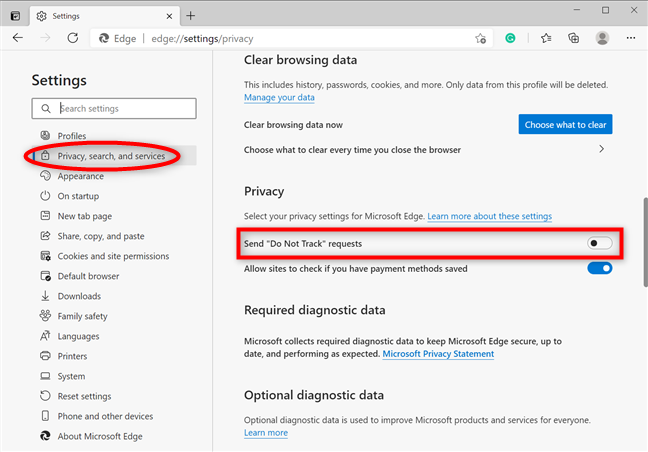
Click or tap to Send Do not Track requests
A pop-up warns you that Do Not Track is entirely up to the websites you visit. Click or tap the Send request button.
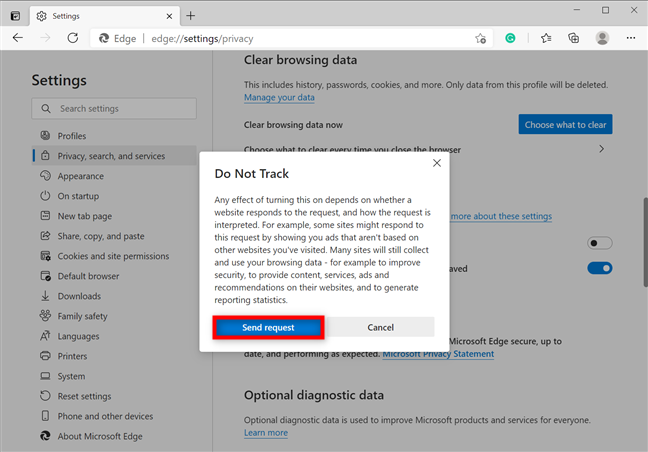
Press Send request to confirm your choice
The Do Not Track switch is turned on, so, from now on, Microsoft Edge includes DNT requests when accessing websites. Close the Settings tab, and you are done.
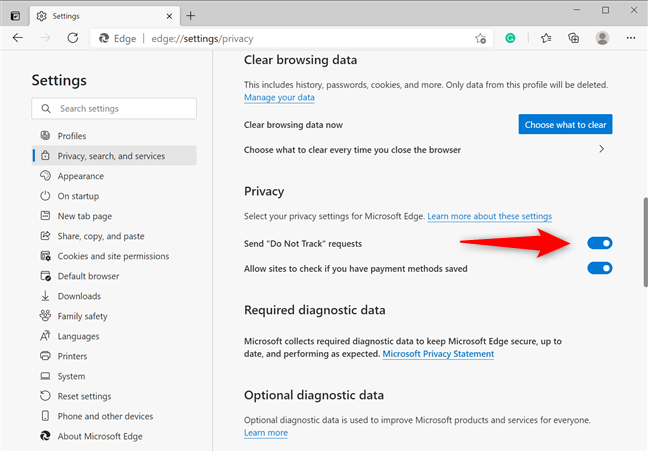
The Edge DNT switch is active
How to enable Do Not Track in Opera
In Opera, click or tap the “Customize and control Opera” button shown in the top-left corner. It looks like the letter O, next to the word Menu. Then, click or tap Settings.
TIP: Alternatively, you can press ALT + P on your keyboard to open Opera’s Settings.
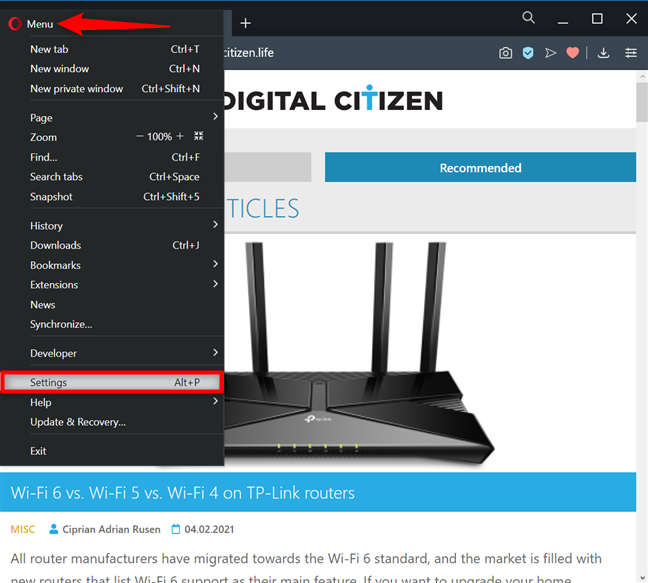
Access the Settings in Opera
Click or tap on Advanced from the left sidebar to reveal a dropdown menu, and then access “Privacy & security.” On the right, press on “Cookies and other site data.”
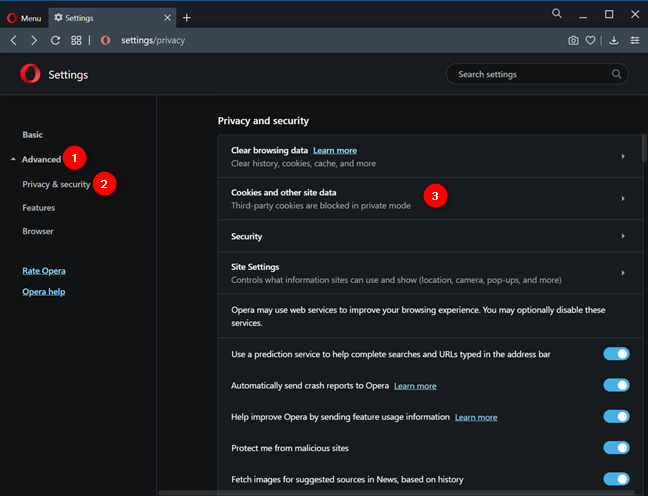
Access Cookies and other site data
Next, click or tap on the ‘Send a “Do Not Track” request with your browsing traffic’ option to activate it.
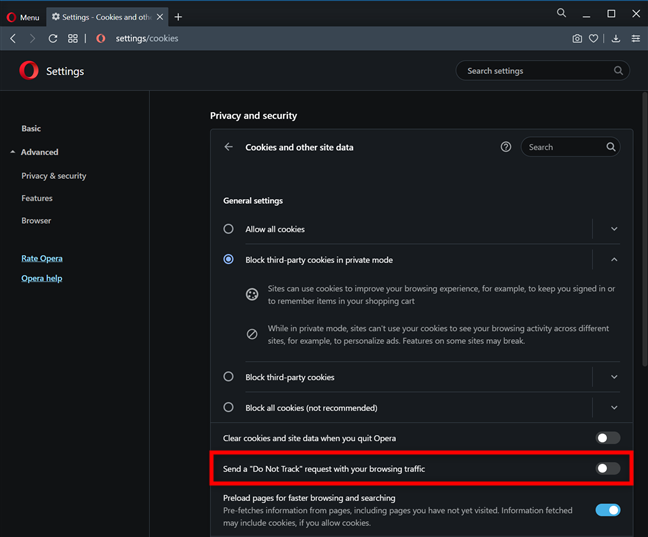
Press to Send a DNT request when browsing the internet
A pop-up lets you know more about Do Not Track and how it works. Click or tap Confirm.
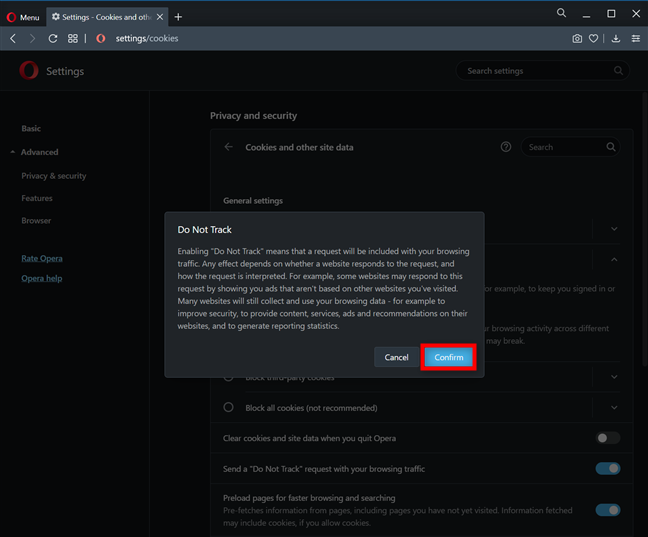
Press Confirm to enable Do Not Track in Opera
As shown by the switch, Do Not Track is now enabled. Close Settings, and Opera now sends DNT signals to the websites you visit.
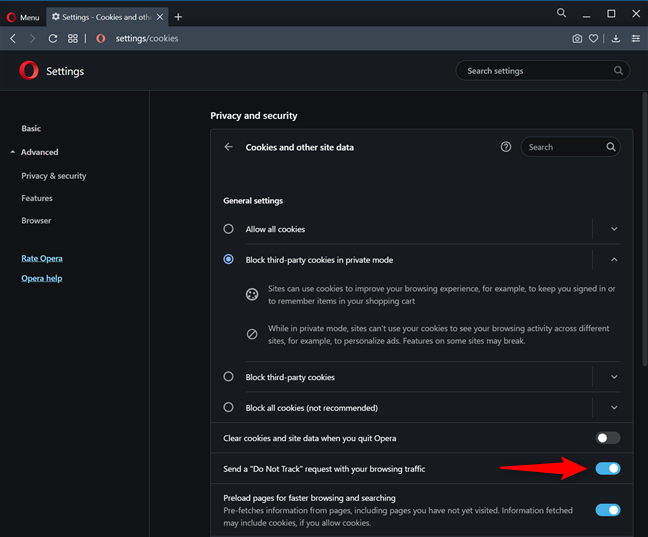
The switch shows you successfully enabled Do Not Track in Opera
Why do you want to send Do Not Track requests?
While enabling DNT may help make your browsing history a bit more private, that does not mean that all websites, ad networks, and third-party services stop tracking you. Some of them ignore your DNT setting and track you just the same. Before closing this tutorial, please leave a comment below with your reason for deciding to send Do Not Track requests and your browsing experience afterward.


 15.04.2021
