
Apple recently launched iOS 17, and one of the most interesting new novelties we’re getting is the ability to create and use Contact Posters. In case you haven’t already heard about them, Contact Posters are a feature that lets you create and share personalized posters with your contacts. Some may like them, others may not, but the reality is that Contact Posters can be a fun and creative way to express yourself. If you’re curious about them and wondering how to customize and use Contact Posters on your iPhone, here’s what to expect and how to get started with them:
What are Contact Posters?
Contact Posters are a new feature in iOS 17 that allows you to customize how you appear on someone’s iPhone when you call them. You can create your own Contact Poster using your camera, photos, memoji, or text (monogram).
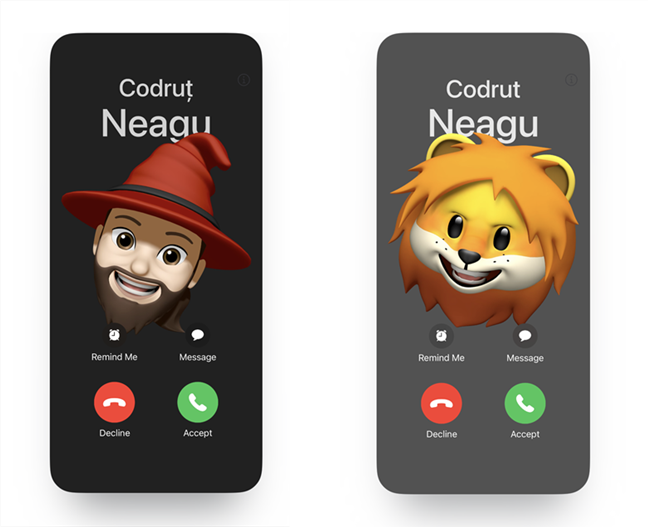
Contact Posters on iOS 17
Moreover, you can also create Contact Posters for the contacts you have saved in your iPhone’s phonebook. Just like for your own Contact poster, you can create a unique and personalized poster for each contact. When you receive a phone call from someone for whom you’ve created a Contact Poster, it will appear on your iPhone’s lock screen, and it should also show up in your call history and notifications.

iPhone Contact Posters based on memojis
If Contact Posters sounds like a fun and personal way to greet your friends and family on iOS 17, here’s how to create them on your iPhone:
How to create Contact Posters on an iPhone
Making a Contact Poster on your iPhone is easy, and it only takes a few steps:
Step 1. Open the Contacts app on your iPhone
In order to create a Contact Poster, the first thing to do is open the Contacts app. Find it on your iPhone’s home screen and tap on it to launch it.
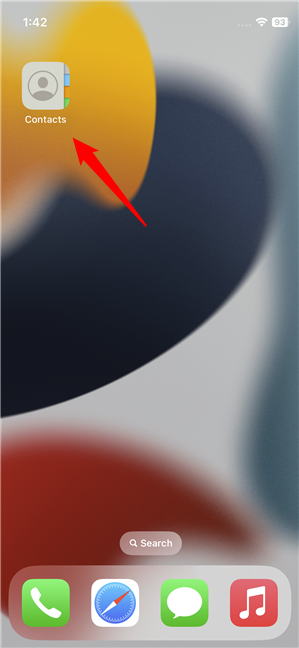
Open the Contacts app
Then, if you want to create a Contact Poster for yourself, tap the My Card entry at the top of the screen. If you’ve previously set a name for yourself in the Contacts app, you might not see the My Card entry but your name. In this case, tap on your name. If what you want is to create a poster for someone other than yourself, find that person in your Contacts list and tap on his or her name.
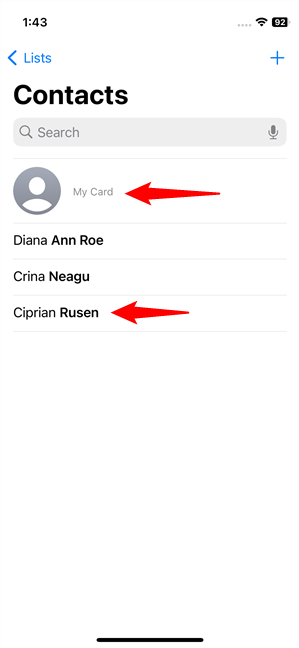
Tap on your name or on a contact
Step 2. Launch the Contact Poster editor
Next, you’ll have to access the Contact Poster editor. Regardless of whether you’re going to make a Contact Poster for yourself or for one of your contacts, you should see a screen like the one below. On it, tap Contact Photo & Poster to launch the poster editor.
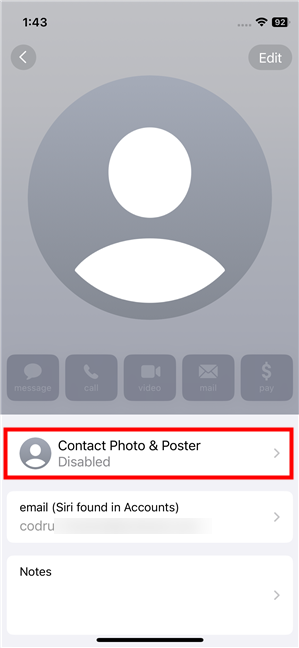
Tap Contact Photo & Poster
If you’ve chosen to create a poster for yourself and this is your first time doing it, you’ll also see the next screen where iOS 17 tells you what Contact Posters is all about. Read the quick info and tap Continue. If this isn’t your first time creating a poster for yourself, or if you’re making a poster for someone else, this screen doesn’t show up.
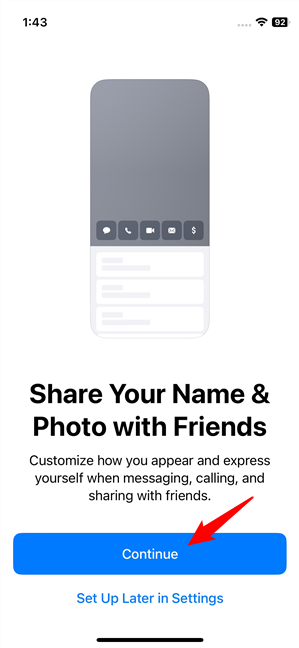
Choose to Continue
NOTE: If you don’t see the Contact Poster editor on your iPhone and you’re wondering “Why is Contact Poster disabled?” the answer is simple. The Contact Posters feature is available only on iOS 17: if you have an older version of iOS, Contact Posters are not working. So, if you want to put Contact posters on your iPhone, you should update to iOS 17 first.
Step 3. Create a Contact Poster
Then, the poster editor tool shows up. First, you should Enter your name in the two fields under the preview area. Then, you can Choose your poster using one of the four options at the bottom of the screen: Camera, Photos, Memoji, Monogram.
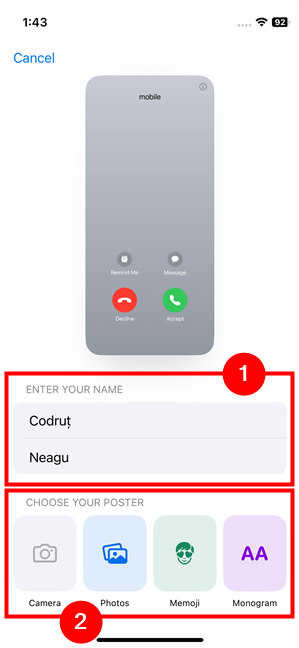
Enter your name and Choose your poster
Each option available for creating your poster is different, but all work more or less the same:
- If you choose Camera, your iPhone launches the Camera app, allowing you to take a picture of yourself (or someone else) and use it as a starting point for your Contact Poster.
- If you tap on Photos, you can select a photo you previously shot with your iPhone and customize it to create the Contact Poster.
- Selecting Memoji lets you create a personalized emoji and use it for your Contact Poster.
- Tapping the Monogram button allows you to create a Contact Poster using text without including any photo or avatar (memoji).
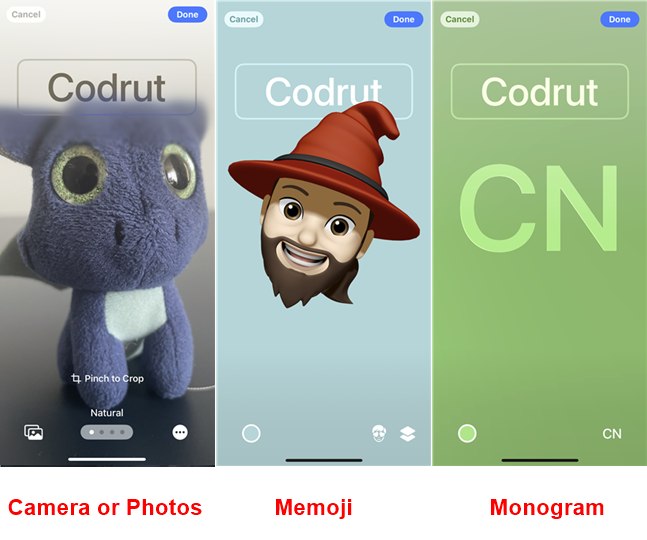
Contact Posters created from a photo, memoji, or monogram
Once you’ve selected the photo, memoji, or monogram you prefer, the editor gives you a couple of tools to customize your Contact Poster.
For instance, if you’ve chosen to use a photo, you can crop or move it to position it on the screen exactly as you want, and you can apply different styles (Black & White, Duotone, Color Wash) to the image, each with its own colors and fonts.
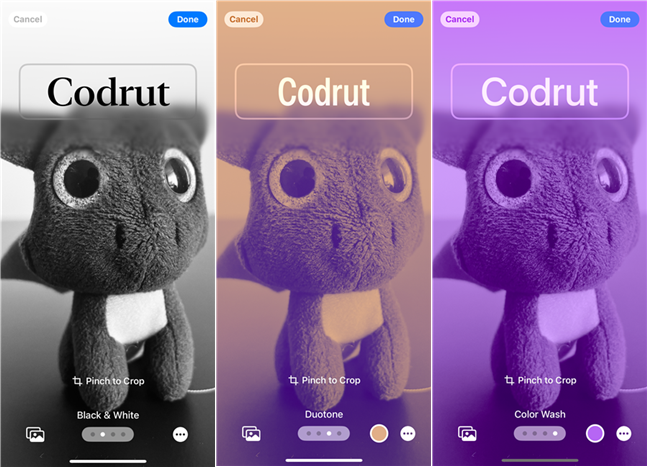
Various effects for Contact Posters based on images
If you choose to use a memoji, you can either use one of the predefined ones, one of the ones you’ve previously created on your iPhone or a new one that you’ll create right now. Either way, once you select the memoji you want, you can set a posture for it and set the background color you prefer.
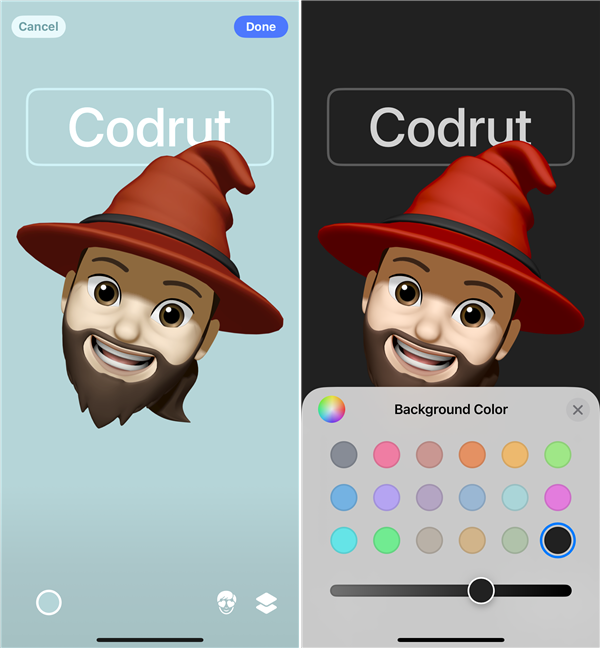
Customizing a Contact Poster based on a memoji
The last choice, Monogram, is a simple text that, by default, shows the initials of your name or the contact for whom you’re creating the poster. If this is what you prefer using for the Contact Poster, you should know that you can change the initials, as well as the font style and color.
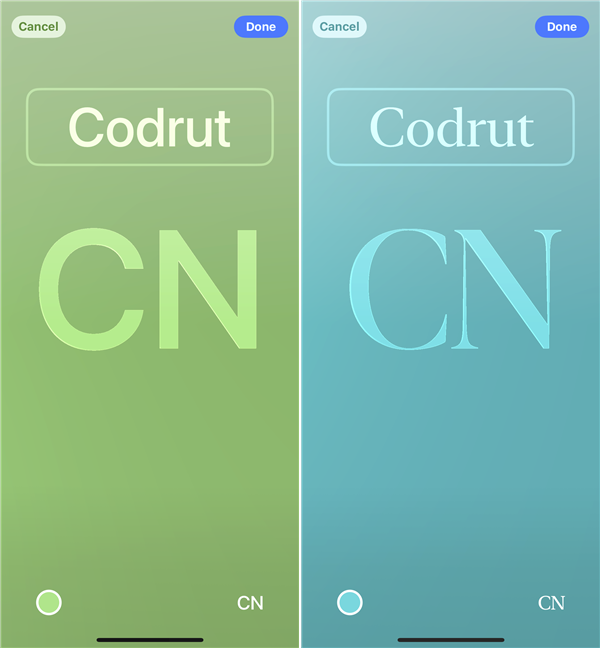
Personalizing a Contact Poster based on a monogram
Step 4. Preview and save the Contact Poster
When you are happy with your Contact Poster, tap the Done button at the top-right corner of the screen. You then get to preview your poster to find out how your contacts will see you on their iPhones when you’re calling them. Or how you’ll see the contact for whom you’ve created the poster when he or she is calling you. If you’re pleased with the result, tap Continue. Otherwise, tap Back at the top-left of the screen to go back to the poster editor screen and make additional changes.
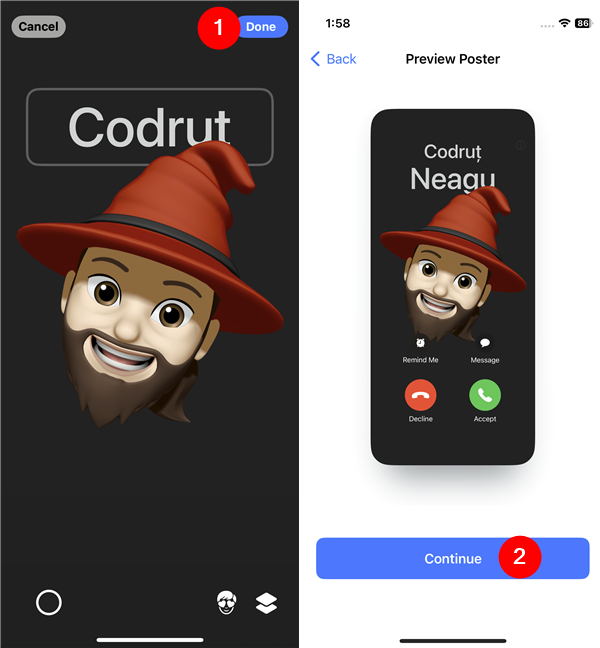
Tap Done and Continue
After you tap on Continue, iOS 17 will ask you if you also want to use your Contact Poster as a Contact Photo. If you don’t want that, you can either skip this step entirely by tapping the Skip button in the top-right corner of the screen or Choose a Different Photo. If you want to use the poster as a Contact Photo too, you can Crop it if needed, and then tap on Continue to save it.
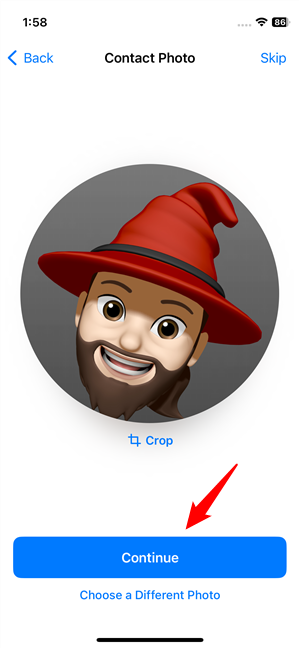
Choose Continue to use the Contact poster as Contact Photo
Then, if you’ve created a contact poster for yourself, you get to choose whether you want your name and photo to be shared by your iPhone with your contacts. You can turn this feature on or off, and you can opt to Share Automatically with your Contacts Only, or make iOS 17 Always Ask you whether you want to share your info. Once you’ve made your choices, tap Done to save and start using your new Contact Poster: you’ll be brought back to your contact page, where you can see the new poster.
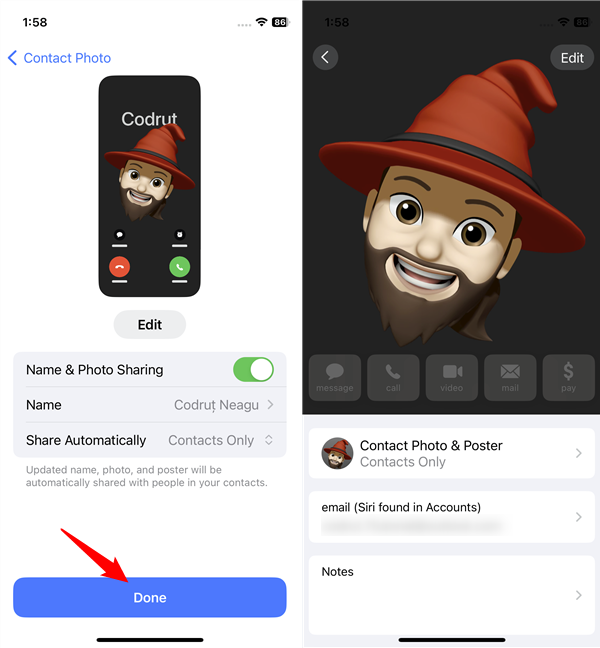
Select how the Contact Poster is shared
That’s it: you’ve created and saved a Contact Poster! But what does a Contact Poster actually look like on an iPhone running iOS 17? Here’s what my friends see when I’m calling them right now: 🙂
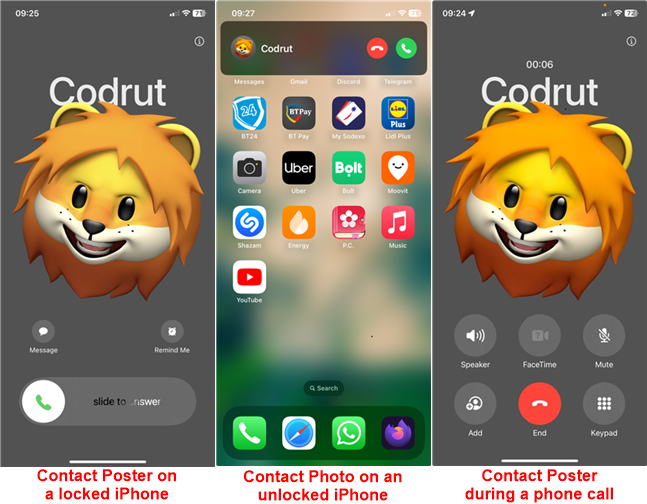
What a Contact Poster and Photo look like on an iPhone
Neat, right?
Did you put Contact Posters on your iPhone?
As you’ve seen, Contact Posters can be a great way to show your personality and connect with your contacts in a new way. Are you already enjoying them on your iPhone? If you don’t, why not at least try out Contact Posters and have some fun? Let me know what you think about this new iOS 17 feature, and if you have anything to add to this guide, don’t hesitate to share it in the comments section below.


 02.10.2023
