Did someone tell you that you can’t change your account name in Windows 11? If you’re here, you probably want to prove them otherwise. And you can, because yes, you can rename a user account in Windows 11, and it’s also quite easy. However, to change your user account name in Windows 11, you need to follow different steps depending on your account type and permissions. There are different methods for renaming local accounts and Microsoft accounts, and I’ll show you both in this guide. Whether you want to use a different name or correct a typo, I have you covered. Here is how to rename an account in Windows 11:
Account types and permissions to consider when you change your account name
The login screen of Windows 11 shows your user account name. You can change this name by following different steps that depend on the type of account you have (local or Microsoft) and your account’s permissions.
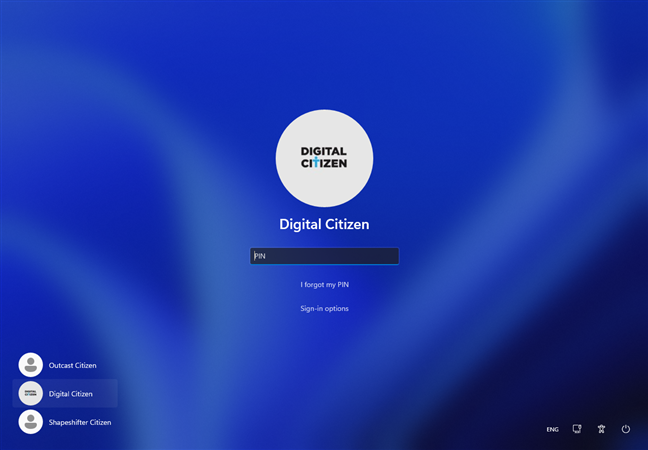
The Windows 11 sign-in screen
If you’re using a Microsoft account that lets you sync your settings and files across devices, changing your account name is simpler, regardless of your account type. You don’t need any “special” permissions to do so: the procedure is identical for standard and Administrator accounts.
However, if you want to change the name of a local user account, you must have administrative permissions. This means that only an Administrator account can rename a local account, whether it’s their own or another user’s.
Now let’s move on and see how to do both, starting with how to change your Microsoft account’s name and continuing with how to change your local account’s name:
How to change the user name in Windows 11 if you’re using a Microsoft account
To change your Microsoft account’s name - the one shown on the login screen of Windows 11 - you have to modify your Microsoft profile settings online. Here are the steps to do that:
First, launch the Settings app by pressing Win + I on your keyboard. Select Accounts on the left sidebar, and then click or tap Your info on the right side of the window.
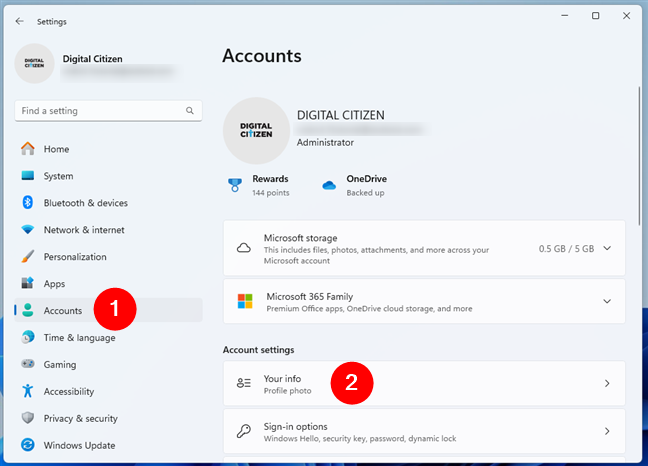
Open Settings and access Your info in the Accounts section
On the Your info page, find the entry called Accounts in the Related settings section and click or tap on it.
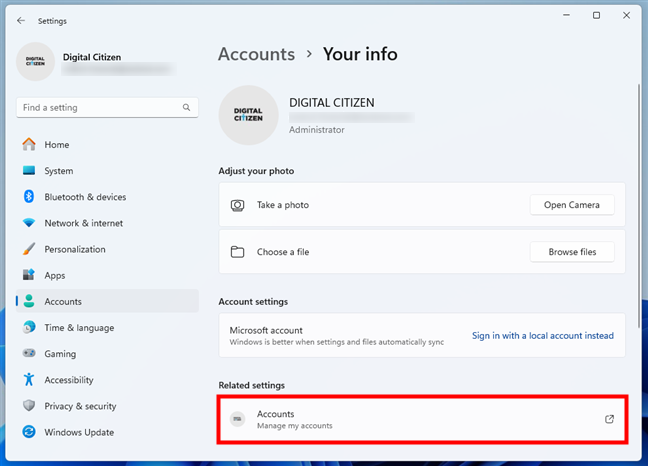
Click or tap on Accounts
This launches your default web browser and takes you to your Microsoft account webpage. Unless you’re already signed into your account, you may be asked to authenticate now.
Once you do, click or tap the Your info link at the top of the page.
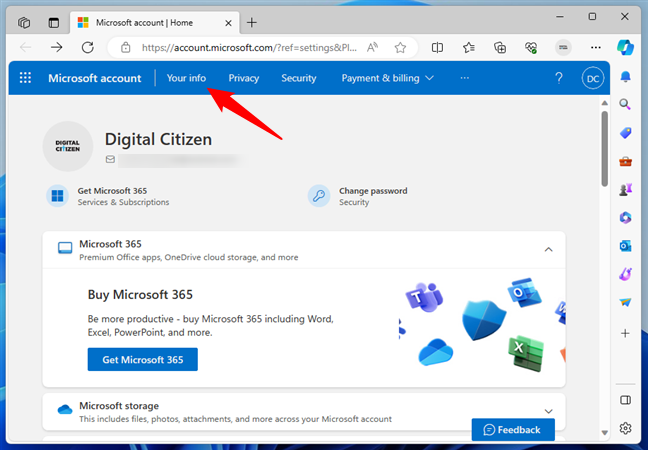
On your Microsoft account webpage, go to Your info
This opens a new page with information about your Microsoft account. Here, click or tap the Edit name link that’s shown to the right of your Full name.
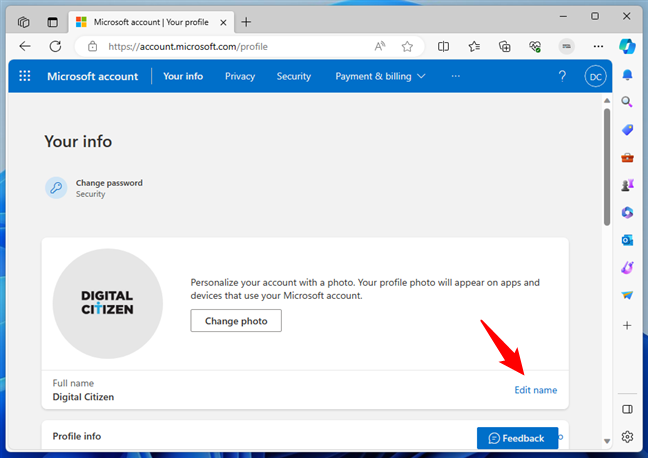
Click or tap on Edit name
The webpage will then load a dialog box called Edit name, where you can see your current first and last names displayed, just like in the following screenshot.
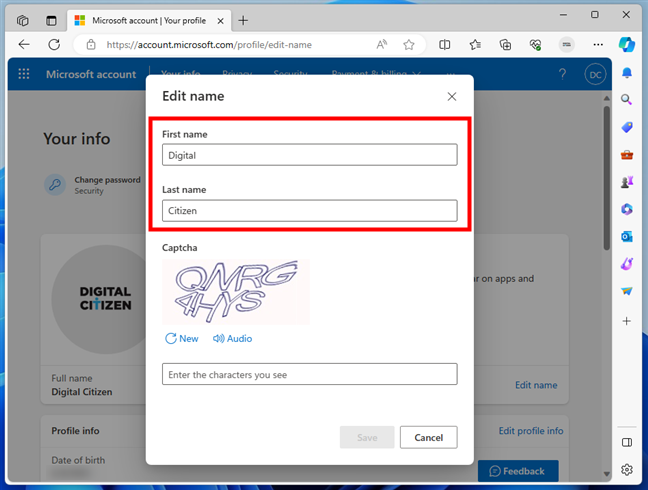
Your first and last name
Type your desired name in the First name and Last name fields, enter the Captcha characters in the appropriate field, and press Save to change your account name.
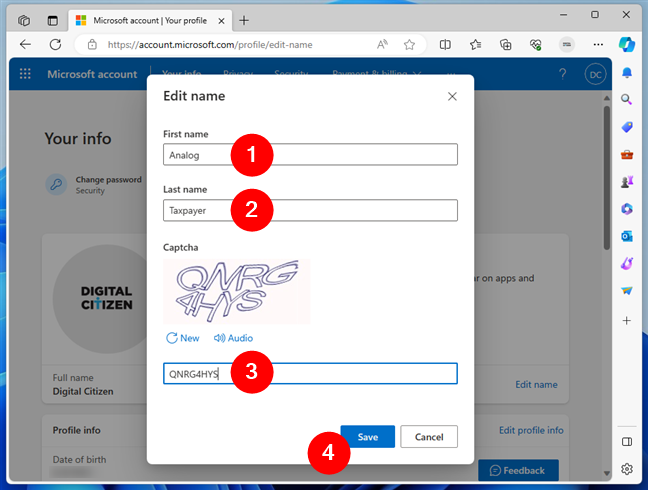
Enter a new name, insert the captcha, and click or tap Save
You are then brought back to your Microsoft account’s page, where you can see that your name has been changed.
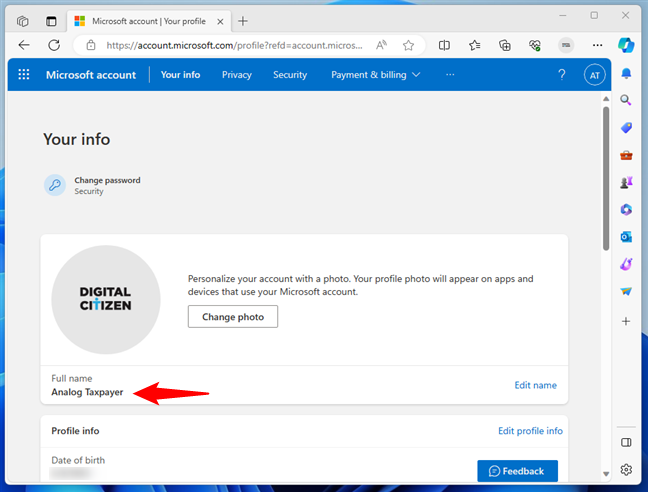
Your Microsoft account name was changed
To apply your changes in Windows 11, you need to either log out and log in again or reboot your PC. This way, your settings are synchronized, and your name is reflected in Windows 11.
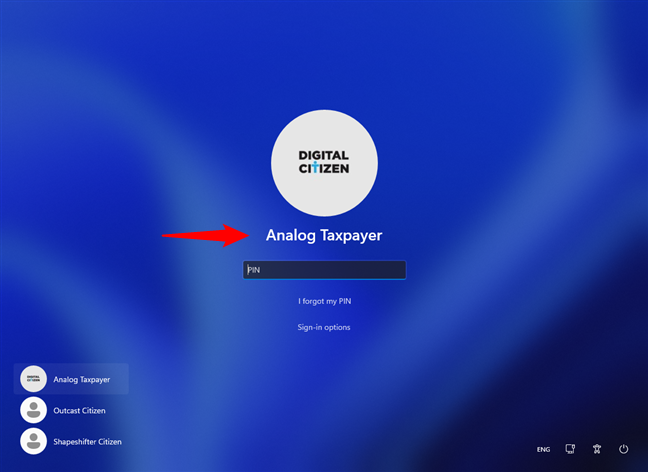
Log out and sign back in to see the change
How to change the user name of a local account in Windows 11
There are a couple of different ways to change the user name of a local account in Windows 11. Depending on the type of user account, follow the steps in one of the following chapters:
How to change your administrator’s name in Windows 11 using the Control Panel
The first step to modify your account name if you are a local administrator is to launch the Control Panel. In it, click or tap on User Accounts.
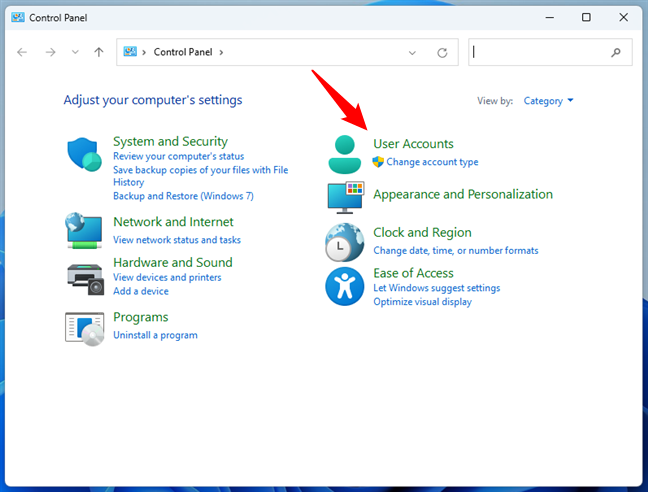
Go to User Accounts in Windows 11's Control Panel
On the next page, click or tap User Accounts once more.
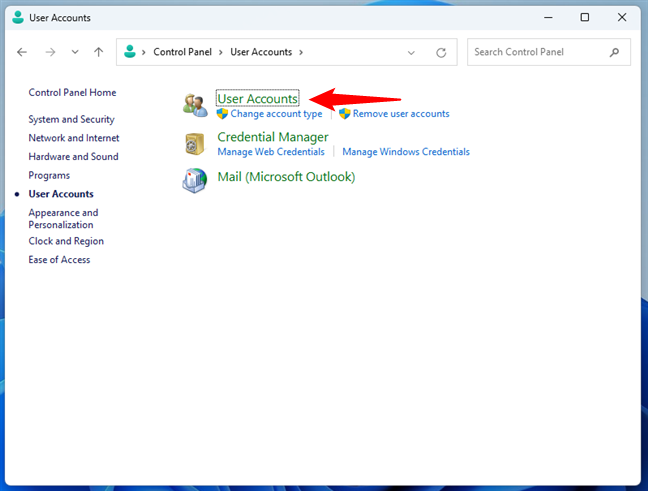
Press User Accounts again
This loads a page titled “Make changes to your user account.” On it, click or tap the “Change your account name” link. Note that this link is not shown if you’ve signed in to Windows 11 with a Microsoft account.
In that case, follow the steps in the previous section of this guide to change your account’s name.
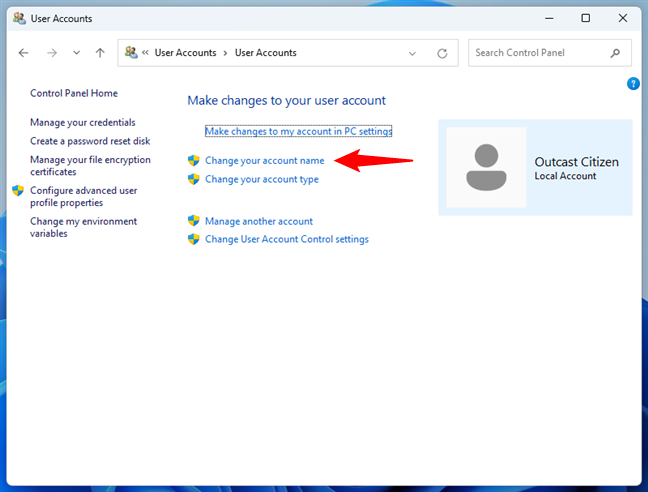
Click or tap Change your account name
The Control Panel will then ask you to “Type a new account name.” Do so, and then click or tap the Change Name button.
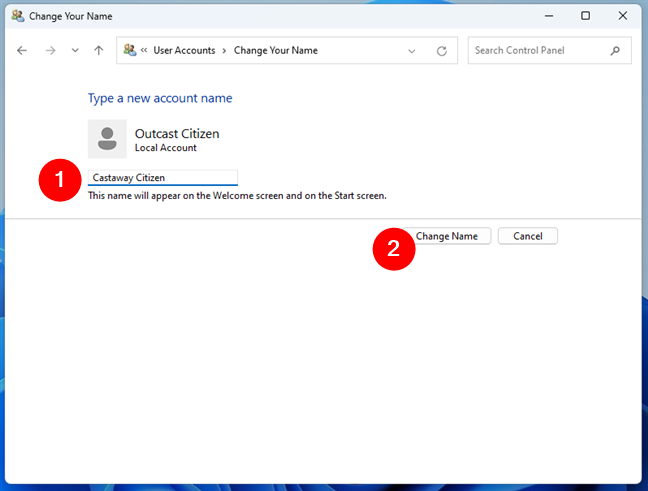
Type in the new name and press Change Name
Sign out of Windows 11, and you’ll see that your user account name has now been changed when you want to sign back in.
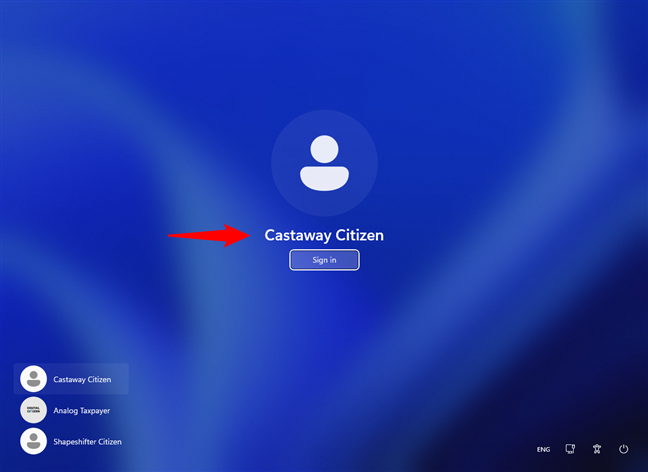
When you sign in, you see the new user name
How to change other users’ names in Windows 11 using the Control Panel
You can also change the user name of any other local account on a Windows 11 computer other than your own. However, you must have Administrator rights even if you only want to change the name of a standard local account.
With that in mind, open the Control Panel and go to User Accounts >User Accounts, as shown in the previous section of this guide. Then, click or tap on “Manage another account.”
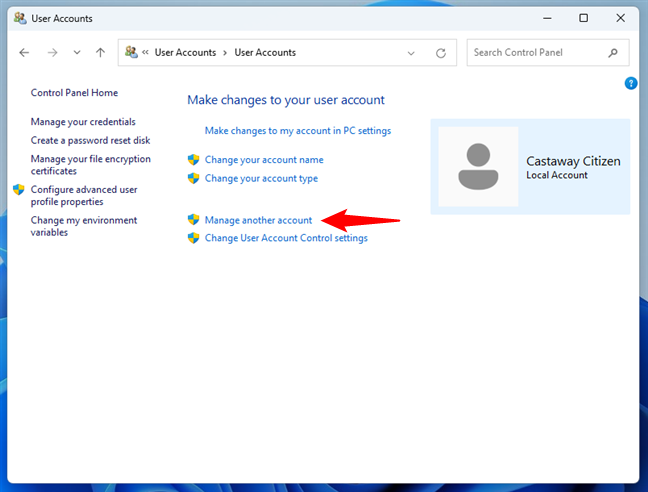
Press Manage another account
This loads a new page titled “Choose the user you would like to change.” On it, Windows 11 lists all the user accounts on your computer together with their account type. Click or tap on the Local Account you want to rename.
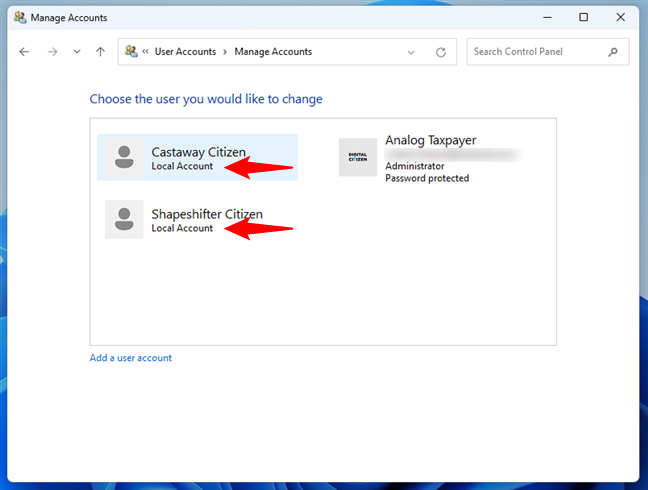
Select the Local Account you want renamed
On the next screen, click or tap the “Change the account name” link.
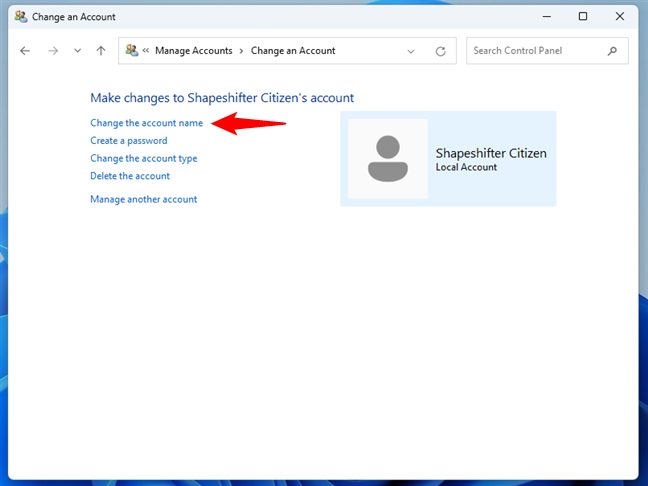
Click or tap Change the account name
Type the new account name you want to assign to the selected user account and click or tap the Change Name button.
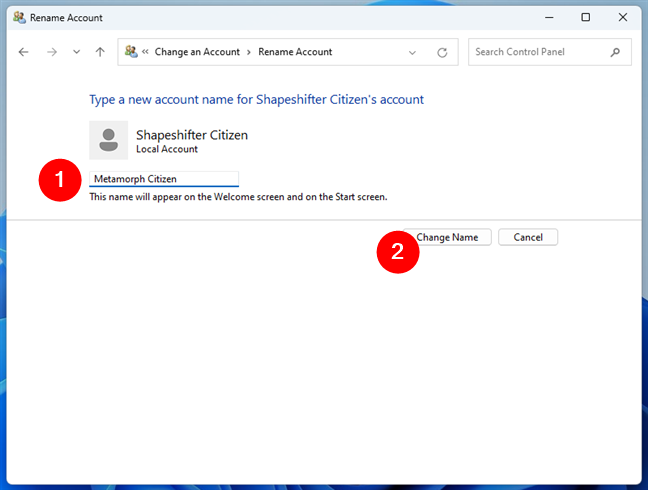
Type a new account name and press Change Name
The local account’s name is then changed and will be displayed on the Windows 11 sign-in screen each time you start your operating system.
How to change the name of a local account using netplwiz in Windows 11
If you’re an administrator, you can also use the netplwiz app to change the name of a local user account. Start by opening the Run window (Win + R) and executing the netplwiz command.
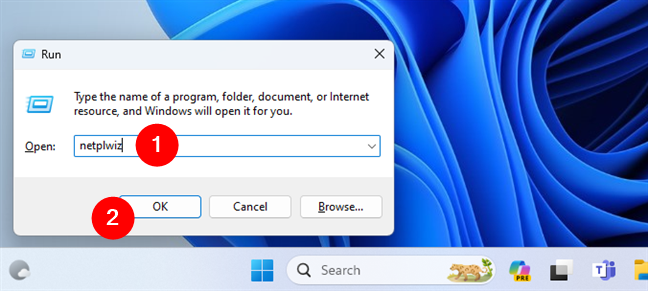
Open netplwiz from the Run window
In the User Accounts window, select the Users tab and choose one of the local user accounts. Make sure you don’t select a Microsoft account, as trying to rename it won’t work: changes are temporary in this case, as Windows 11 will revert to the original user name of that Microsoft account the next time you sign in. Once you’ve chosen a local account from the list, click or tap the Properties button.
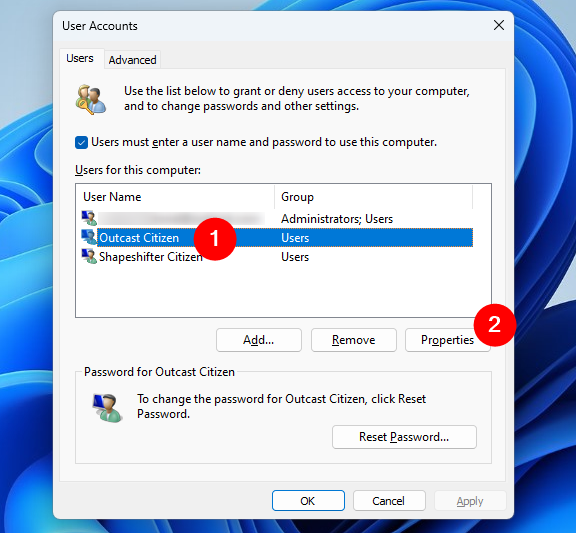
Choose a local account and press Properties
Windows 11 will open a new window with the Properties of the selected local account. In it, type the user’s Full name in the appropriate field and press OK.
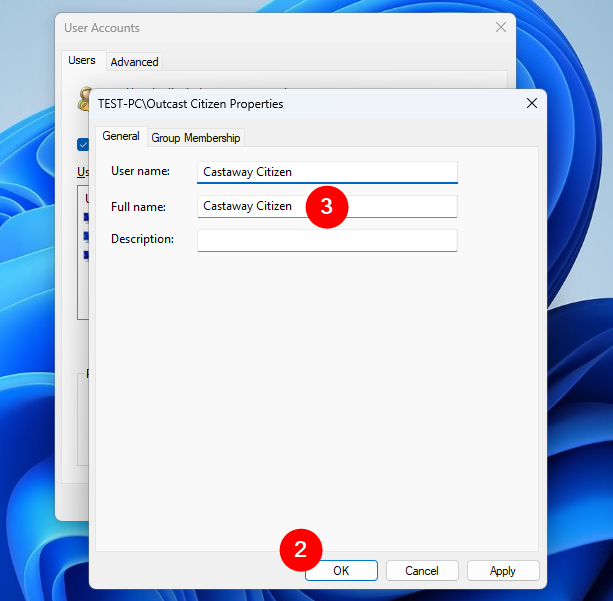
Type a new Full name and hit OK
Back in the User Accounts window, press OK again to apply and save the change.
TIP: On a similar subject, you might be interested in learning how to use Netplwiz to log in to Windows without a password.
How to change a local account’s user name using Computer Management in Windows 11
Another way to rename a local user account in Windows 11 is offered by the Computer Management tool. Launch it (press Win + X and select Computer Management), expand the Local Users and Groups in the left sidebar, and select Users. On the right, you’ll see all the user accounts on your Windows 11 computer.
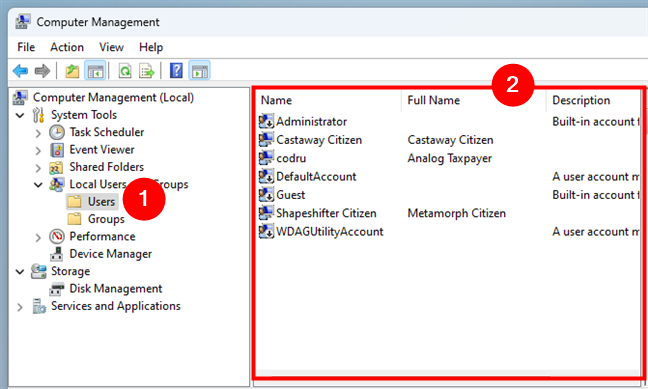
In Computer Management, go to Local Users and Groups and select Users
To change the name of a local user account, open its Properties by double-clicking or double-tapping on it. Enter the new name for the account in the Full name field, and click or tap on OK. Don’t try to rename a user account that’s associated with a Microsoft account: your changes will be displayed for the moment, but Windows 11 will forget them as soon as you sign in again, reverting to the name of your Microsoft account.
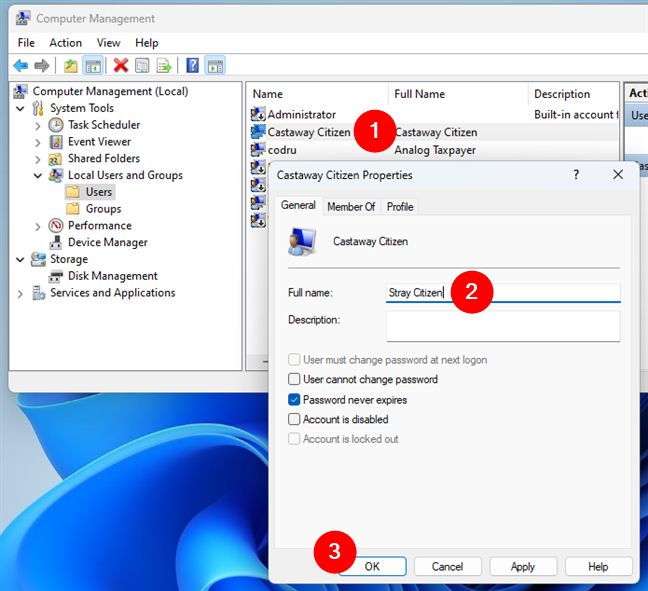
Type the new name for the local user account and hit OK
Sign out to see the new user account name on the Windows 11 sign-in screen.
Why did you want to change your account name?
Now you know that it is possible to change your Windows 11 user name. You’ve learned the steps to rename your Microsoft account in Windows 11, and you know how to change an administrator’s name on a Windows 11 PC, too. What’s your motivation for wanting to rename your user account? Share your thoughts in a comment.


 07.12.2023