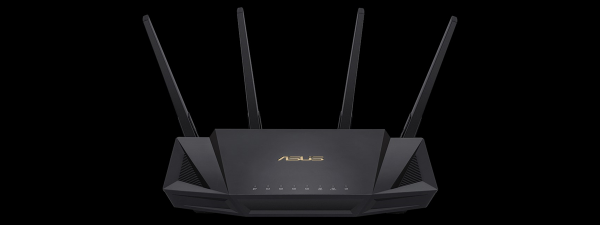
ASUS Smart Connect is a feature present on every ASUS router. When you run the quick setup process of your ASUS router, you are asked whether you want it enabled. However, few people know what ASUS Smart Connect is and what it does. Even fewer know the best settings for ASUS Smart Connect. If you want to learn more about this very technical feature found on all ASUS Wi-Fi routers, read this article:
What is ASUS Smart Connect?
Smart Connect is a feature of modern wireless routers that tries to simplify the user’s networking experience by doing the following:
- It creates a unified network name (or SSID) for all the wireless bands emitted by the router. Therefore, if you have a dual-band Wi-Fi router, you see only one network name instead of two. Similarly, if you have a tri-band wireless router, you see just one network name instead of three.
- The router identifies each device that connects to the Wi-Fi and assigns it to the “best” band for it (2.4 GHz or 5 GHz) based on a long list of criteria: the networking capabilities of the device, the wireless standard that the device can work with (Wi-Fi 4, Wi-Fi 5, or Wi-Fi 6), the signal strength for each band in the area where the device is found, the load of each band, and so on.
This feature is implemented by all networking equipment manufacturers on most of their wireless routers. On ASUS routers, it’s called ASUS Smart Connect.
The benefits of ASUS Smart Connect
In theory, ASUS Smart Connect is a feature that should deliver the following benefits:
- You have to remember only one network name and password and use them to connect all your devices to the Wi-Fi.
- It balances the network load and assigns your devices to the best wireless band so that things work smoothly for the entire network, not just one specific device.
- It automatically switches the wireless band for your devices depending on what they do and where they are placed in the network’s coverage area.
ASUS Smart Connect: How to turn it on or off
You can easily turn on or turn off the Smart Connect feature on an ASUS router by using its web user interface or the ASUS Router mobile app for Android and iOS. Here’s how it’s done from both:
How to enable or disable ASUS Smart Connect from the router’s interface
On a laptop or PC connected to the network managed by your ASUS router, open your favorite web browser and go to router.asus.com. Log in with your administrator account and password. If you need help, here’s a guide on how to log into your ASUS router.
Then, in the left sidebar, click or tap Wireless and, on the right, go to the General tab. There, you should find the Enable Smart Connect switch at the top.
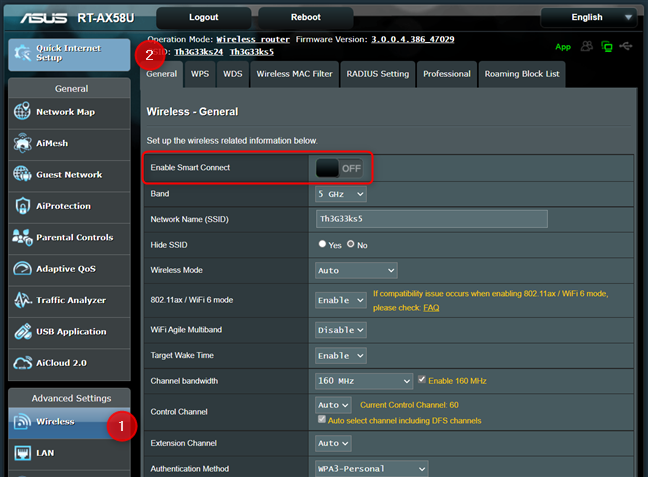
Enable Smart Connect
If you want to enable this feature, click the switch to turn it ON. If you want to disable it, set it OFF. When you turn ASUS Smart Connect on, you see whether you’re enabling a Dual-Band or Tri-Band Smart Connect, depending on your specific router. Next, set the Network Name (SSID) for the Wi-Fi.
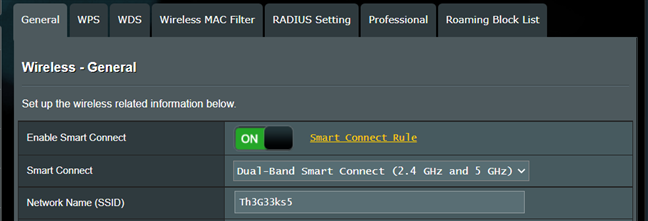
ASUS Smart Connect is enabled
If you’re enabling ASUS Smart Connect, don’t forget to scroll to the bottom of your Wireless - General settings and configure the channel bandwidth, the control channel, and the extension channel you want to use for each band. I recommend the following values:
- 40 MHz for the 2.4 GHz band
- 80 or 160 MHz for the 5 GHz band. If you have a tri-band Wi-Fi 6 router, set the first 5 GHz band to use 80 MHz, and the second to use 160 MHz.
The Control Channel should be one that’s free or with the least congestion. To help you identify such channels, read our guide on how to use NetSpot WiFi Analyzer to identify the best channel for your Wi-Fi.
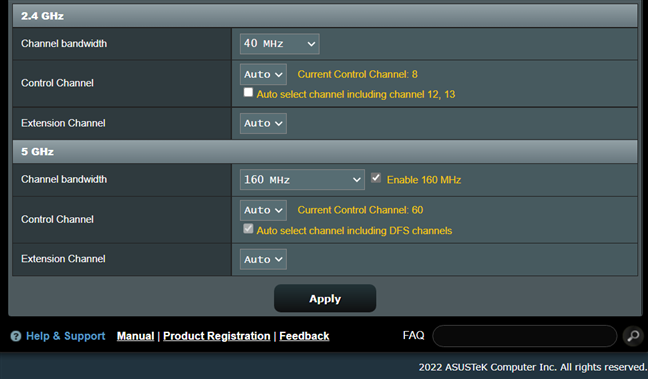
Set the Channel bandwidth, Control channel, and Extension channel
Don’t forget to click or tap the Apply button to activate your settings. Also, keep in mind that your ASUS router will restart the Wi-Fi network, and this process will take a bit of time (up to three minutes), in which you won’t have any Wi-Fi available. Be patient until your router finishes applying your settings.
How to enable or disable Smart Connect from the ASUS Router mobile app
If you’re using the ASUS Router app on your smartphone, go to Settings and tap WiFi.
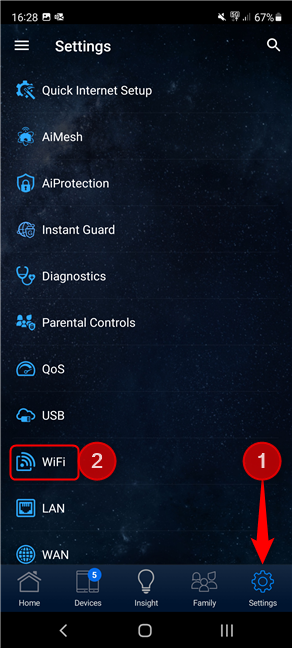
Tap Settings followed by WiFi
Then, tap on Wireless Settings.
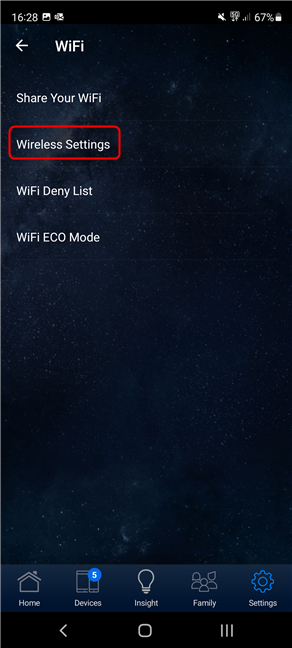
Tap Wireless Settings
Next, tap on Network Settings.
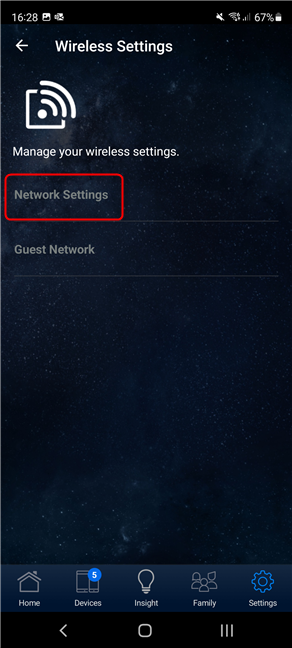
Tap on Network Settings
The Smart Connect entry at the top tells you whether this feature is enabled or not.
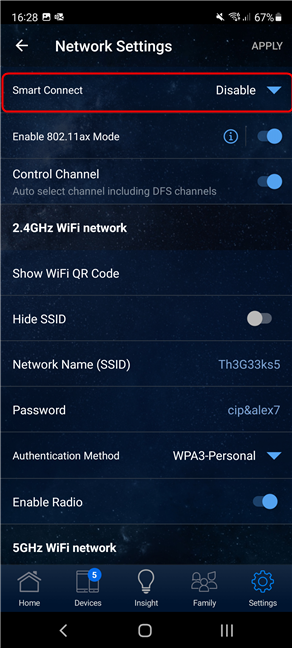
See whether Smart Connect is enabled
If it’s turned off, and you want to switch it on, tap on Disable, and then choose Dual-Band Smart Connect or Tri-Band Smart Connect, depending on the option(s) available for your ASUS router. Tap OK followed by Apply and then OK again. Your router will spend a few moments restarting the Wi-Fi network with your new settings.
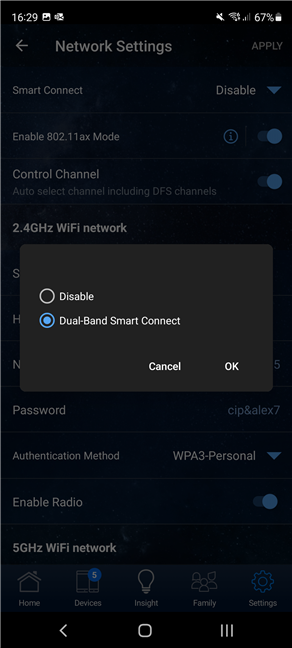
Enabling ASUS Smart Connect
If you want to disable ASUS Smart Connect, tap the Smart Connect entry, and choose Disable. Then, tap OK, followed by Apply and OK.
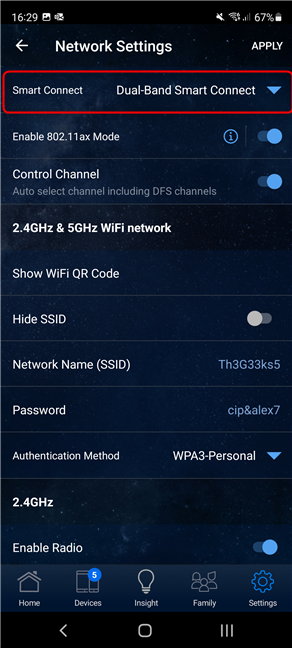
Disable ASUS Smart Connect
Your router will require a couple of moments to restart the Wi-Fi and apply your settings.
How to configure in detail your ASUS Smart Connect settings
Alongside the basic configuration options I’ve mentioned for the process of enabling ASUS Smart Connect, there are also some advanced settings that you can tweak. They’re not available in the ASUS Router app, only in the web user interface of your router. To access them, open your favorite web browser on a PC connected to the network, go to router.asus.com and log in with your administrator username and password. Then, in the left sidebar, go to Network Tools, and on the right, click or tap Smart Connect Rule. There, you’ll find all the advanced settings for ASUS Smart Connect. As you can see for yourself, the language used for these settings is very technical and intimidating.
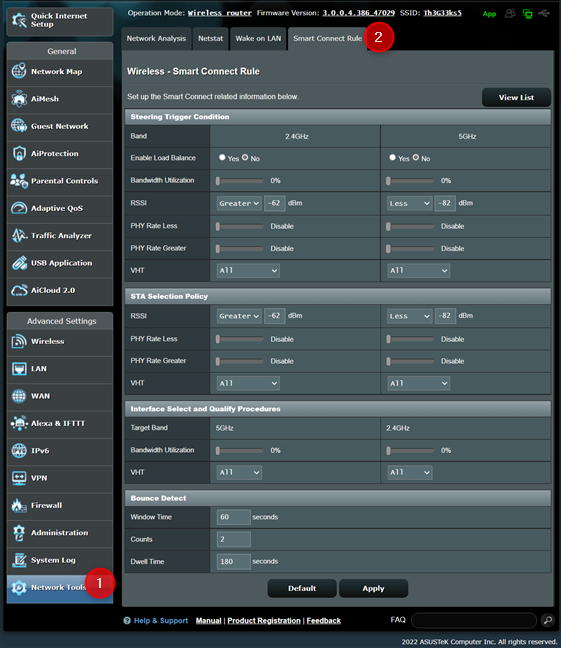
Accessing Smart Connect Rule
First of all, you see the Smart Connect settings for all the wireless bands emitted by your ASUS router. Most routers are dual-band, so you’ll see the rules for 2.4 GHz and 5 GHz. If your router is tri-band, you’ll see 2.4 GHz, 5 GHz-1, and 5 GHz-2.
The first section is called Steering Trigger Condition and includes the conditions that must be met for a network device to be steered (or switched) from one band to another. You can set the following:
- Enable Load Balance - the steering settings are handled automatically by the ASUS router based on the load of each band, using criteria known and managed by the router itself, not the user. When you enable this, the other trigger conditions are no longer editable by the user. For less technical users, this may be a good approach.
- Bandwidth Utilization - how much of the available wireless bandwidth is used by all connected devices.
- RSSI - the signal strength, which can be greater or smaller than a given value, measured in dBm.
- PHY Rate - or the Physical Layer Rate is the wireless connection speed, measured in Mbps. The PHY Rate can be smaller or greater than a value selected by the user.
- VHT - means Very High Throughput and it’s an evaluation of the kind of throughput supported by the client device:
- ALL - any type of station/client device can trigger the steering process.
- AC only - only devices compatible with the 802.11ac (Wi-Fi 5) standard can trigger the steering to another band.
- not-allowed - only older devices that are NOT compatible with the 802.11ac (Wi-Fi 5) standard can trigger the steering to another band.
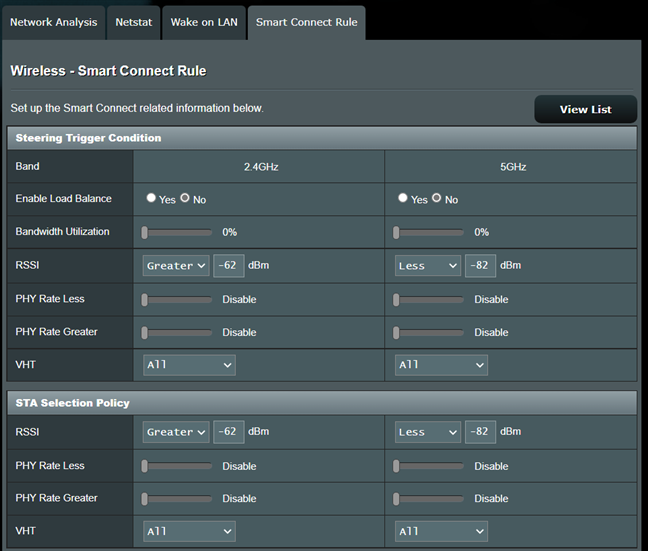
Editing the Smart Connect Rule
The STA Selection Policy settings are used to select the clients that are going to be steered to another band when the Steering Trigger Conditions set earlier are met. The STA Selection Policy settings are somewhat redundant and should be set to the same values as the Steering Trigger Conditions.
The Interface Select and Quality Procedures state the target band for the steering/switching process. For example, on dual-band ASUS routers, clients that meet the steering conditions for the 2.4 GHz band are steered to the 5 GHz band, and the other way around. On tri-band ASUS routers, you can set a primary target band for the steering process, and a secondary band.
The Bandwidth Utilization setting tells the router to perform the steering process to the new band, only if its bandwidth utilization is lower than the level you have set, while the VHT setting tells it to make the switch only if it meets the throughput requirements explained earlier.
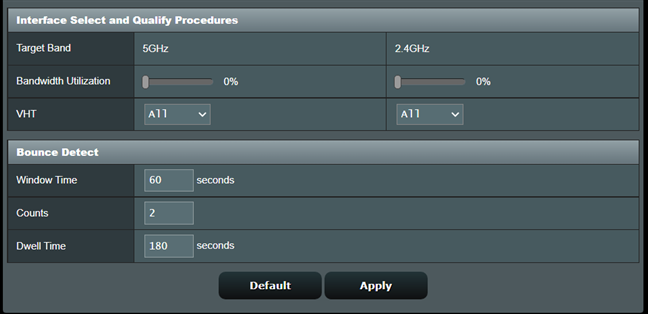
Interface Select and Quality Procedures settings
The Bounce Detect section is used for preventing network clients from getting steered too often from one band to the next. The Counts field is for setting the maximum number of times a network client gets steered from one band to another in the Windows Time specified above it. The Dwell Time tells the router how many seconds to wait until another band switch is initiated for the same network client. The default values on any ASUS router are 60 seconds, 2 counts, 180 seconds. That means that if the network client has been steered two times from one band to another in the last 60 seconds, the ASUS router should wait for at least 180 seconds until the next band switch.
As you can see, all the Smart Connect Rule settings available on ASUS routers are very technical, and even with the explanations I’ve provided, most people will have a difficult time setting things up correctly, because of the level of technical expertise involved. However, if you do tweak the ASUS Smart Connect settings, don’t forget to click or tap the Apply button on the bottom, so that they’re saved and used by your router.
What is your experience with ASUS Smart Connect?
Now you know what ASUS Smart Connect is, how it works, and how to set it up. Before closing this article, comment below and share your experience with ASUS Smart Connect. Do you consider this technology beneficial? Did you decide to keep it turned on or did you disable it? Don’t be shy and let’s discuss.


 23.03.2022


